Database Upgrade
Database Upgrade
In this guide, you will:
- Resize and/or upgrade a database engine version with minimal downtime using AWS and PostgreSQL tools.
Turbot Guardrails Enterprise Database (TED) is an AWS Service Catalog product that provides automated configuration and management of the infrastructure needed to run the enterprise version of Turbot Guardrails in your AWS account. Efficient management of database resources ensures optimal storage utilization, minimizes costs, and enhances performance by reducing unused storage. This process also ensures seamless version upgrades with minimal disruption.
This guide outlines two main scenarios for database upgrades:
- Storage Optimization: Resizing storage allocation for improving efficiency and cost.
- Engine Version Upgrade: Upgrading the PostgreSQL database engine version to access new features and security updates.
Prerequisites
The activities are performed in the Turbot Guardrails hosting AWS account.
- Access to the Guardrails hosting AWS account with Administrator Privileges.
- Familiarity with AWS RDS, EC2, Service Catalog and CloudFormation services.
- Knowledge of the current database usage (storage and version).
- Awareness of the backup schedule to avoid disruptions during the process.
Required Down Time
- Less than 1 minute for rebooting DB instance while enabling the logical replication in the source DB Step 1: Enable DB Logical Replication
- Approximate ~5 to ~10 minutes in the process of renaming the databases Step 14: Rename DB Instances
Step 1: Enable DB Logical Replication
Select the origin(source) database instance.
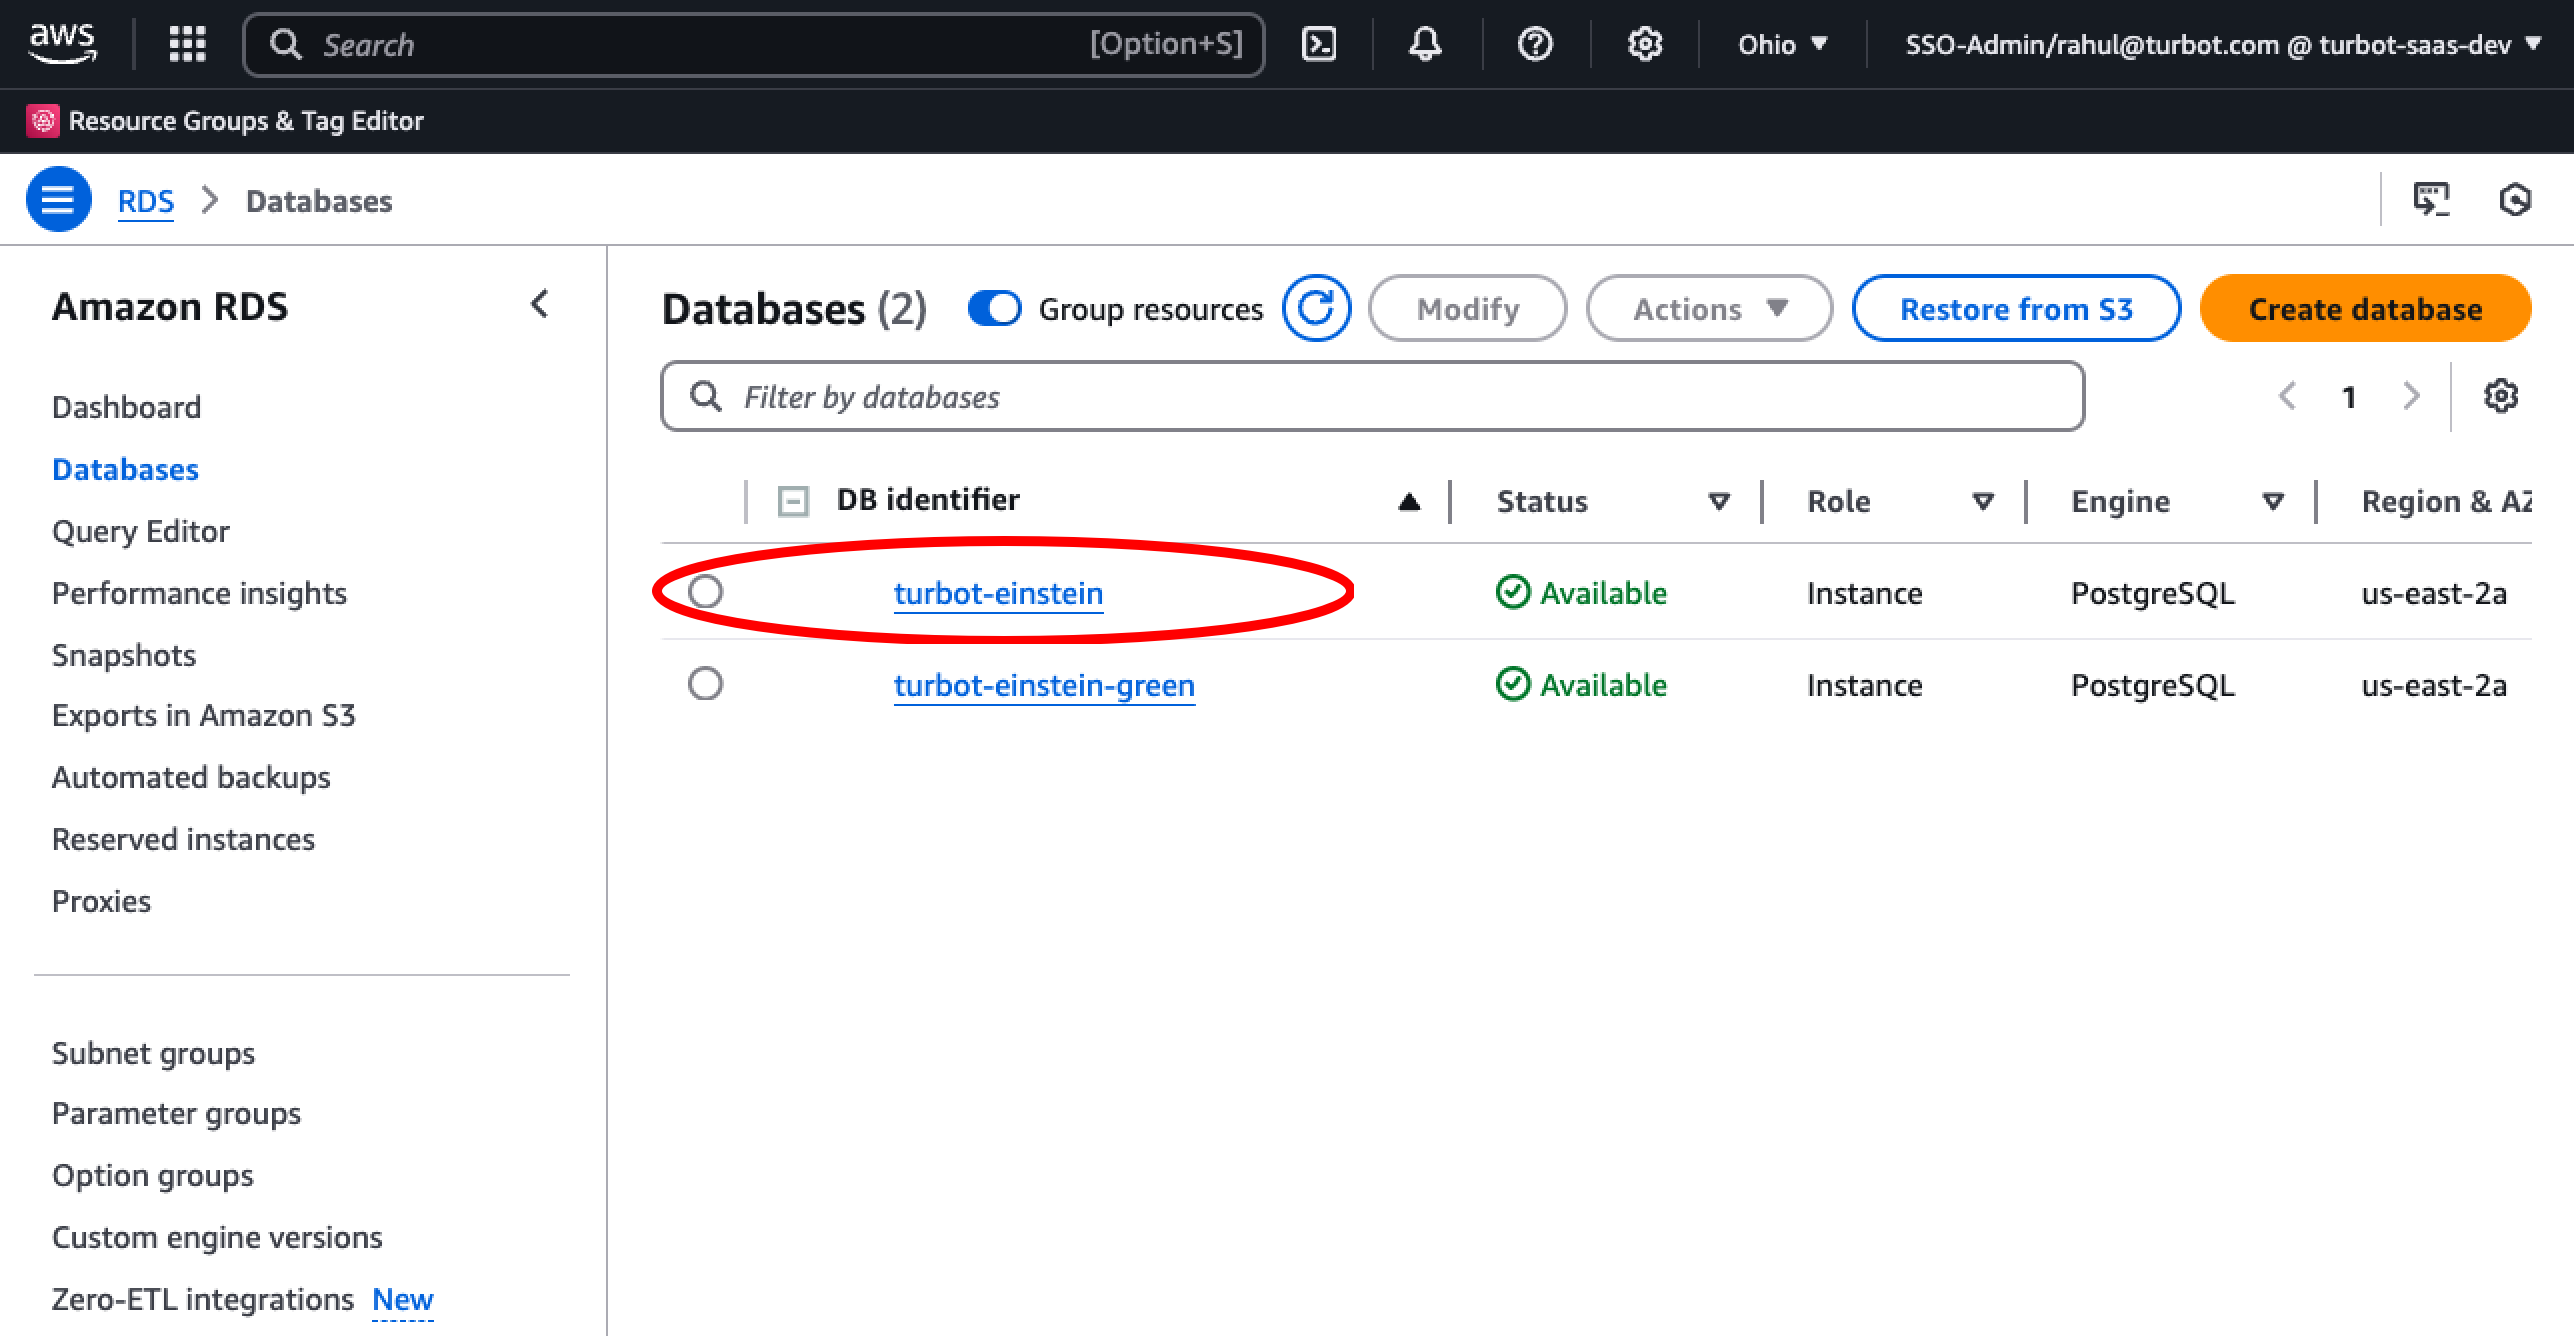
Navigate to the Configurations tab and select the DB instance parameter group.
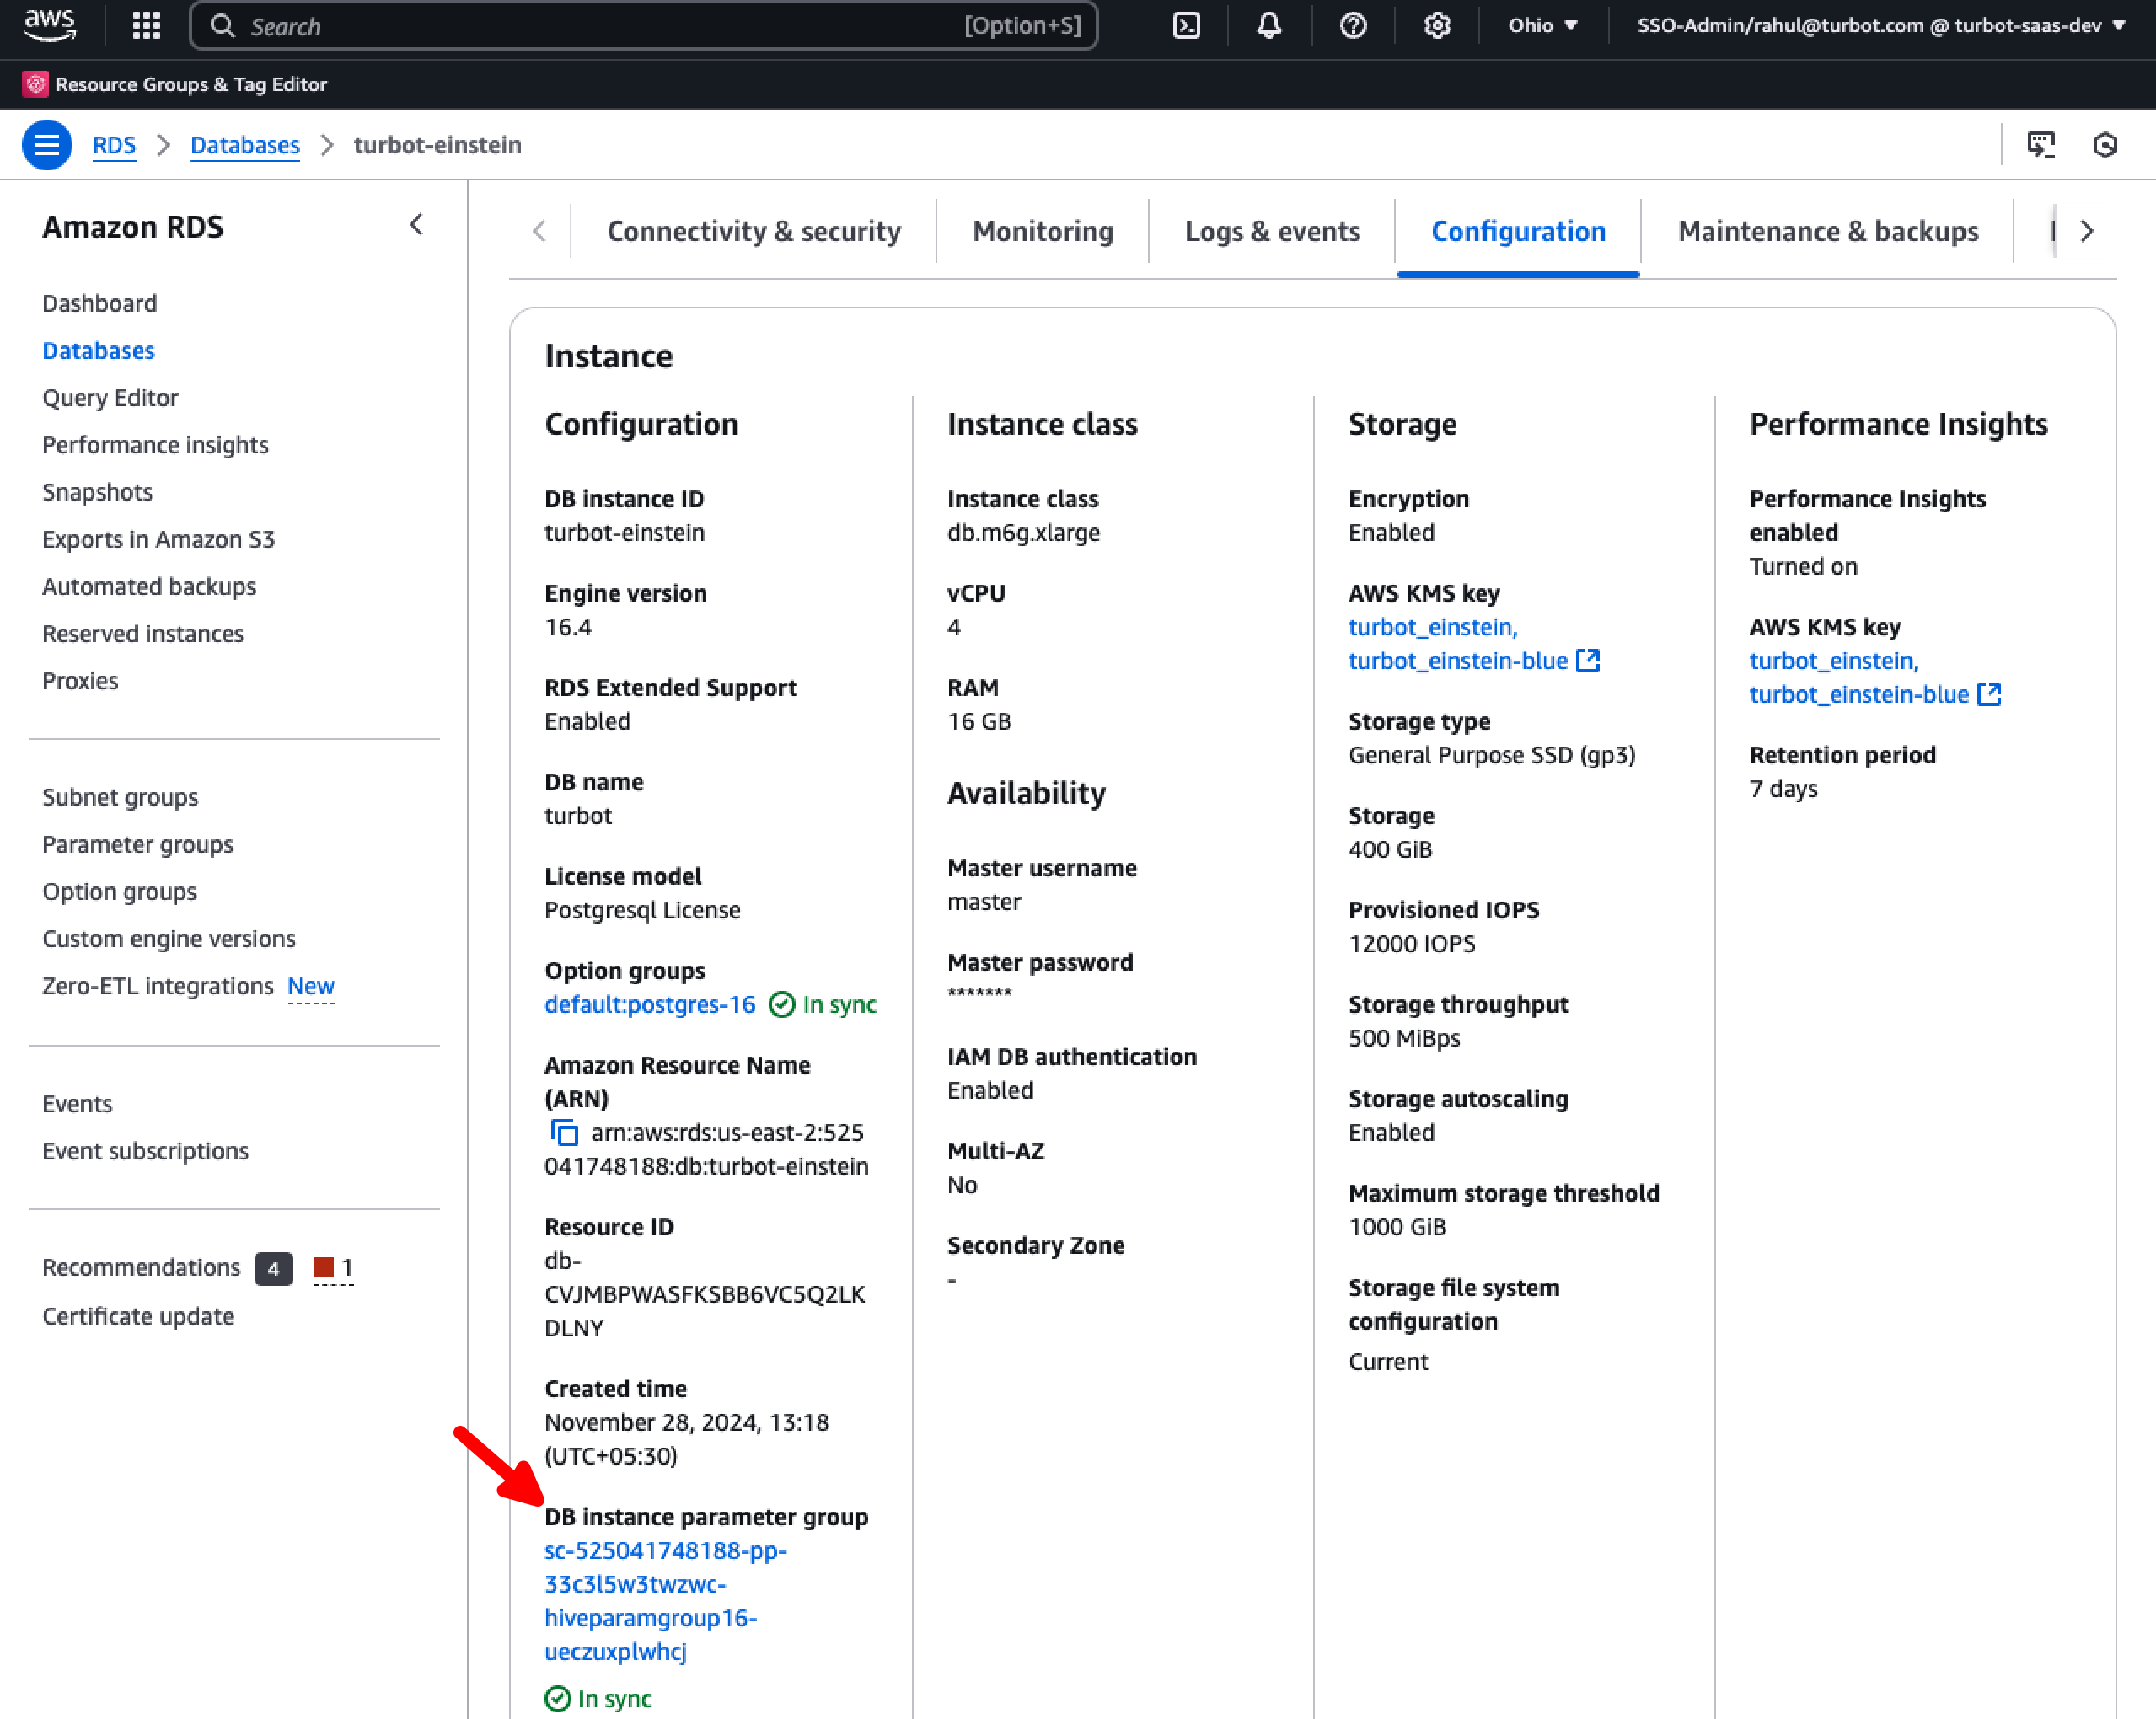
Select Edit.
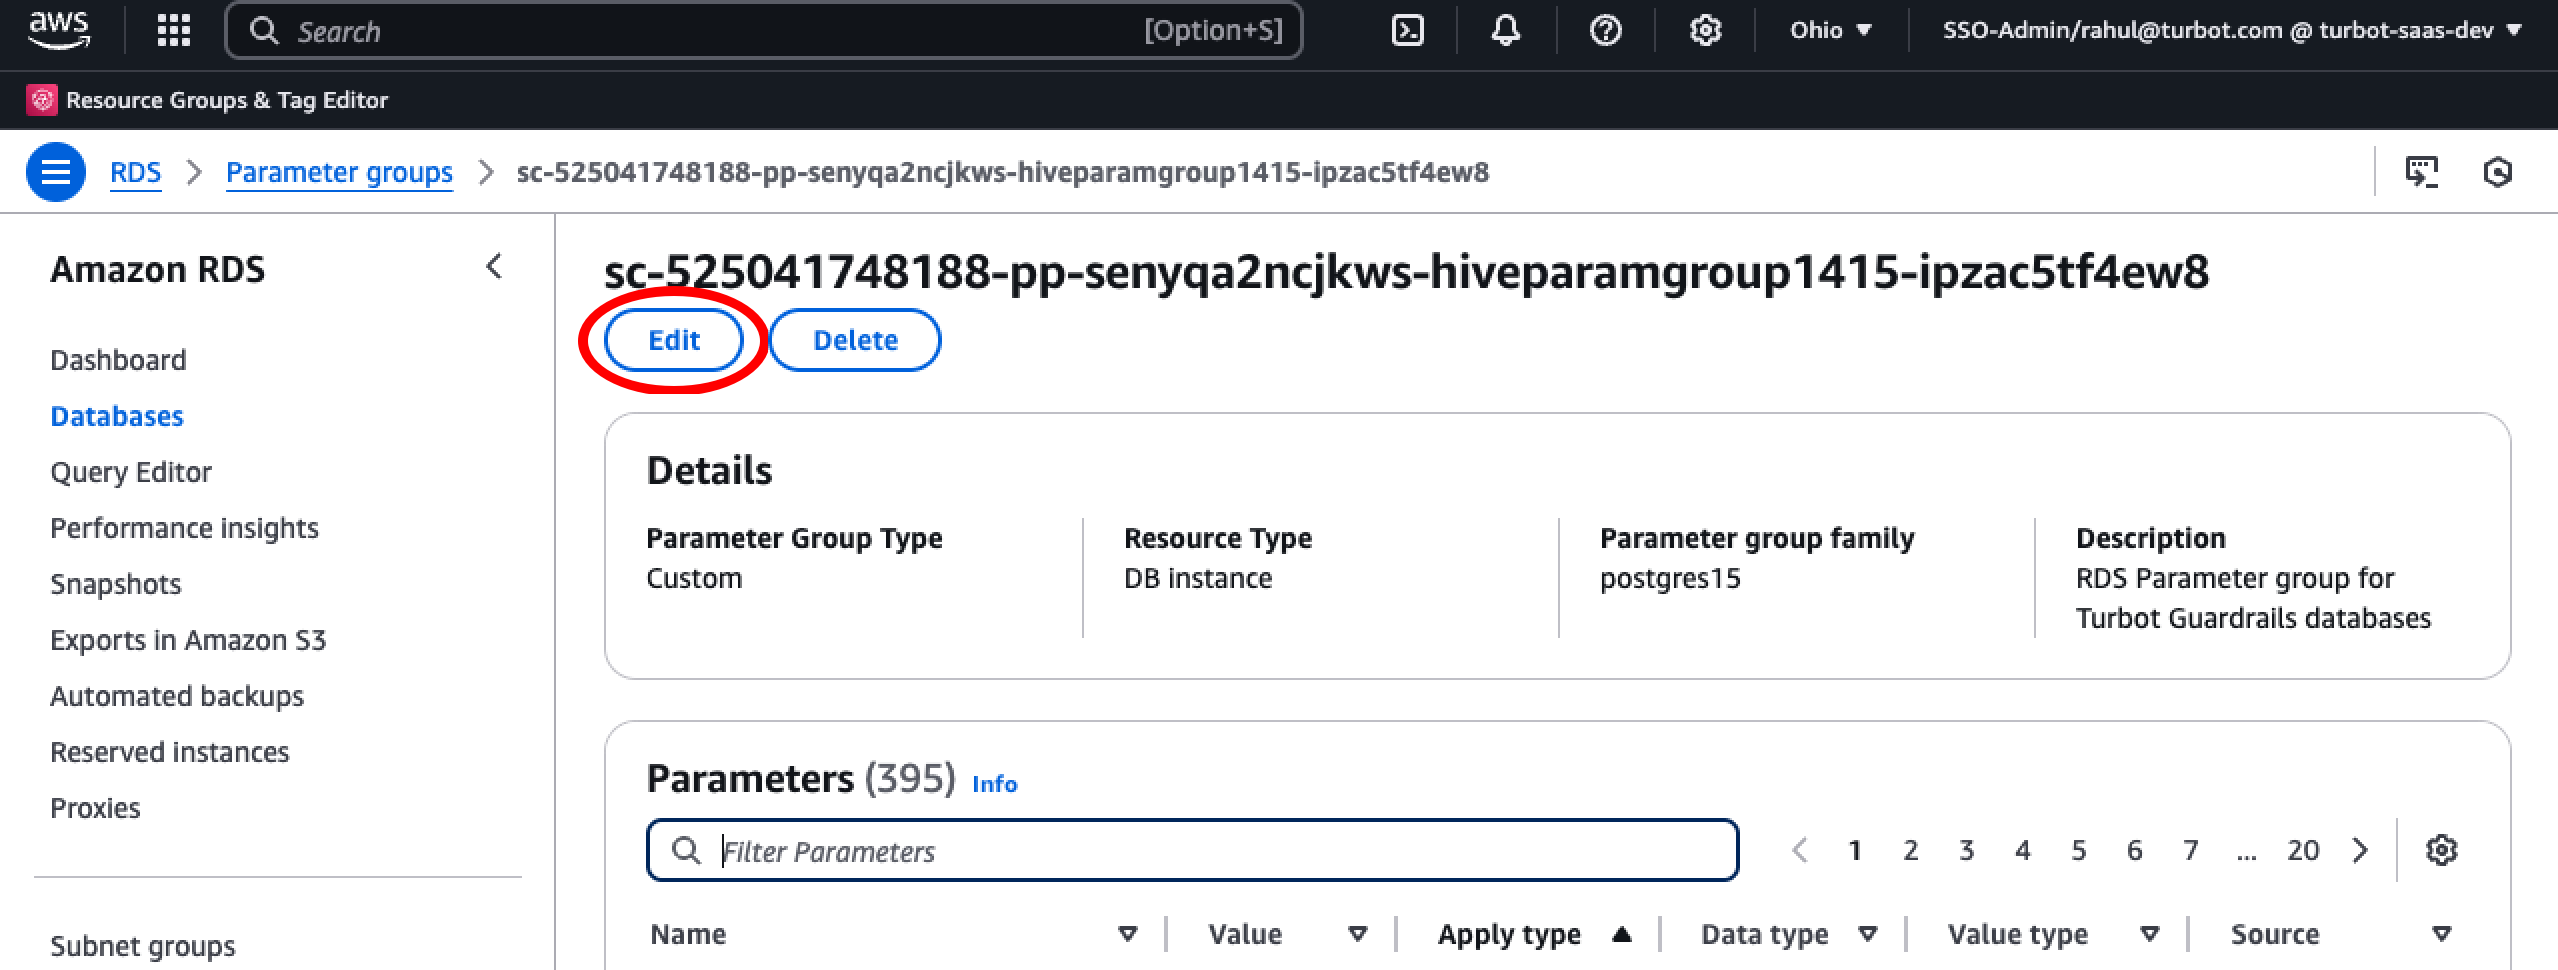
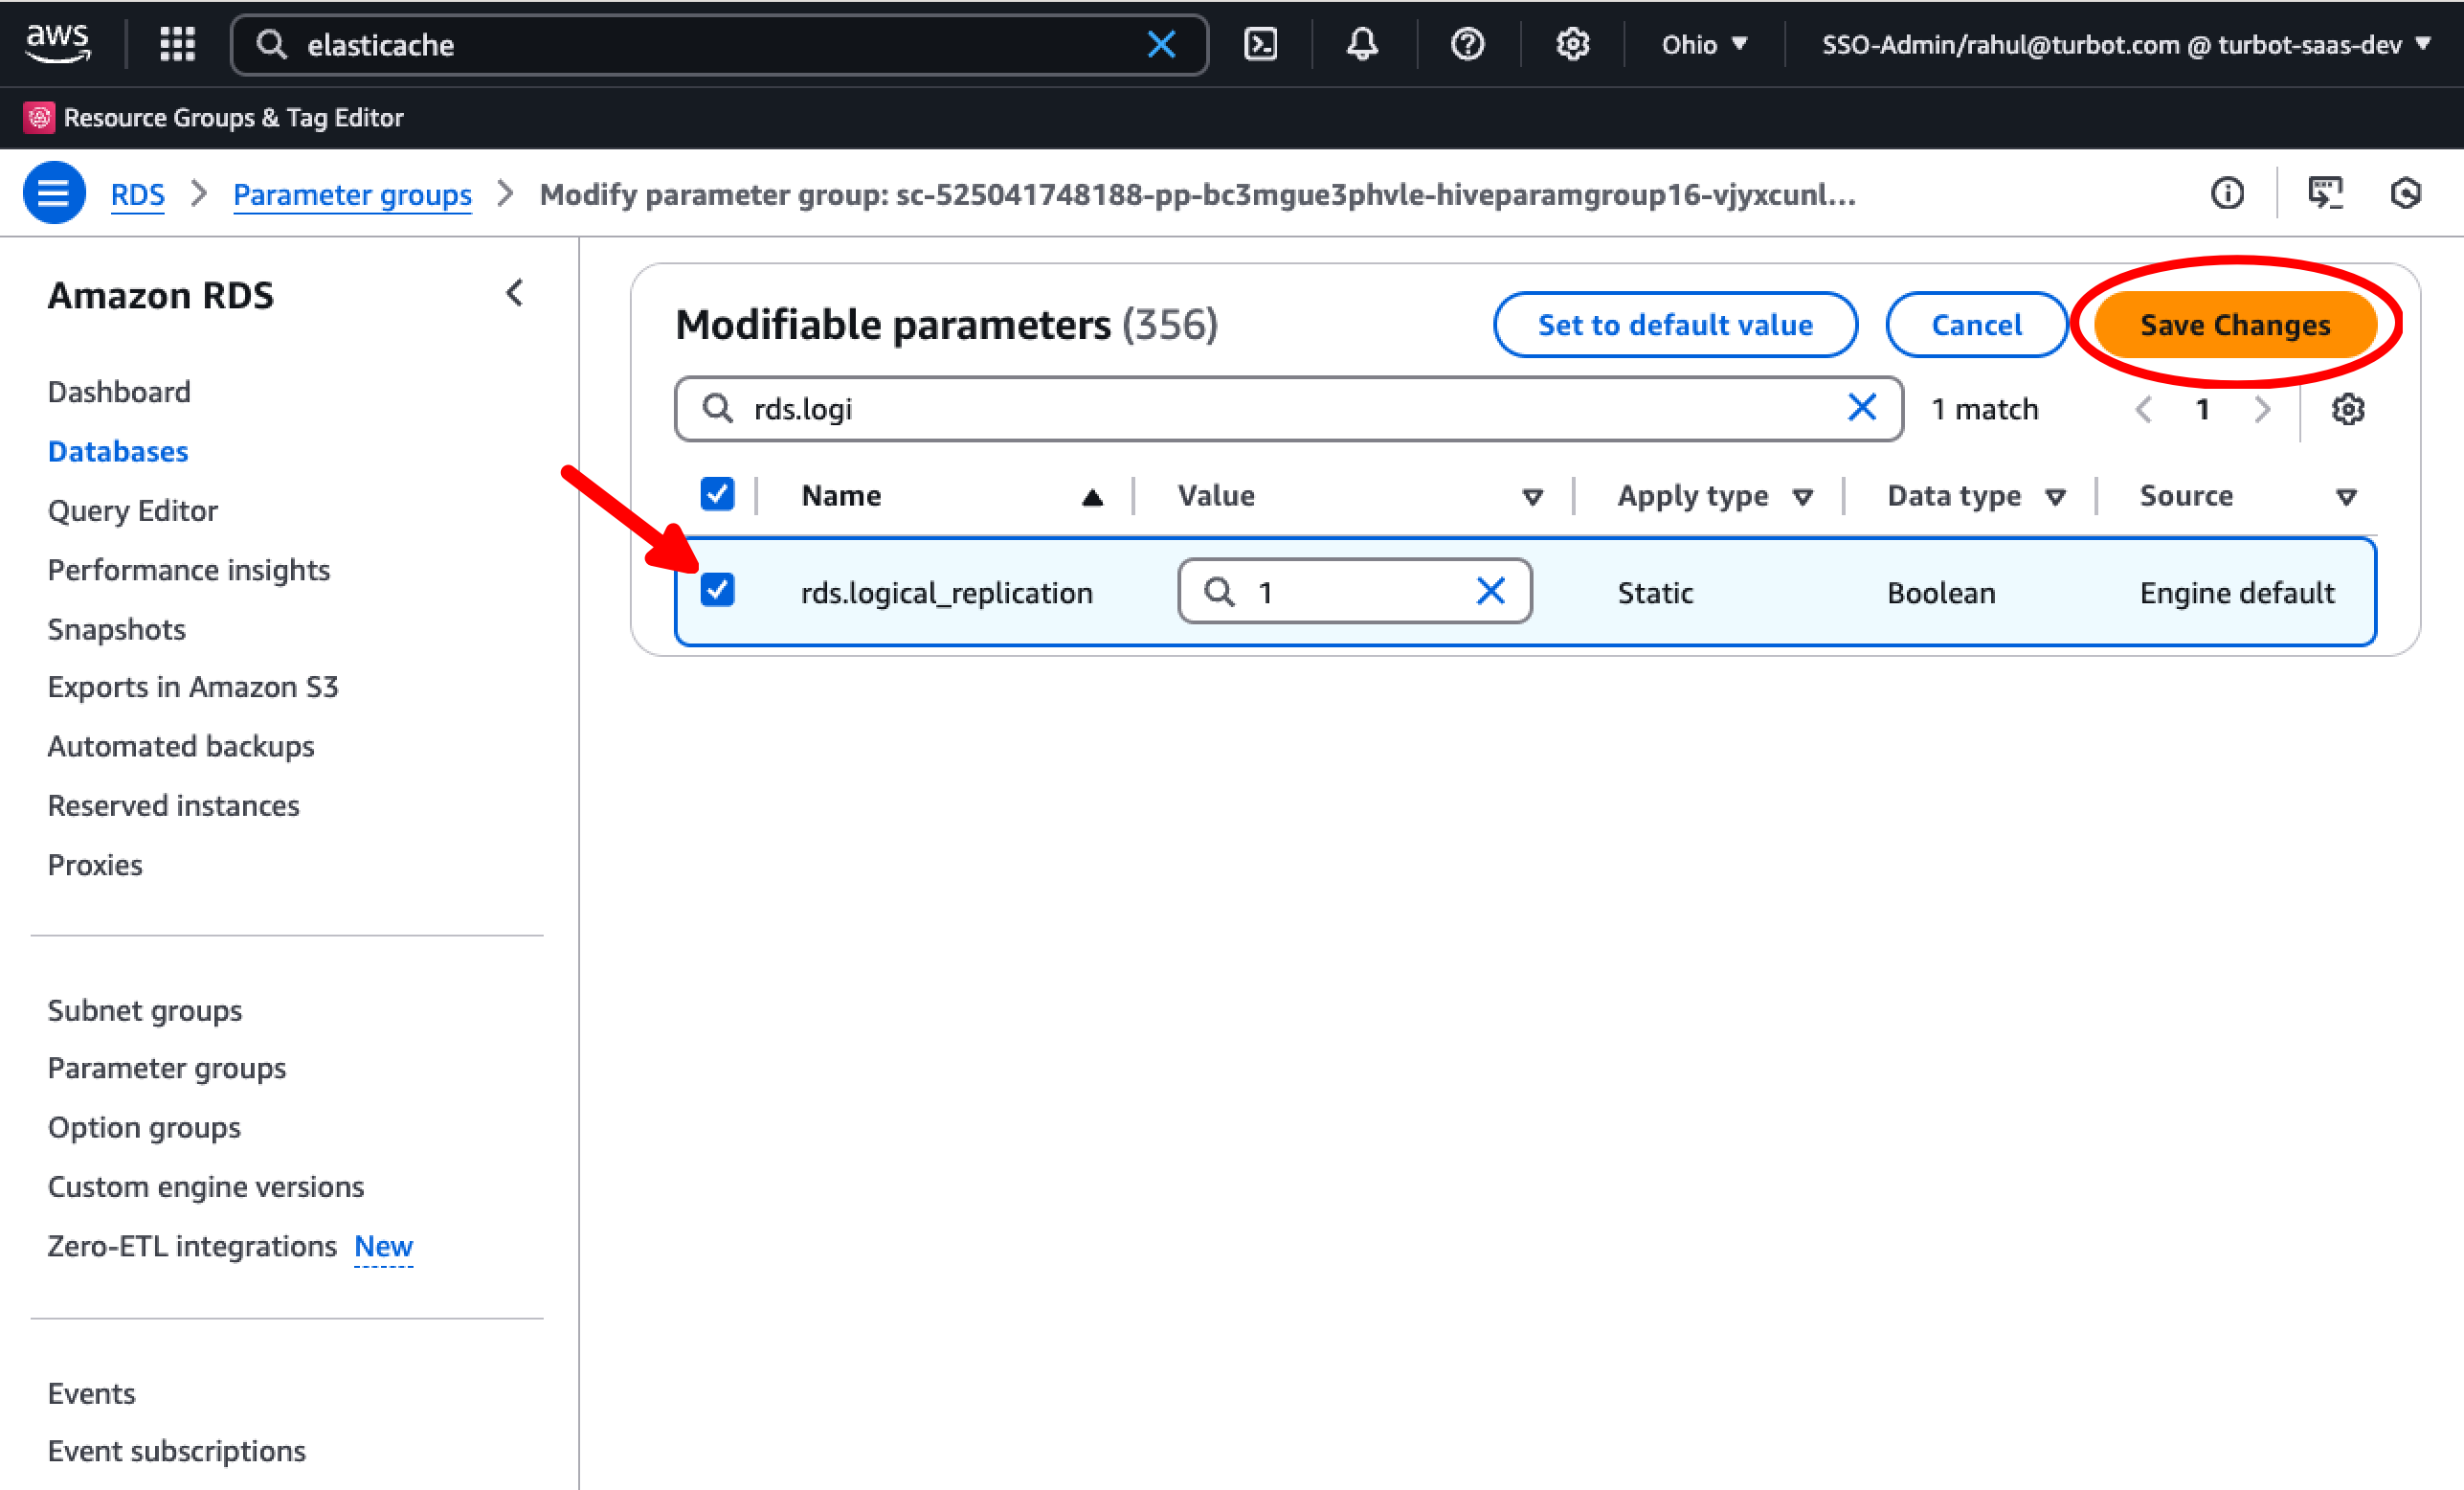
Set rds.logical_replication to 1. Select Save Changes.
Pause Events
Pause the events to avoid any lost events. During this time the respective workspace will still be available in readonly mode.
[!TIP] Pausing events before database downtime is critical because:
- During database unavailability, Guardrails continues to receive events from cloud providers
- If events are not paused, these events will be lost since they cannot be written to the database
- Lost events mean missing state changes in your infrastructure, leading to inaccurate resource tracking and potential security/compliance gaps
- By pausing events, they are queued and will be processed once the database is available again, ensuring no infrastructure changes are missed
Reboot DB Instance
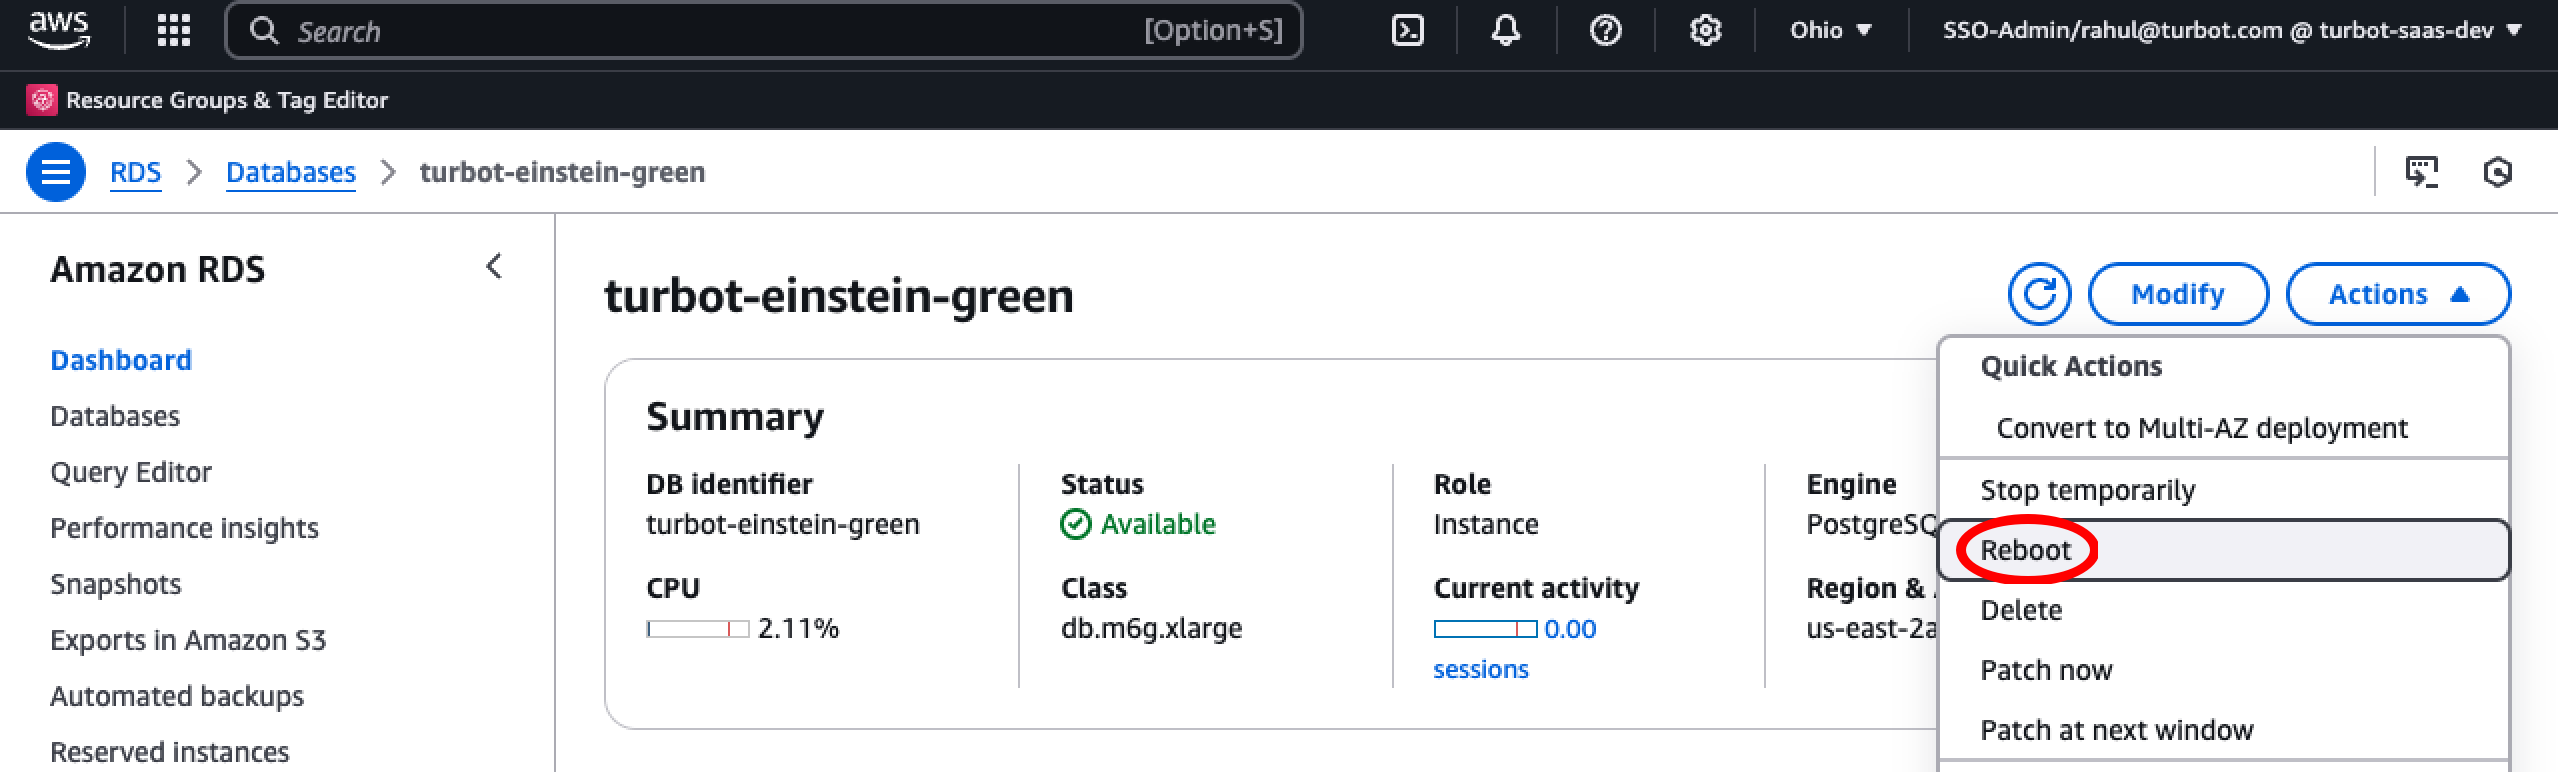
[!WARNING] During the database reboot, users will experience a brief service interruption lasting approximately 1 minutes or less. Please plan this maintenance window accordingly.
Start Events
Now enable event processing. Refer Enable the events. At this stage workspace will resume it's normal operation.
Step 2: Provision New Database Instance
Deploy a new TED instance to create a new database that will serve as the target for replication from the original(source) database. This allows us to perform the upgrade with minimal downtime by replicating data from the old database to the new one.
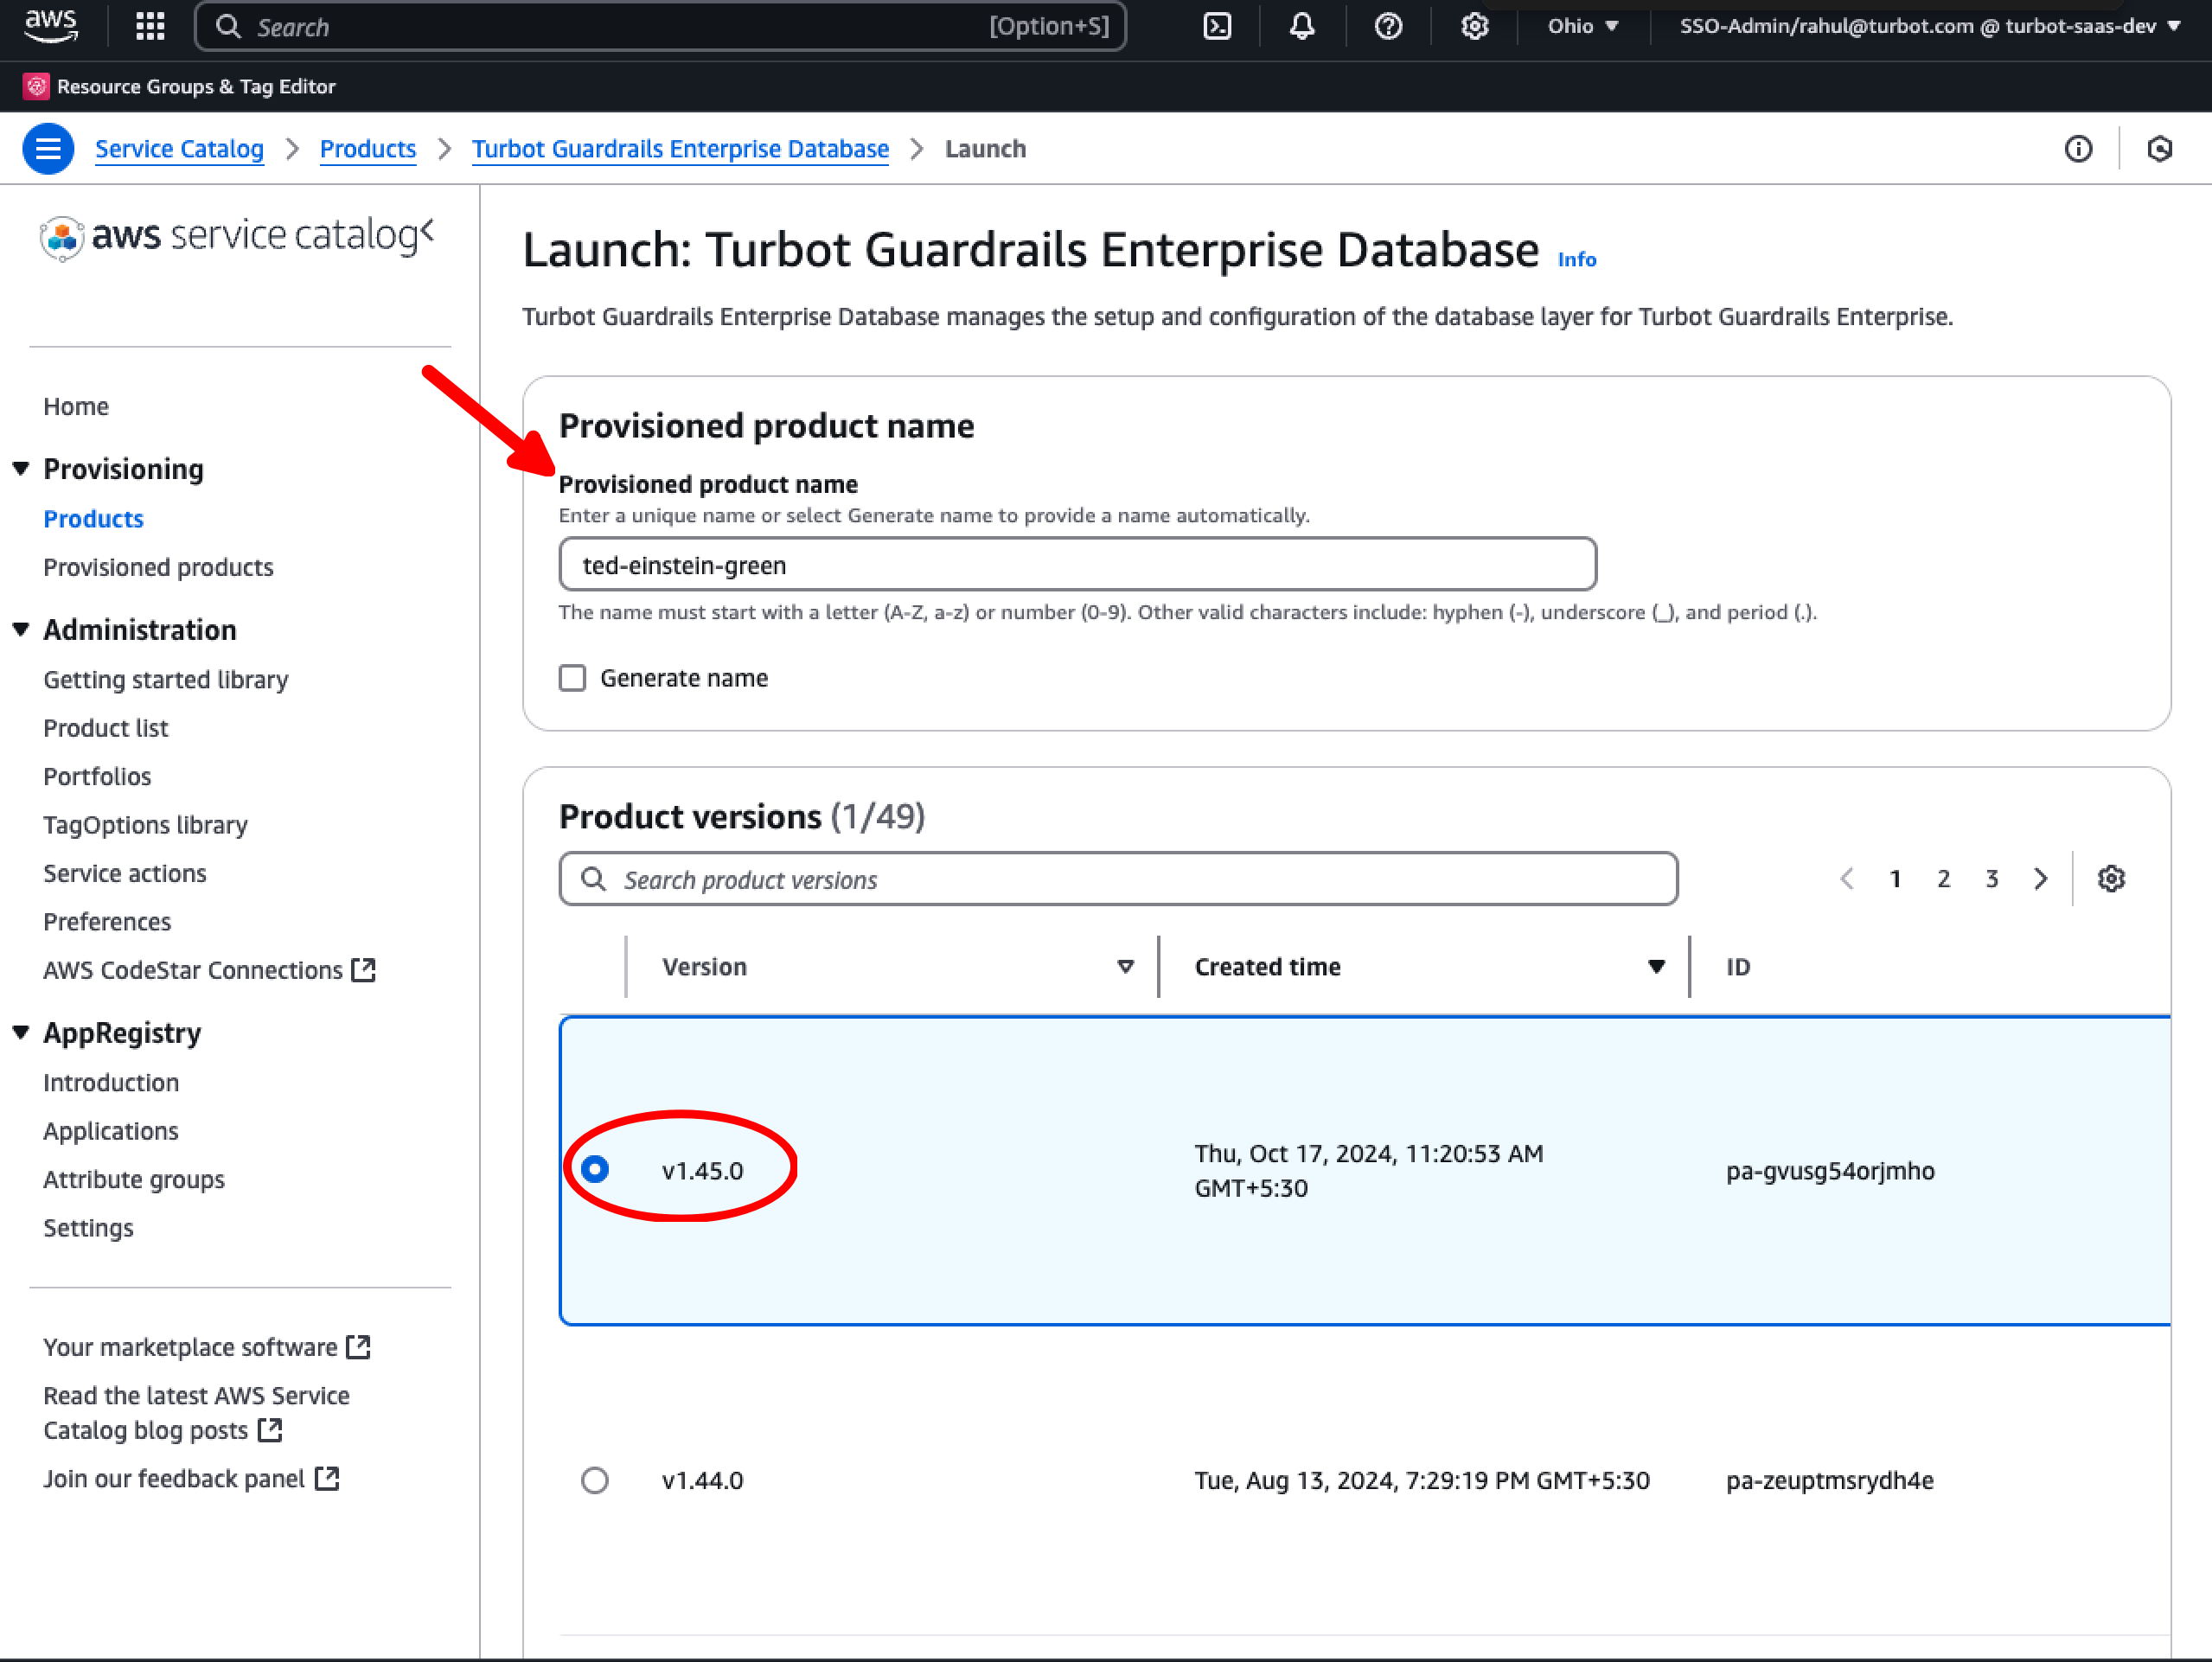
Navigate to AWS Service Catalog console and deploy a new TED. Follow the instruction provided in Install Turbot Guardrails Enterprise Database (TED) product.
For example, if your original source database is named turbot-einstein, name the new one as turbot-einstein-green (using the -green suffix). This suffix helps identify the new instance during the upgrade process. Set the Version parameter to 1.45.0 or higher.
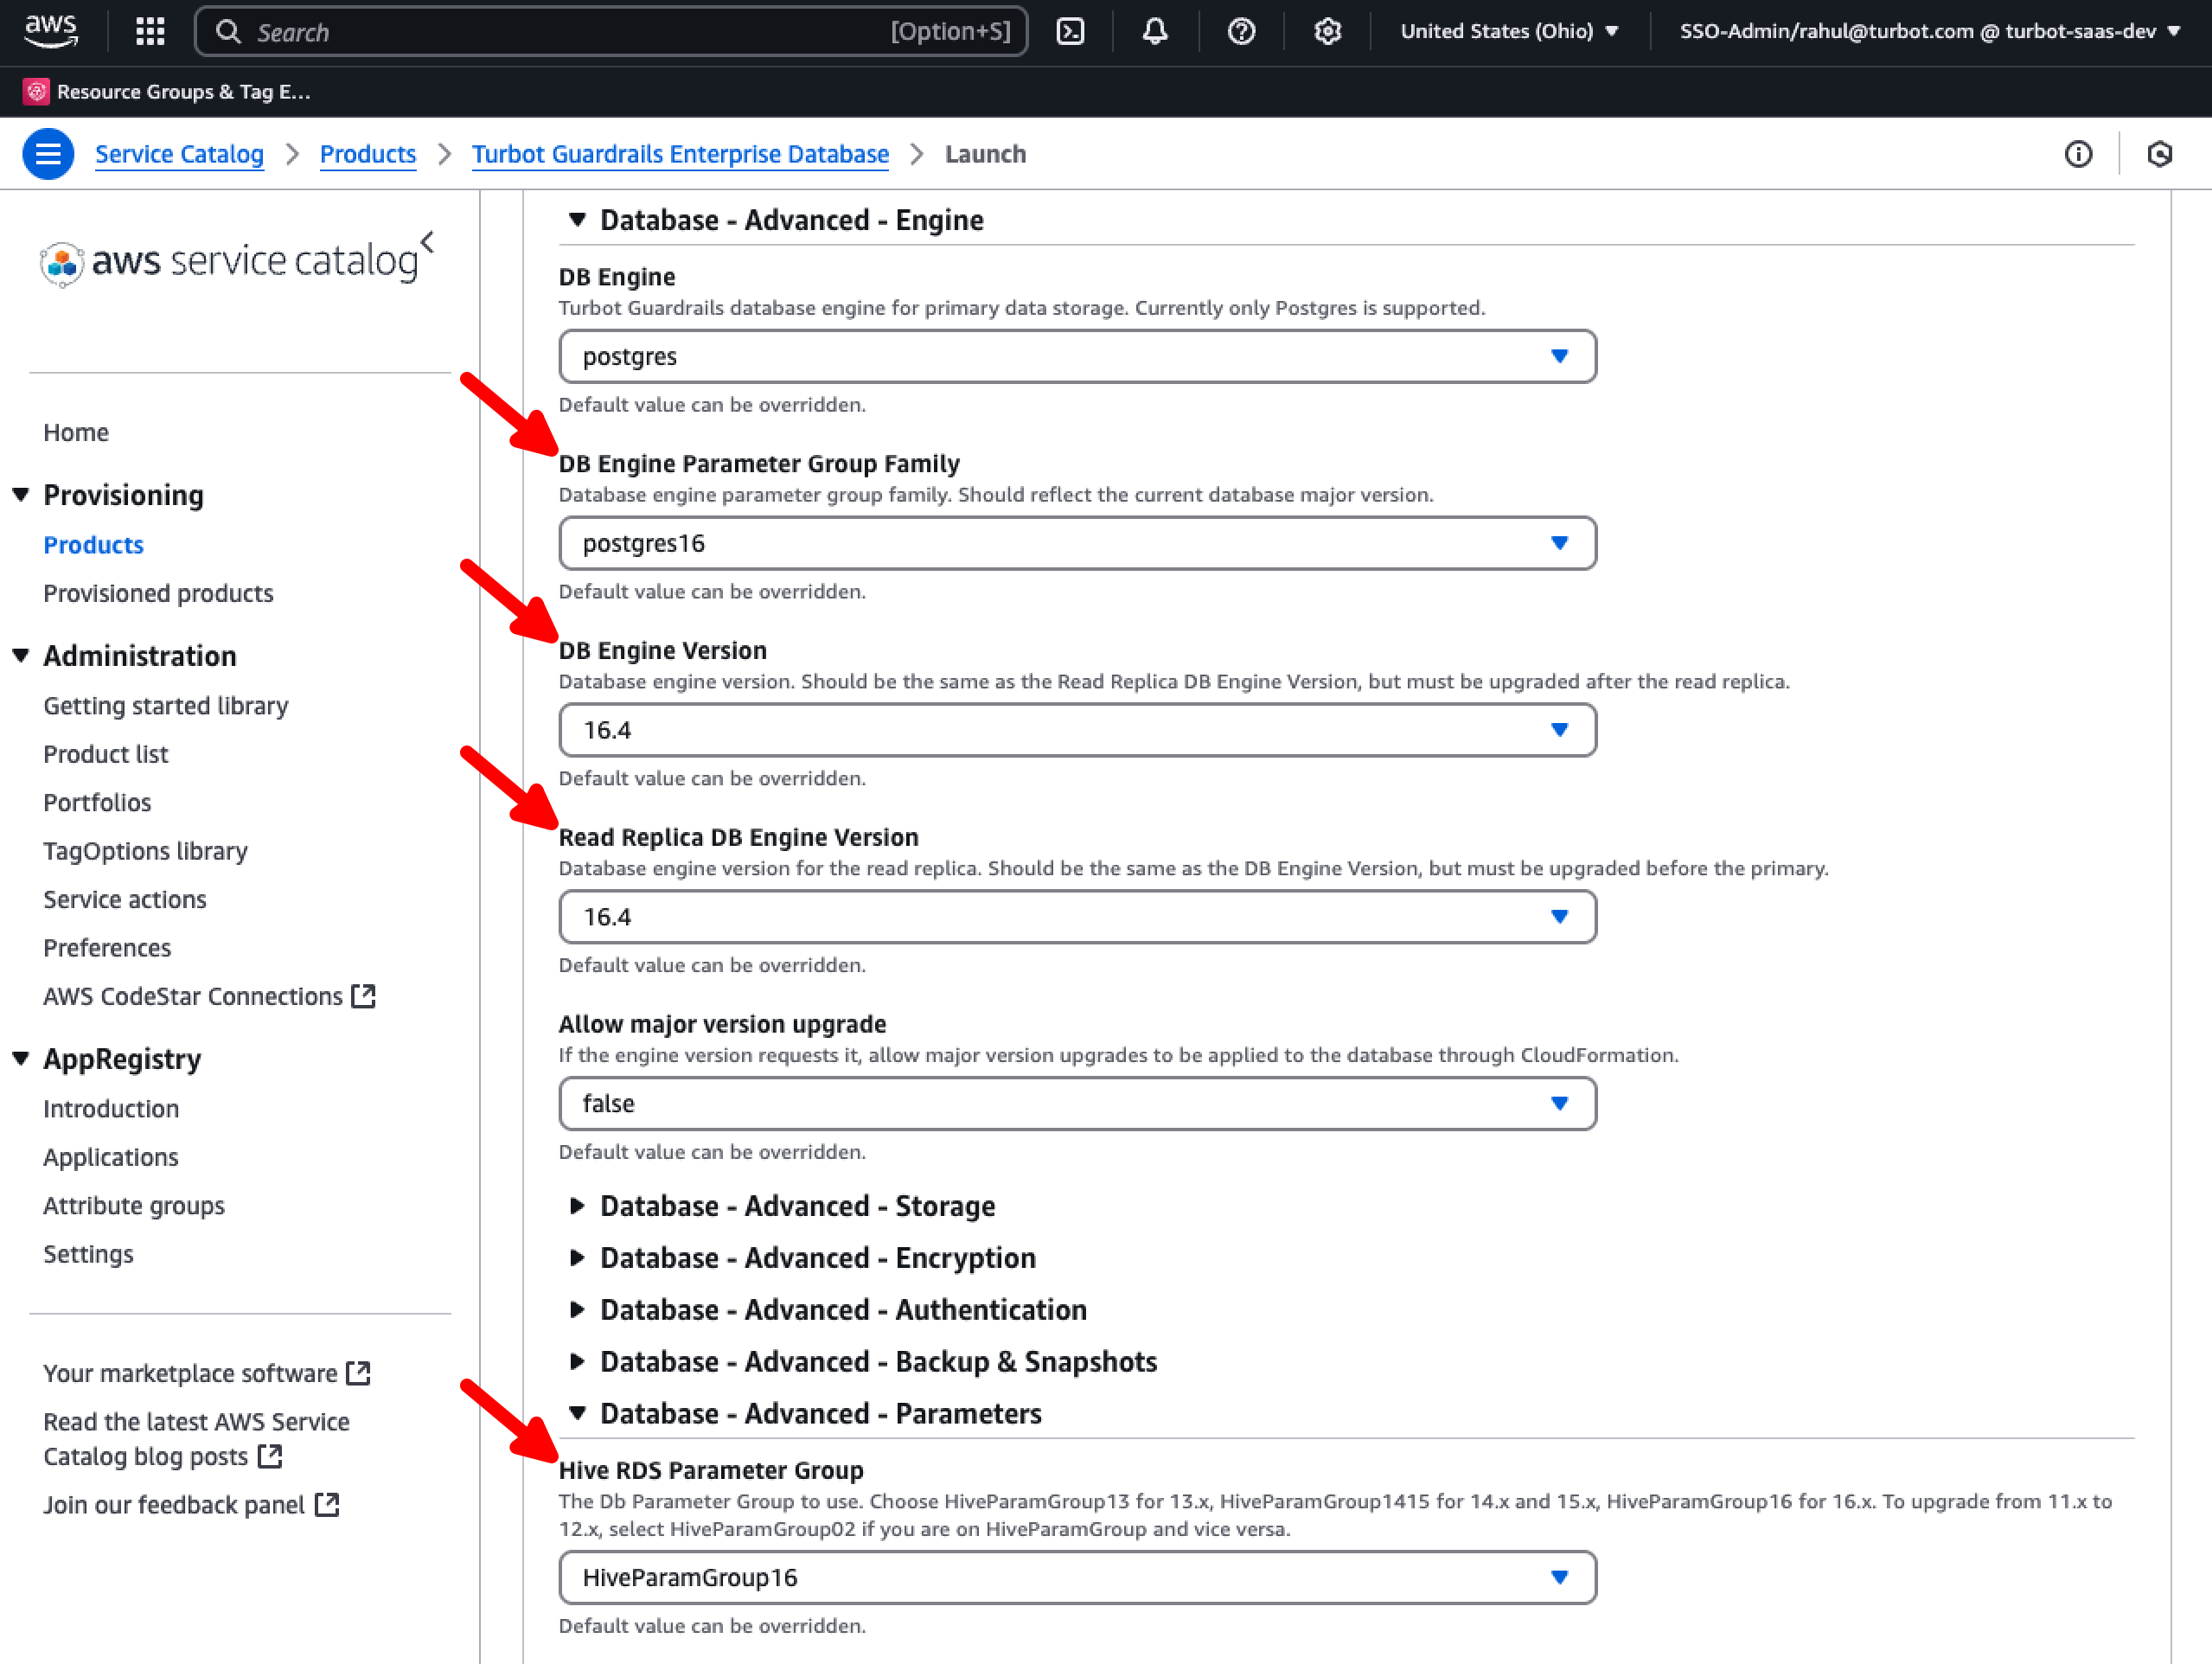
In case of DB engine upgrade
If performing a database version upgrade e.g. migrating to PostgreSQL v16.x, use the DB Engine Version and Read Replica DB Engine Version parameters under the Database - Advanced - Engine section. Set the appropriate DB Engine Parameter Group Family and the Hive RDS Parameter Group under the Database - Advanced - Parameters section.
[!IMPORTANT] This guide assumes you are not using read replicas. For environments with read replicas enabled, additional steps may be required. Please contact Turbot Support for assistance.
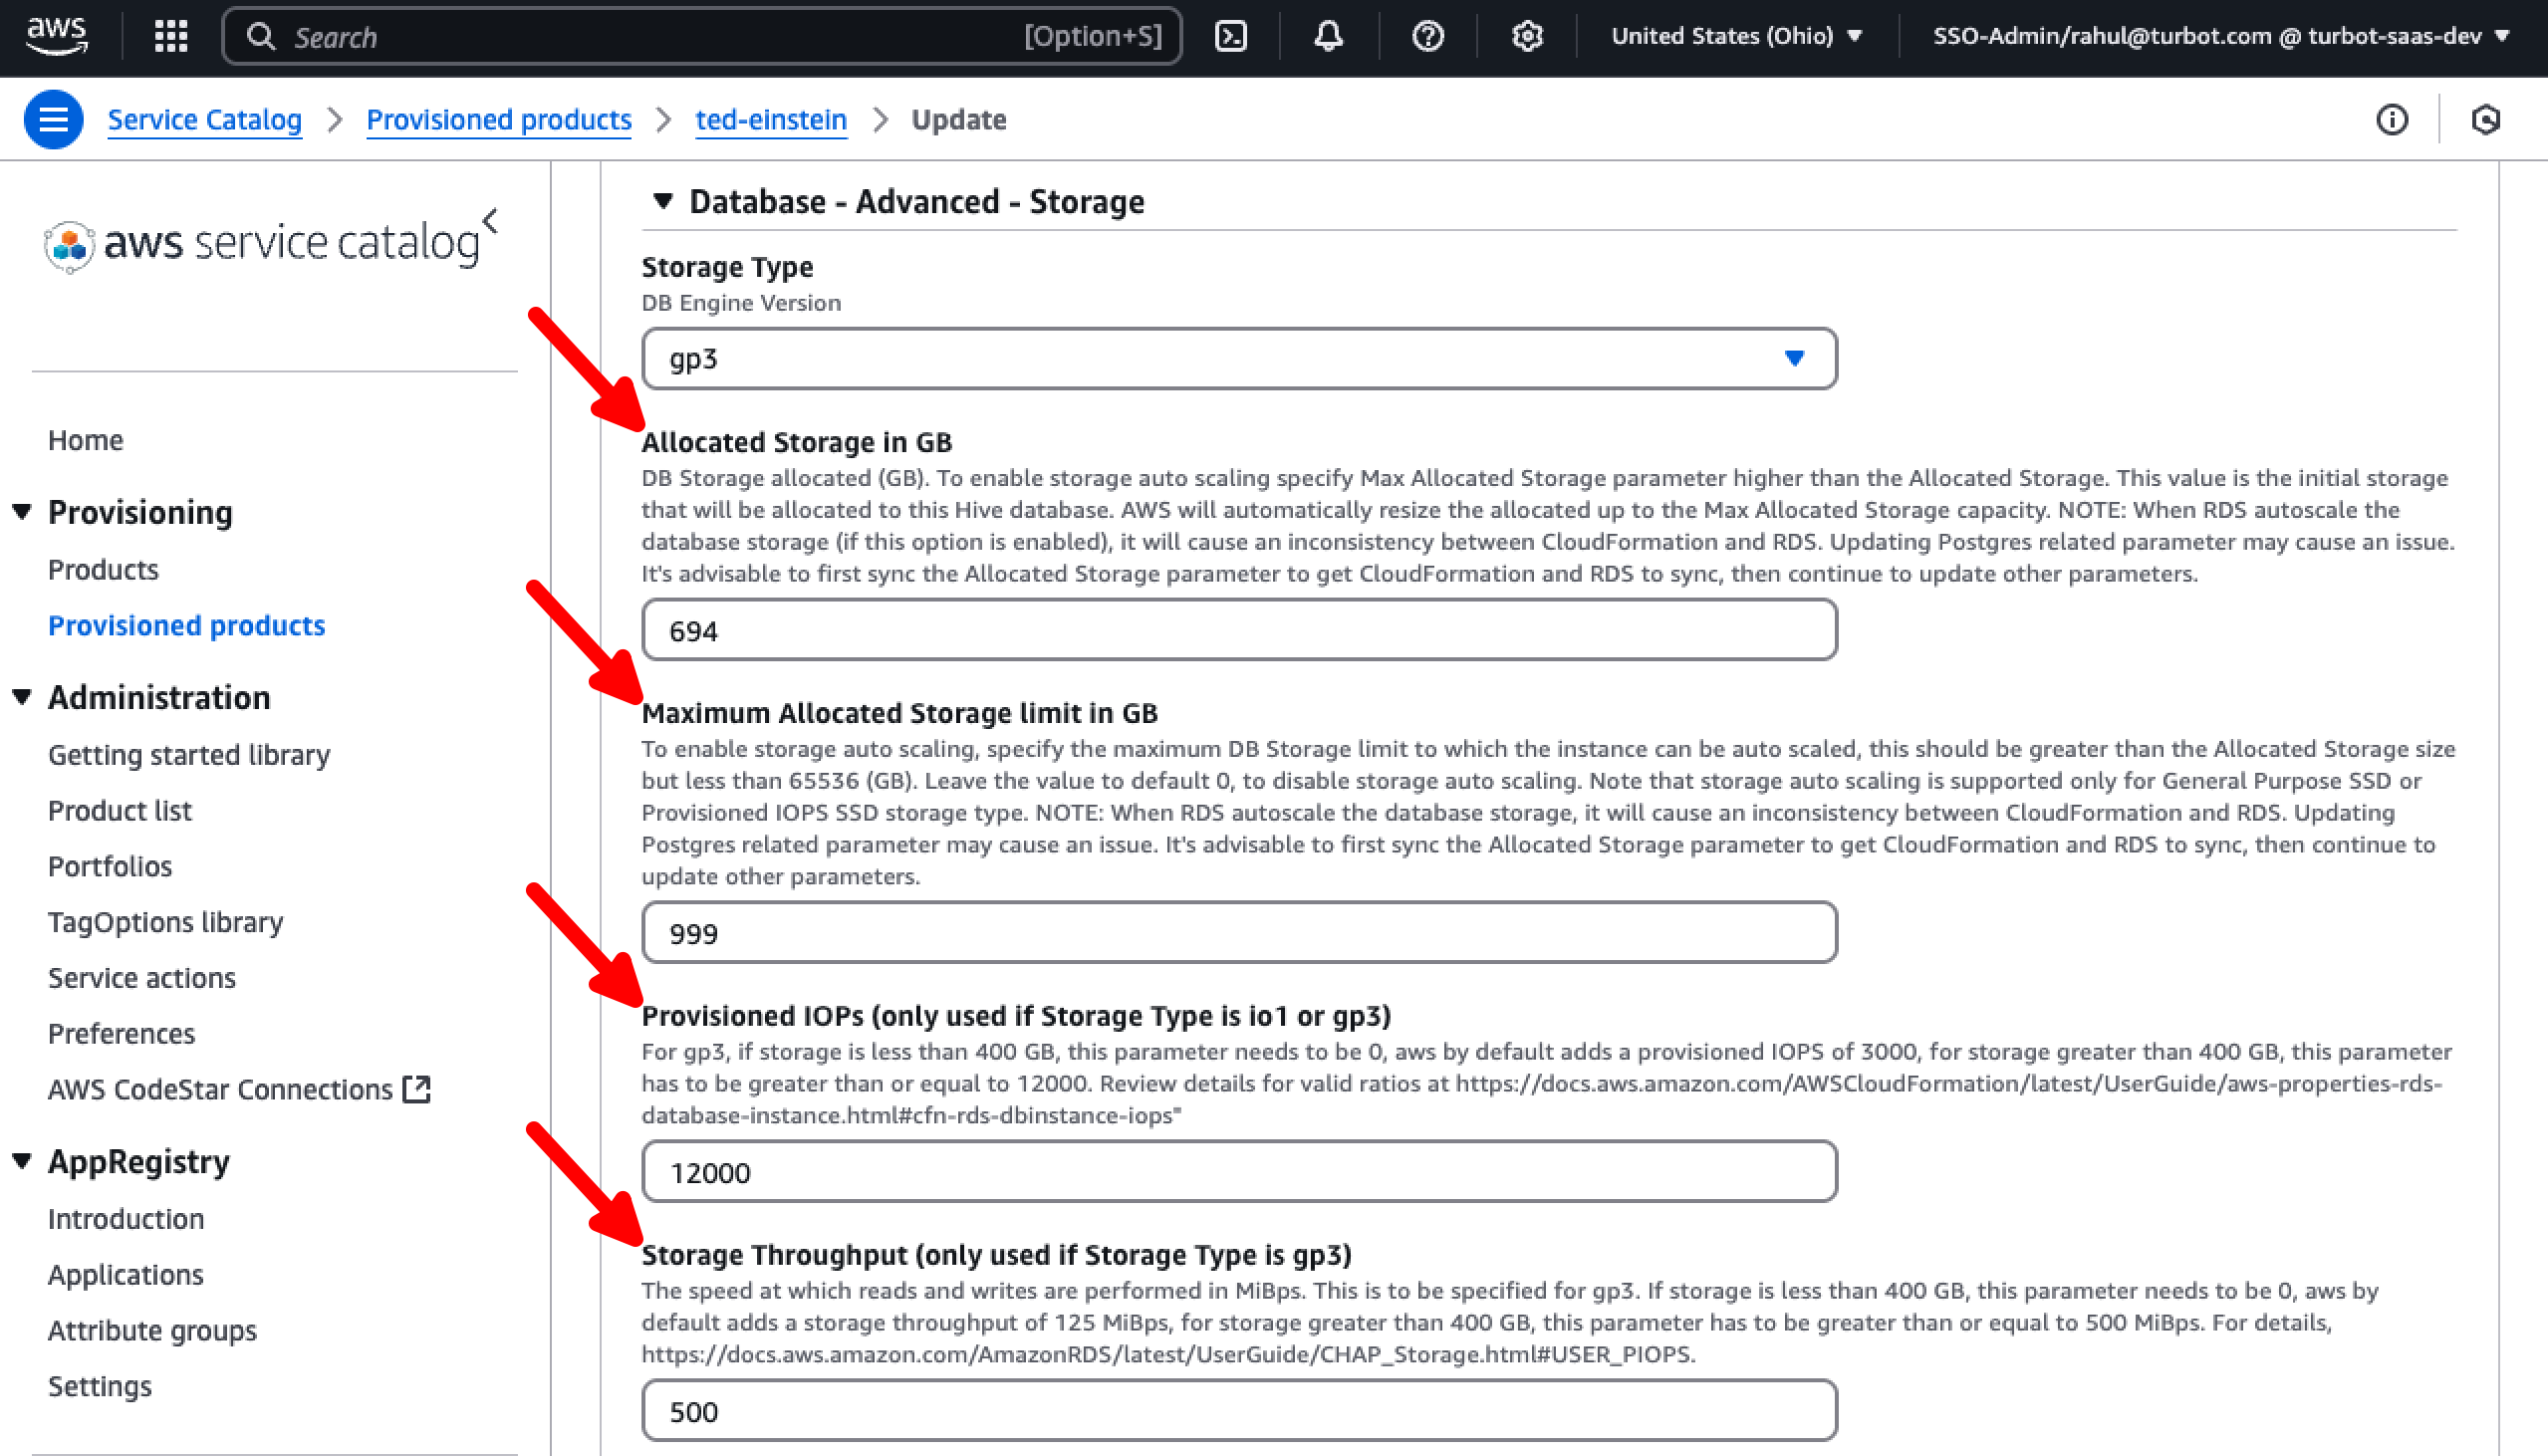
In case of Storage Optimization
Set the allocated storage to match the current disk usage using the Allocated Storage in GB parameter (e.g., if 210 GB out of 500 GB is used, set it to 210 GB) and define the Maximum Allocated Storage limit in GB to a suitable value, both located under the Database - Advanced - Storage section; use the FreeStorageSpace metric to determine the size.
Set the encryption by configuring the Custom Hive Key parameter to use the original KMS key under the Advanced - Infrastructure section. This should be the Key ID, typically formatted as: 1111233-abcd-4444-2322-123456789012.
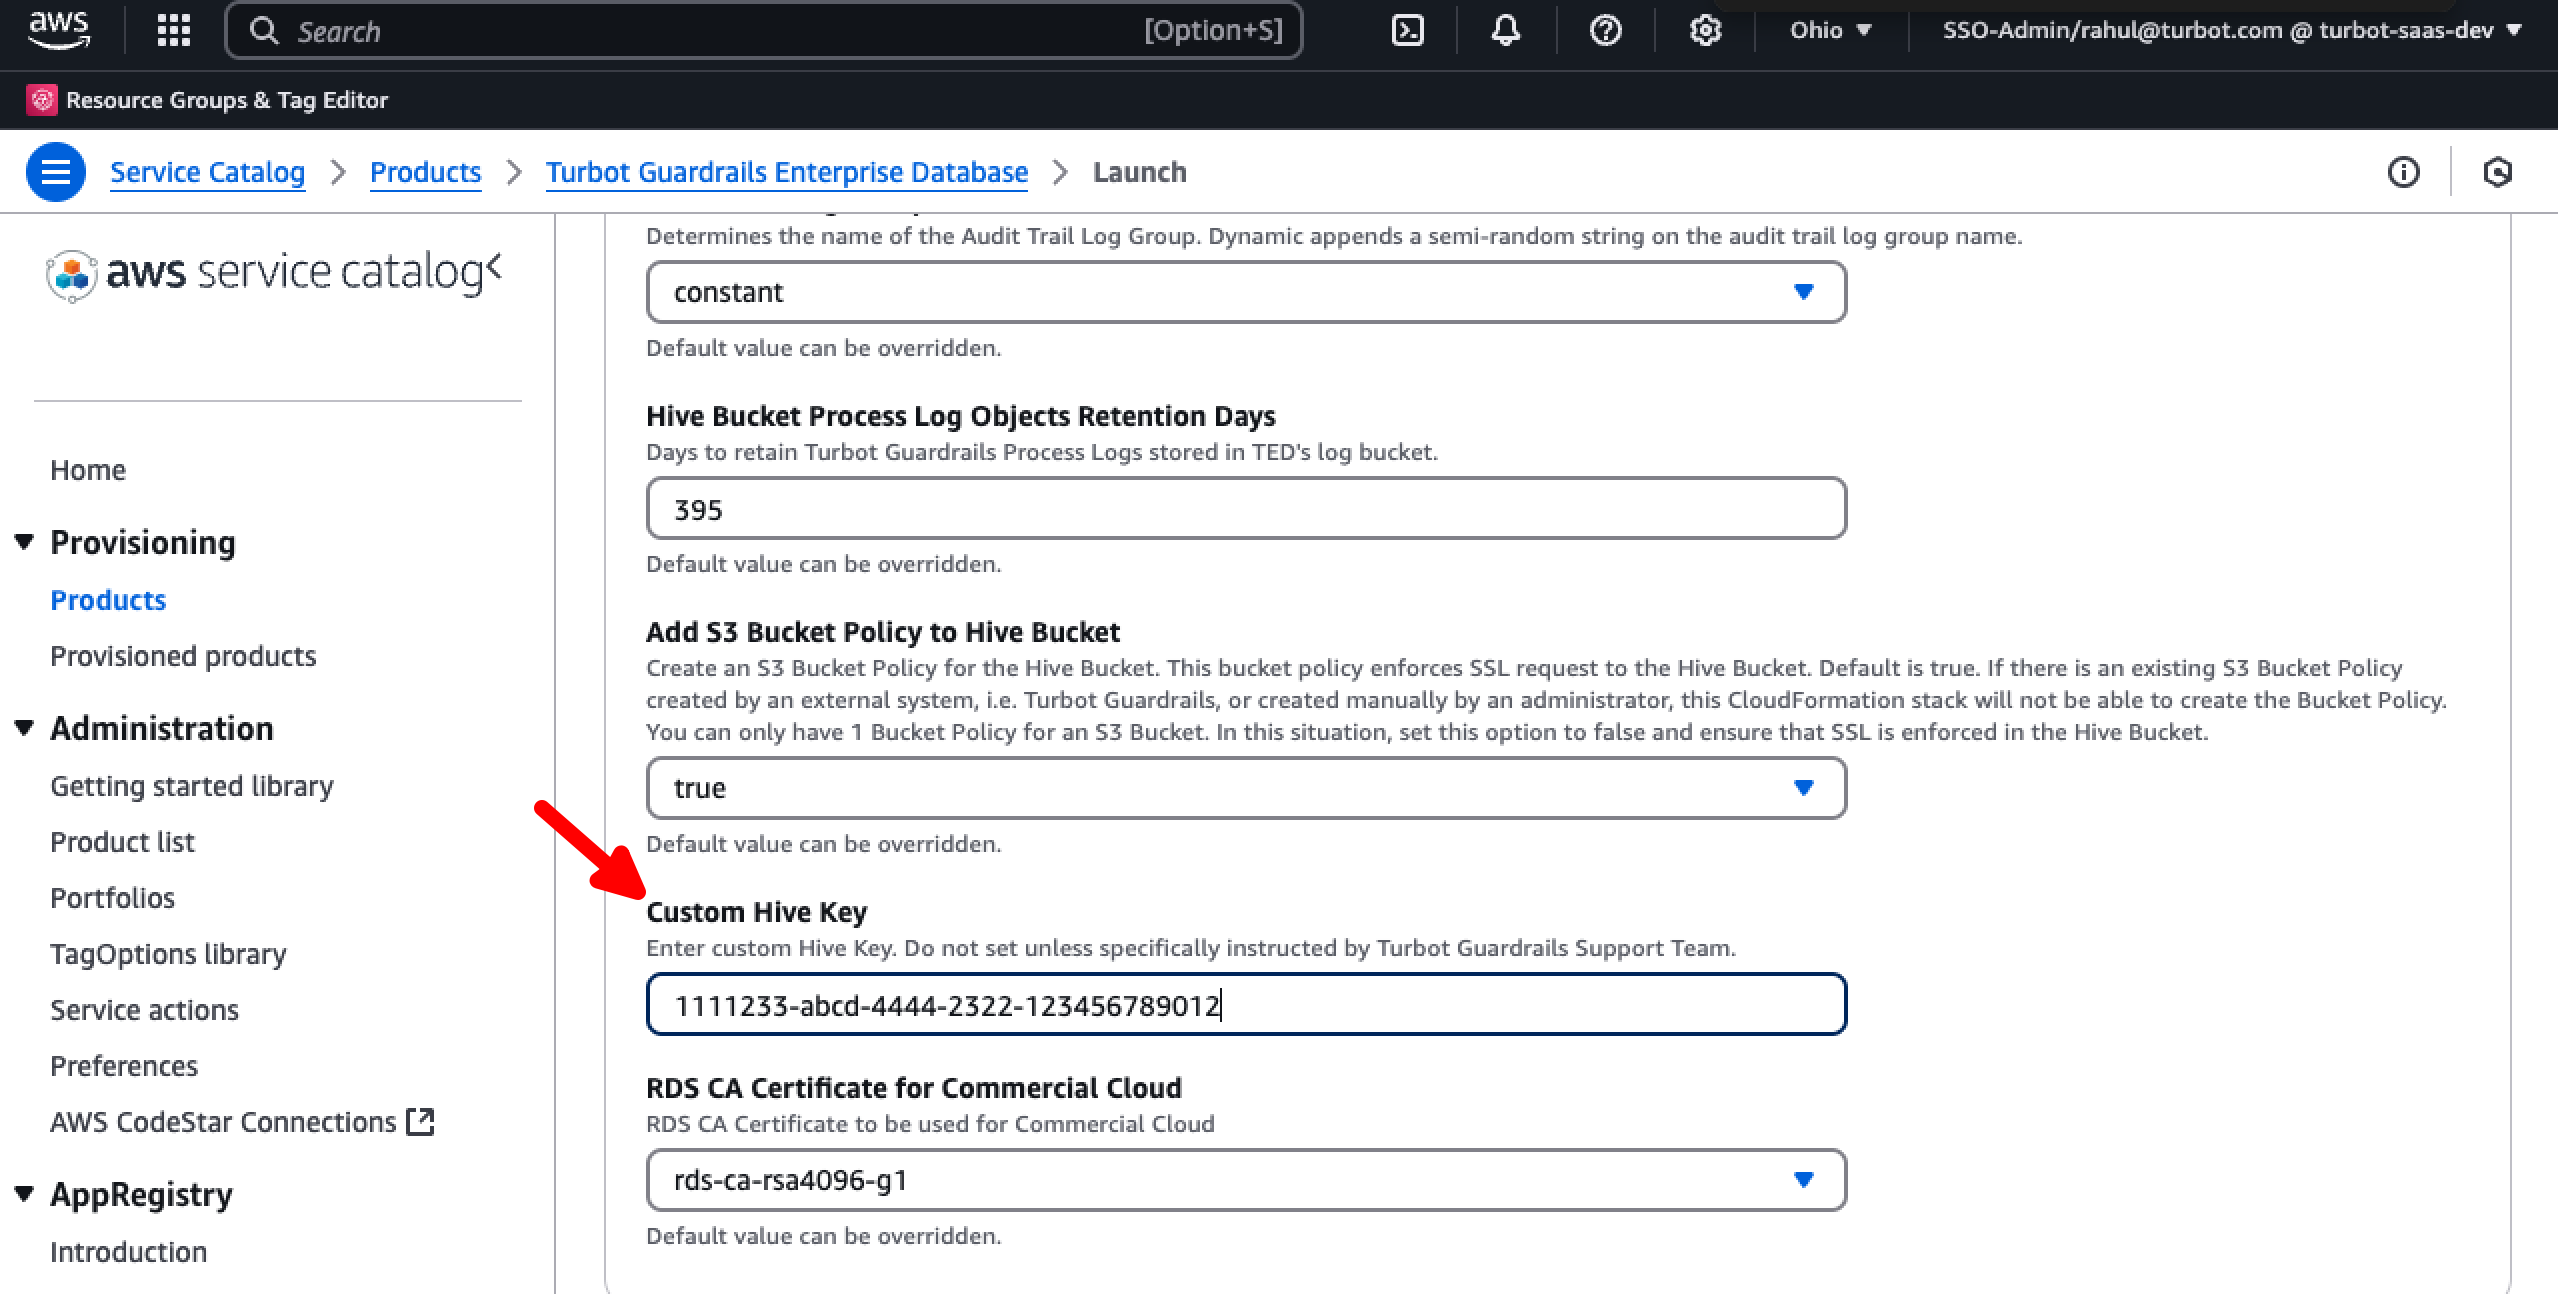
Keep all other values unchanged.
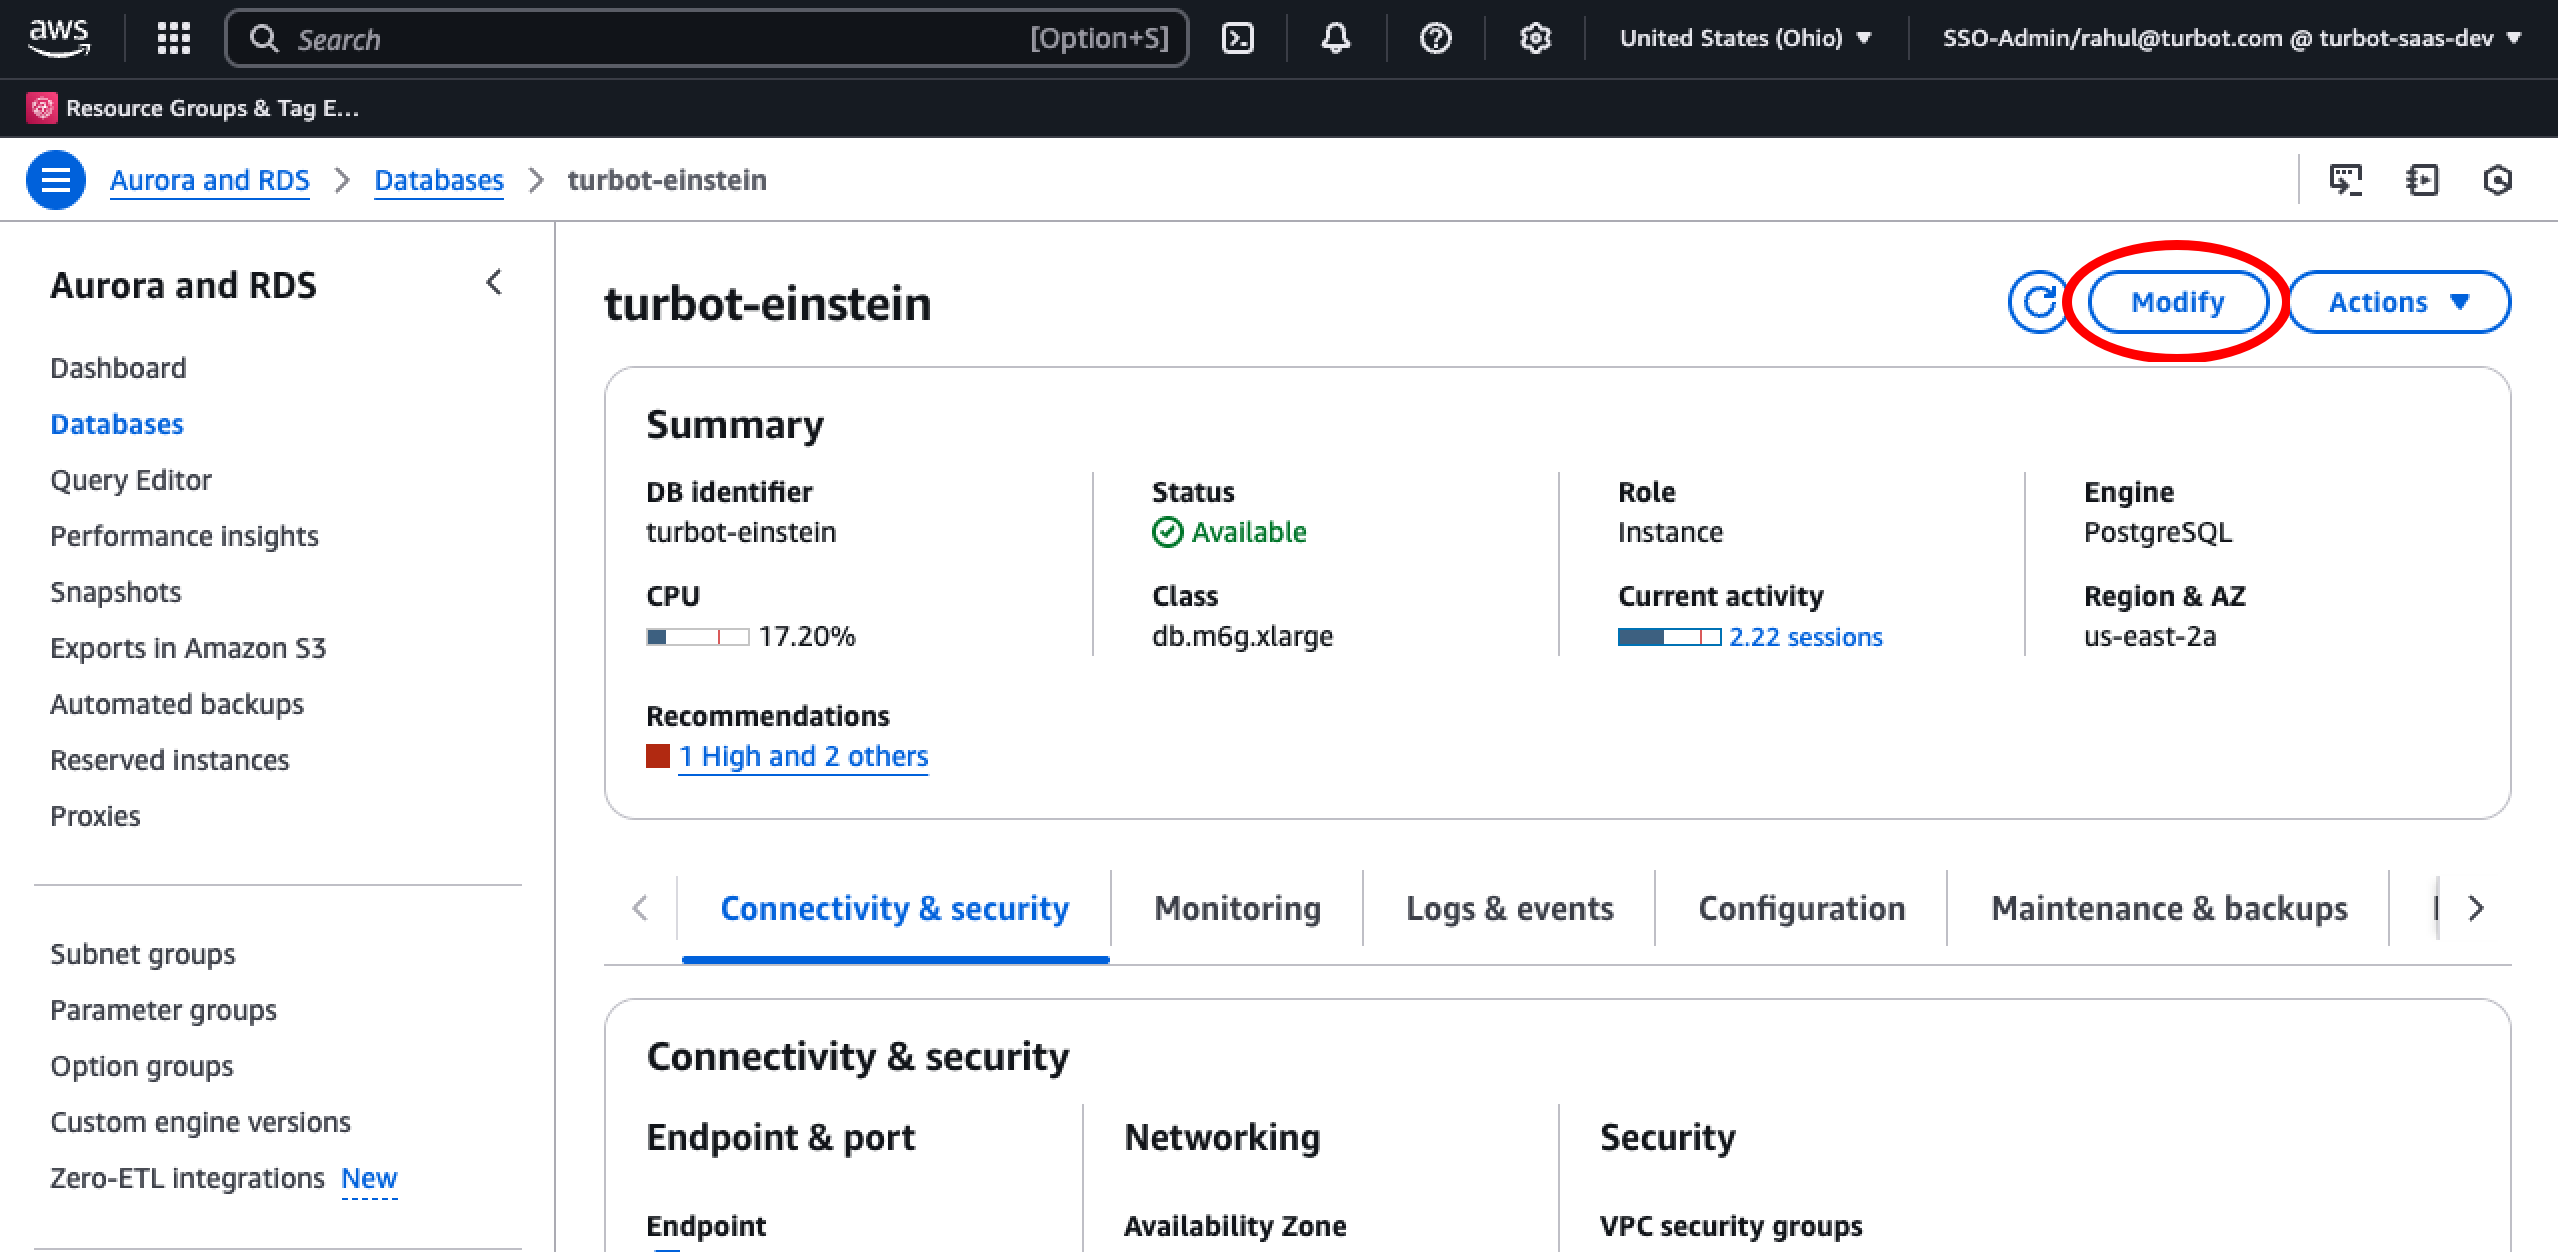
Step 3: Set Master Password in Source and Target Databases
Set the master password for both the DB instances via the AWS console.
[!TIP] Setting the master password in both source and target databases is crucial for:
- Ensuring execution the logical replication process between databases.
Select the source DB instance and choose Modify.
Provide the master password
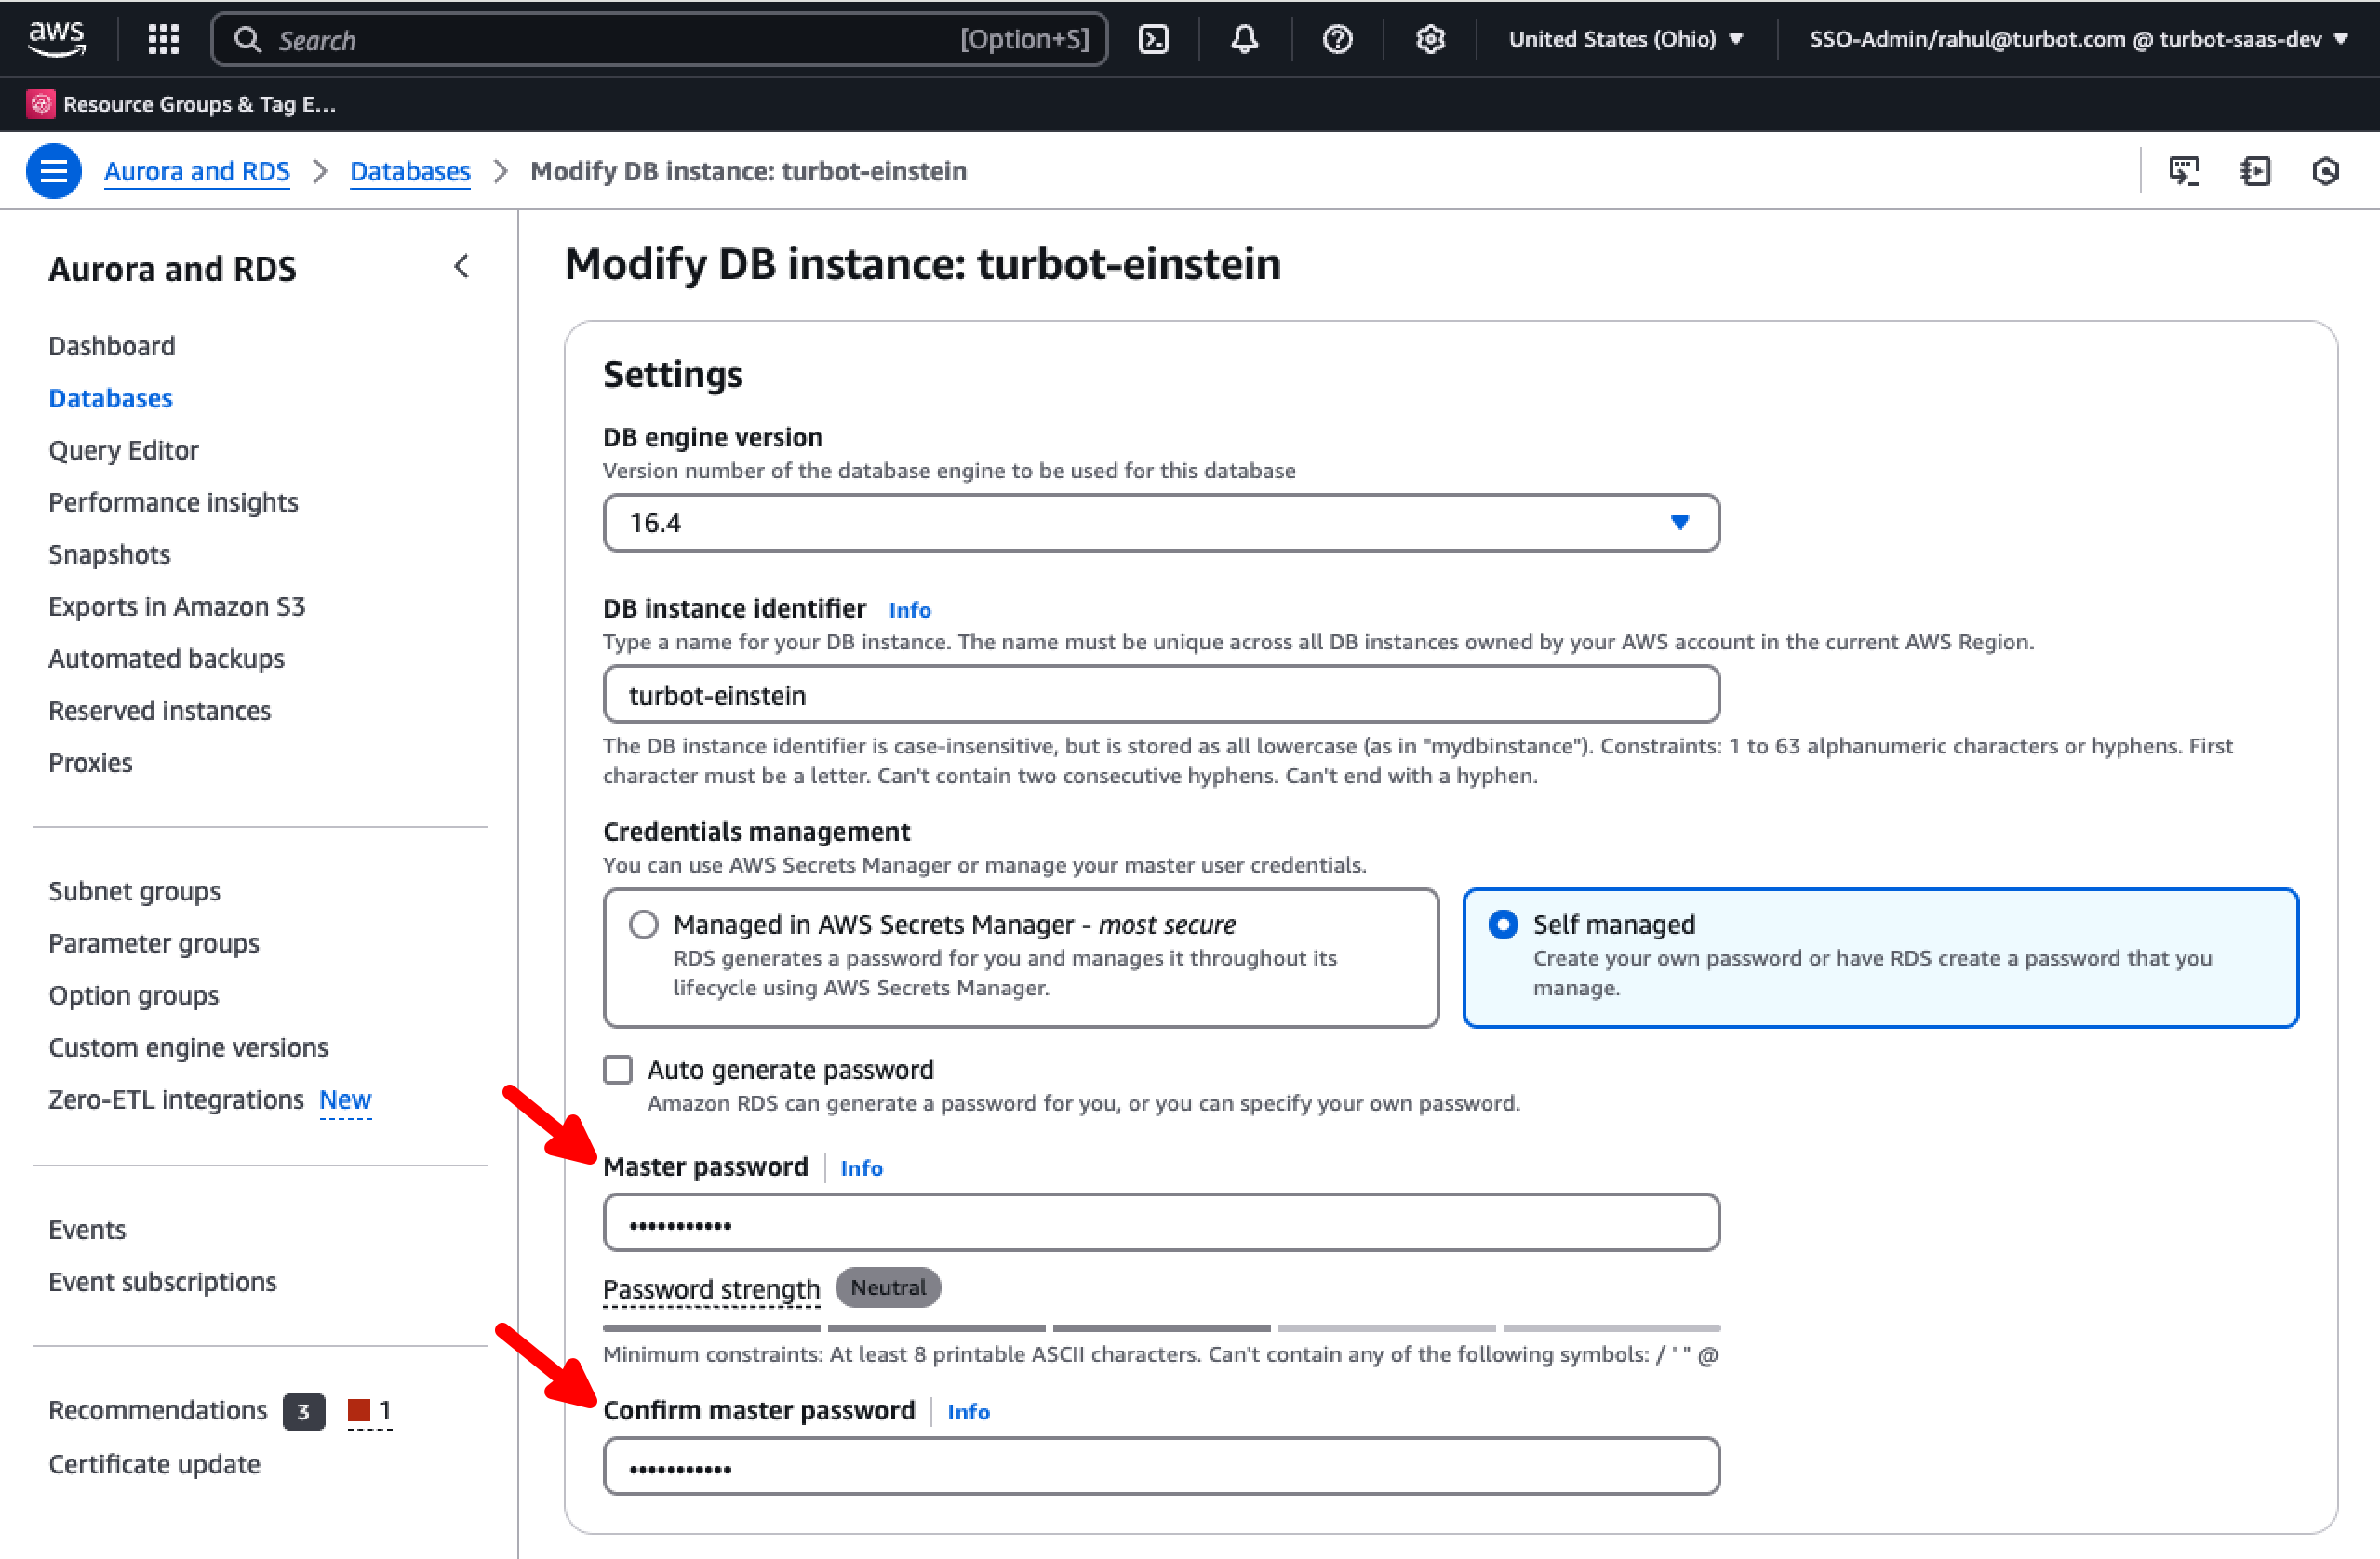
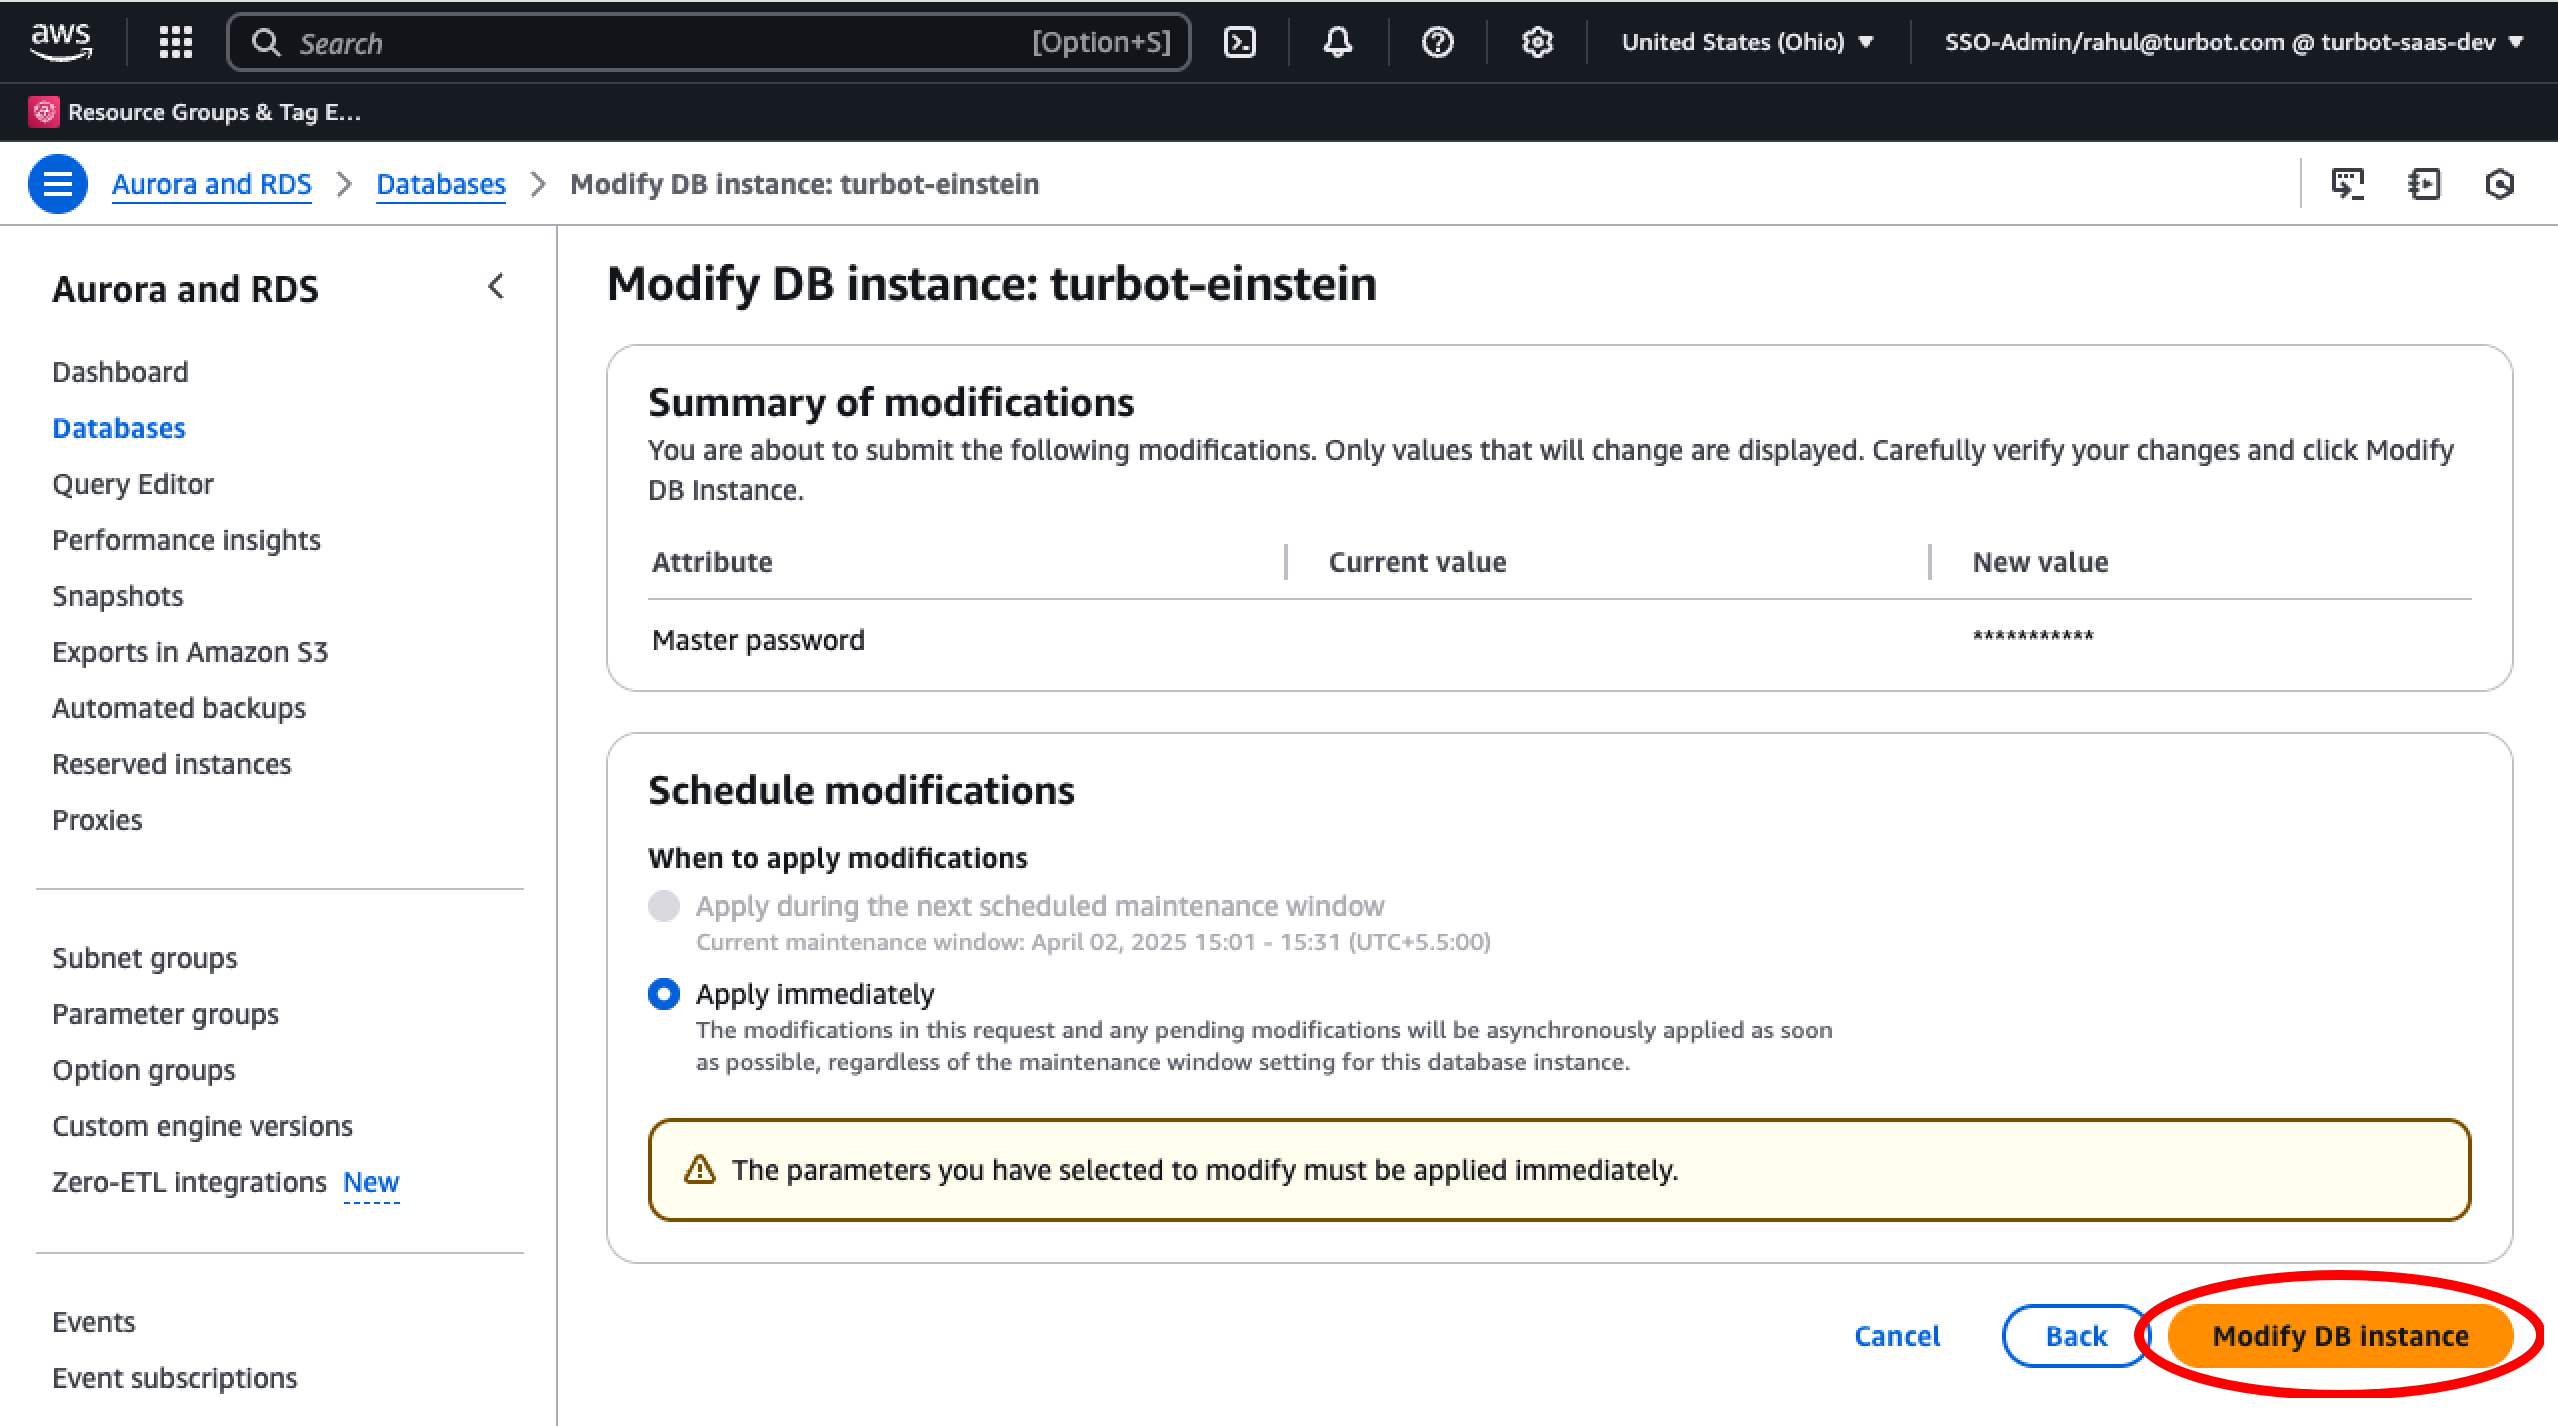
Select Modify DB Instance and apply the changes.
Apply the same changes to the target DB.
[!NOTE] Securely store this master password till the time of migration completion. This will be automatically be rotated when
blue<>greendeployment is performed in Step Step 17: Update Original TED Stack > Executeblue<>green
Step 4: Create Bastion Host
Create a Bastion using the CloudFormation Template. Follow steps provided in Turbot Bastion Host.
[!NOTE] Set the bastion host image to
/aws/service/ami-amazon-linux-latest/al2023-ami-kernel-6.1-x86_64. Set RootVolumeSize to a bit larger than the original DB size (e.g., if 300 GB is used, set RootVolumeSize to 350 GB).
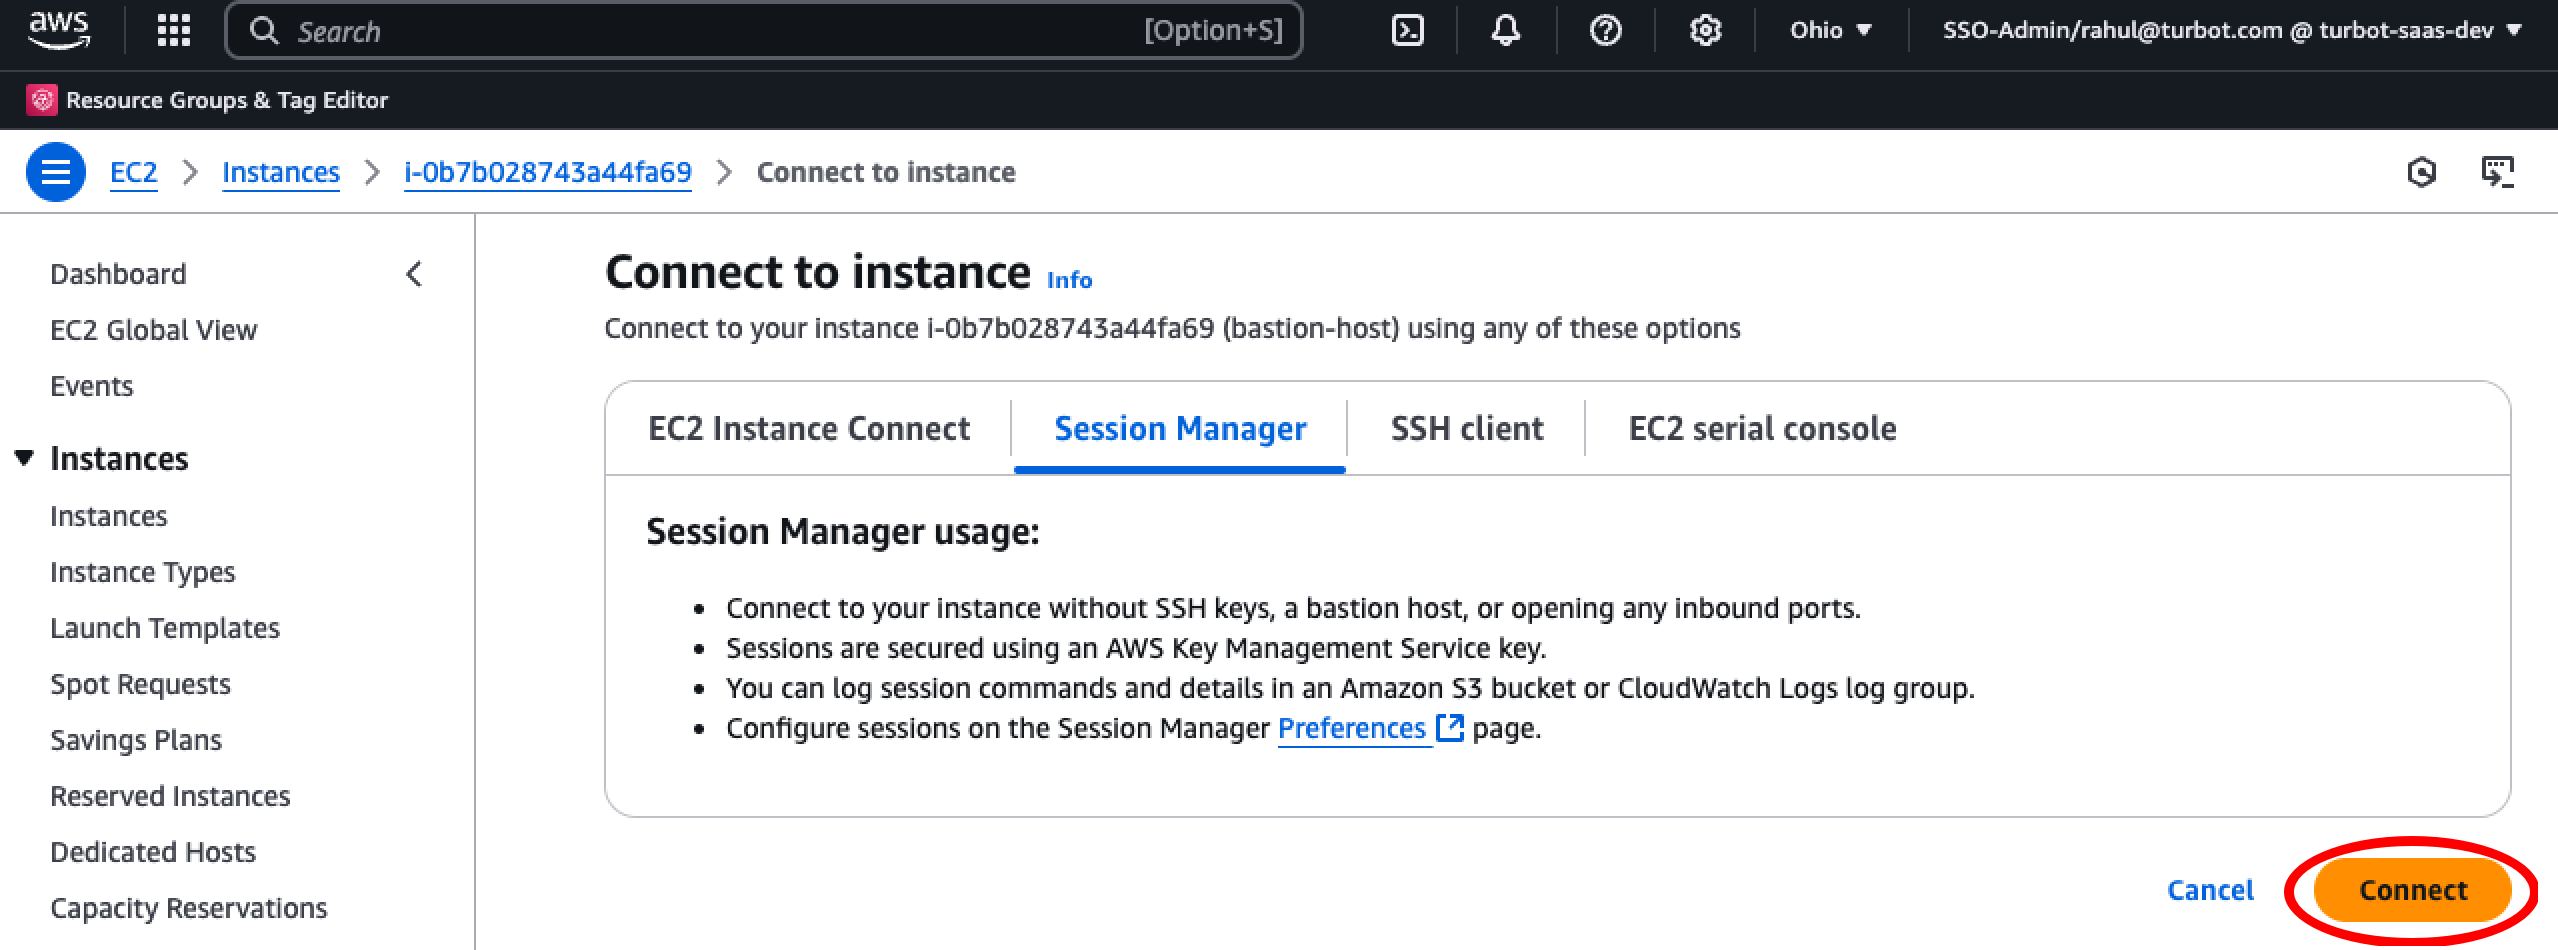
Connect to Bastion Host
Connect to the newly created Bastion Host
Step 5: Install PostgreSQL Client
To install or update the PostgreSQL client on the bastion host, you have two options based on your PostgreSQL version:
PostgreSQL 15
Use the package manager to install PostgreSQL 15:
sudo dnf install postgresql15.x86_64 postgresql15-server -y
PostgreSQL 16
Use PostgreSQL 16 installation steps:
sudo yum install -y gcc readline-devel libicu-devel zlib-devel openssl-devel
sudo wget https://ftp.postgresql.org/pub/source/v16.3/postgresql-16.3.tar.gz
sudo tar -xvzf postgresql-16.3.tar.gz
cd postgresql-16.3
sudo ./configure --bindir=/usr/bin --with-openssl
sudo make -C src/bin install
sudo make -C src/include install
sudo make -C src/interfaces install
Step 6: Create Temporary Folder for Migration
[!TIP] Create a temporary folder to store migration files and database dumps. This folder will serve as a workspace for:
- Storing database backup files created by
pg_dump.- Staging data during replication between source and target databases.
- Maintaining intermediate files generated during migration.
- Keeping migration artifacts organized and separate from system files.
Execute the commands in the home directory to create the tmp_migrations folder and assign the required permissions.
sudo mkdir tmp_migrations
sudo chmod 777 tmp_migrations
cd tmp_migrations
Step 7: Set Environment Variables
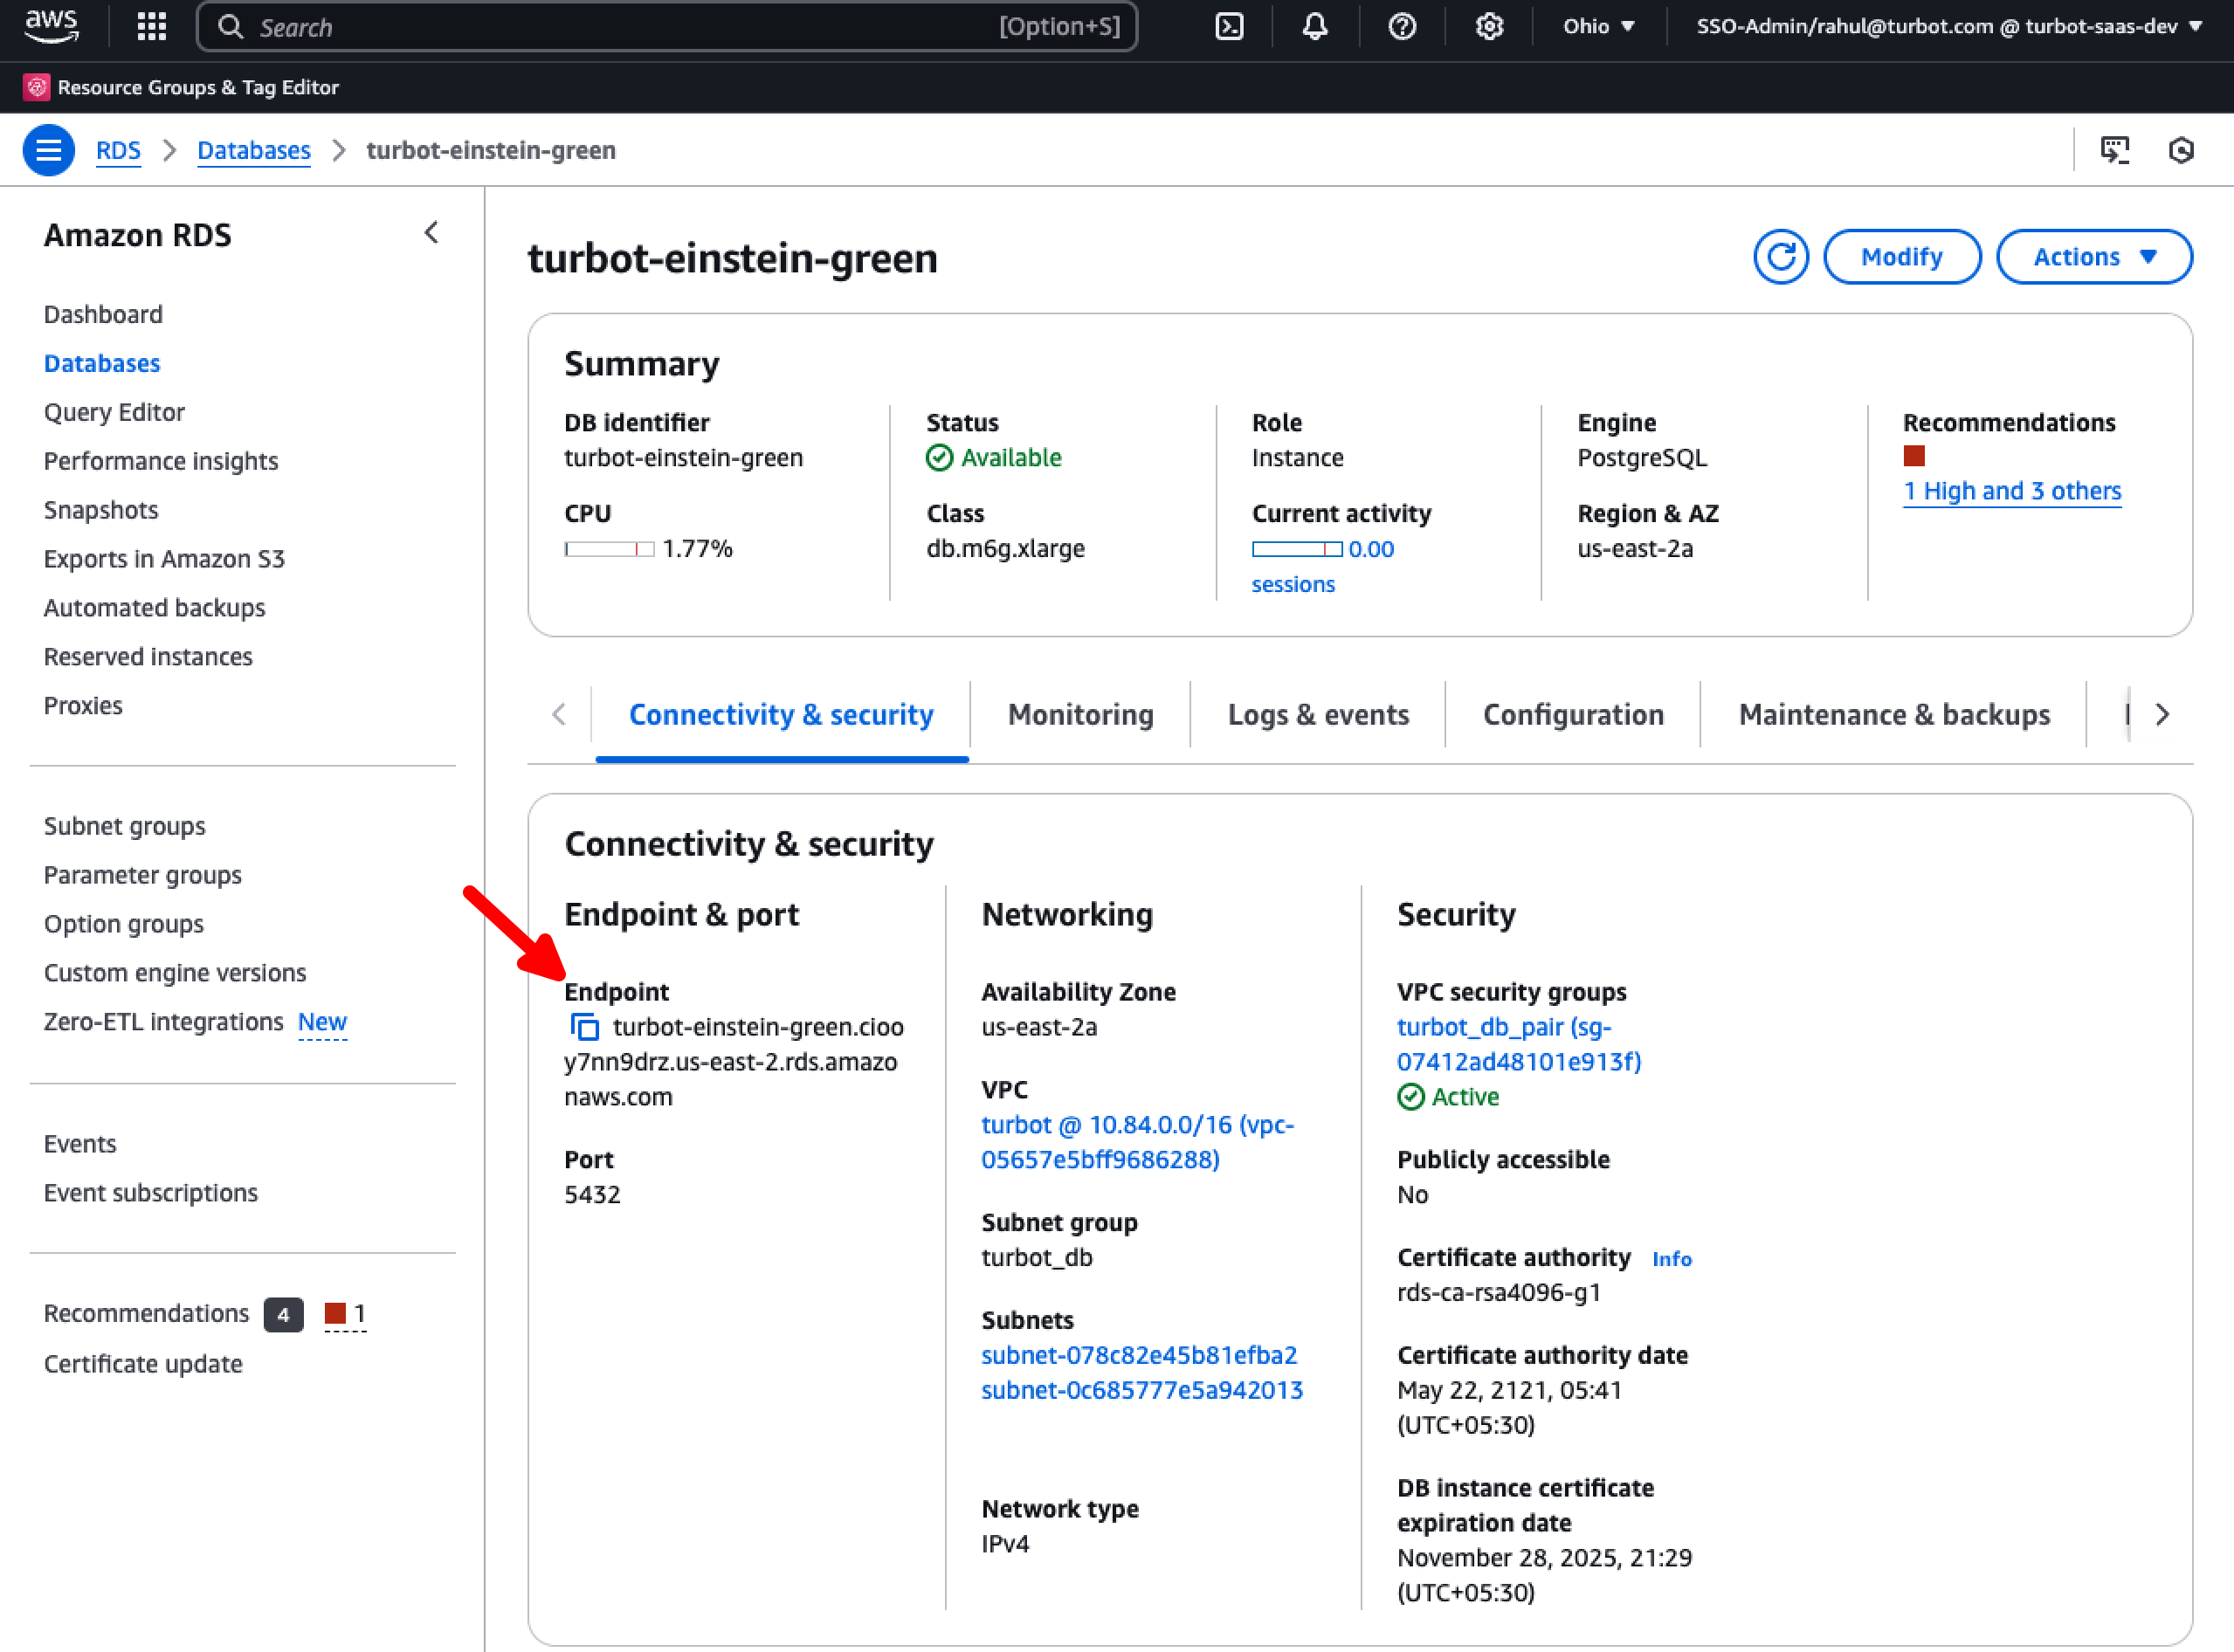
Set the source and target DB endpoints, available under the Connectivity & Security tab of the RDS DB instance, and export the pg password configured in Step 6.
export SOURCE=<source_db_endpoint>
export TARGET=<target_db_endpoint>
export PGPASSWORD=<master_password_set_in_step4>
Step 8: Create Publisher and Replication Slot in Source DB Instance
While continuing with the first bastion host session, execute the commands to create a publication and replication slot. Make a note of the output value for future use.
psql --host=$SOURCE --username=master --dbname=turbot
CREATE PUBLICATION pub_blue FOR ALL TABLES;
SELECT * FROM pg_create_logical_replication_slot('rs_blue', 'pgoutput');
[!WARNING] After creating replication slots, upgrading existing workspaces or creating new ones
will not be possibleuntil the process is complete. Additionally, no DDL changes can be performed during this time.
Step 9: Create Source DB PG Dump
[!TIP] A PG dump is required for following reasons:
- Initial Data Copy: It provides a consistent snapshot of the source database that can be used to initialize the target database before starting logical replication
- Data Consistency: The dump ensures all tables and data are copied in a transactionally consistent state, preventing data inconsistencies during migration
- Replication Starting Point: The dump establishes a known good starting point from which logical replication can begin catching up with any changes that occurred during and after the dump
- Backup Safety: The dump serves as a backup in case issues arise during the migration process
- Performance: Using a dump for the initial data copy is typically faster than relying solely on logical replication to copy the entire database
Establish a New Bastion Host Session
Set the transaction isolation level, and export a snapshot using these commands. This will be separate session than you are using in above step.
psql --host=$SOURCE --username=master --dbname=turbot
BEGIN TRANSACTION ISOLATION LEVEL REPEATABLE READ;
SELECT pg_current_wal_lsn(), pg_export_snapshot();
[!IMPORTANT] This does not create an actual snapshot but captures the current state of the database and assigns it an ID.
Keep this session open, as the snapshot ID will be used in the next step.
Create Snapshot
turbot=*> SELECT pg_current_wal_lsn(), pg_export_snapshot();
 pg_current_wal_lsn | pg_export_snapshot
--------------------+---------------------
 AC96/49F46070      | 00000062-000182C4-1
(1 row)
Start PG Dump
In a new session, initiate the pg_dump process using the snapshot ID obtained from the previous step:
nohup time pg_dump -h $SOURCE -U master --snapshot="00000062-000182C4-1" -F c -b -v -f data.dump turbot > dump.log 2>&1 &
[!CAUTION] Enabling logical replication before a long pg_dump/restore can lead to WAL buildup and storage exhaustion. It is recommended to enable RDS storage autoscaling to prevent out-of-space errors during migration.
Monitor
Check the dump.log file to confirm the process has begun. Look for log entries indicating table contents are being dumped.
[!TIP] Wait for the table content dump to be started.
cat dump.log
Once pg_dump is running, return to the first bastion host session which has the transaction isolation set and rollback the transaction isolation settings.
ROLLBACK;
[!IMPORTANT] This process may take several hours, depending on the size of the database dump. The purpose of using the
nohupcommand is to ensure that the pg_dump process continues to run even if the session is terminated.
Check the process is running or not during the monitoring.
ps aux | grep pg_dump
Once complete, check for errors in the dump file.
cat dump.log | grep error
cat dump.log
If no error is visible in the dump.log, move to next step.
Step 10: Restore Dump in Target Database
Start PG Restore
Restore the database in the target DB instance i.e. turbot-einstein-green here.
nohup time pg_restore -h $TARGET -U master --verbose --no-publications --no-subscriptions --clean --if-exists -d turbot data.dump > restore.log 2>&1
[!IMPORTANT] The restore process may take several hours. Periodically run
ps auxto check if thepg_restoreprocess is still active.
Monitor
ps aux | grep pg_restore
Check for any errors in the restore process.
cat restore.log | grep error
If no error except few trigger, deadlock related errors is visible in the restore.log, move to next step.
Example of Probable Error
pg_restore: error: could not execute query: ERROR: deadlock detected - 1
pg_restore: error: could not execute query: ERROR: operator does not exist: public.ltree = public.ltree - 264
Step 11: Create Subscription in the Target DB Instance
[!TIP] Creating a subscription in the target database is required to:
- Establish a logical replication connection between source and target databases
- Enable continuous data synchronization after the initial data restore
- Ensure any changes made to the source database during migration are replicated to the target
- Minimize downtime by keeping both databases in sync until the final cutover
Create a subscription in the target database.
psql --host=$TARGET --username=master --dbname=turbot
CREATE SUBSCRIPTION sub_blue CONNECTION 'host=<SOURCE DB IDENTIFIER> port=5432 password=<MASTER PASSWORD> user=master dbname=turbot' PUBLICATION pub_blue WITH (
        copy_data = false,
        create_slot = false,
        enabled = false,
        synchronous_commit = false,
        connect = true,
        slot_name = 'rs_blue'
    );
SELECT * FROM pg_replication_origin;
Sample output as below and save the value to be used in the next step.
turbot=> SELECT * FROM pg_replication_origin;
 roident |   roname
---------+------------
       1 | pg_1846277
(1 row)
Execute below to advance the replication point
SELECT pg_replication_origin_advance('output_from_step_above','lsn_of_starting_point');
ALTER SUBSCRIPTION sub_blue ENABLE;

e.g.
SELECT pg_replication_origin_advance('pg_1846277','AC96/49F46070');
ALTER SUBSCRIPTION sub_blue ENABLE;
The value AC96/49F46070 is derived from this step.
Monitor Progress
Execute the following command in the source database to monitor the replication progress. Proceed to the next steps once the lsn_distance reaches 0, by executing following command. Wait for lsn_distance to reach 0 at-least once.
psql --host=$SOURCE --username=master --dbname=turbot
SELECT slot_name, confirmed_flush_lsn as flushed, pg_current_wal_lsn(), (pg_current_wal_lsn() - confirmed_flush_lsn) AS lsn_distance FROM pg_catalog.pg_replication_slots WHERE slot_type = 'logical';
Step 12: Add Triggers
[!TIP] Triggers are required for following reasons:
- During database migration, triggers are not automatically copied from the source to target database
- These triggers are essential for maintaining data integrity and relationships, particularly for path-based hierarchies in Turbot Guardrails
- The triggers handle automatic updates of path columns when parent-child relationships change
- Without these triggers, hierarchical data structures (like resource types, control categories, etc.) would not maintain proper relationships
- They must be created before the database becomes active to ensure data consistency from the first operation
Execute the commands on the target database to set local search path and create Triggers. Replace the $WORKSPACE_SCHEMA with the actual schema name.
Workspace schemas can be retrieved by executing the \dn command.
psql --host=$TARGET --username=master --dbname=turbot
set local search_path to $turbot_schema, public;
create trigger control_category_path_au after update on $turbot_schema.control_categories for each row when (old.path is distinct from new.path) execute procedure $turbot_schema.types_path_au('controls', 'control_category_id', 'control_category_path');
create trigger control_resource_category_path_au after update on $turbot_schema.resource_categories  for each row when (old.path is distinct from new.path) execute procedure $turbot_schema.types_path_au('controls', 'resource_category_id', 'resource_category_path');
create trigger control_resource_types_path_au after update on $turbot_schema.resource_types for each row when (old.path is distinct from new.path) execute procedure $turbot_schema.types_path_au('controls', 'resource_type_id', 'resource_type_path');
create trigger control_types_path_au after update on $turbot_schema.control_types for each row when (old.path is distinct from new.path) execute procedure $turbot_schema.types_path_au('controls', 'control_type_id', 'control_type_path');
create trigger policy_category_path_au after update on $turbot_schema.control_categories  for each row when (old.path is distinct from new.path) execute procedure $turbot_schema.types_path_au('policy_values', 'control_category_id', 'control_category_path');
create trigger policy_resource_category_path_au after update on $turbot_schema.resource_categories  for each row when (old.path is distinct from new.path) execute procedure $turbot_schema.types_path_au('policy_values', 'resource_category_id', 'resource_category_path');
create trigger policy_resource_types_path_au after update on $turbot_schema.resource_types for each row when (old.path is distinct from new.path) execute procedure $turbot_schema.types_path_au('policy_values', 'resource_type_id', 'resource_type_path');
create trigger policy_types_path_au after update on $turbot_schema.policy_types for each row when (old.path is distinct from new.path) execute procedure $turbot_schema.types_path_au('policy_values', 'policy_type_id', 'policy_type_path');
create trigger resource_resource_category_path_au after update on $turbot_schema.resource_categories for each row when (old.path is distinct from new.path) execute procedure $turbot_schema.types_path_au('resources', 'resource_category_id', 'resource_category_path');
create trigger resource_resource_type_path_au after update on $turbot_schema.resource_types for each row when (old.path is distinct from new.path) execute procedure $turbot_schema.types_path_au('resources', 'resource_type_id', 'resource_type_path');
create trigger resource_types_500_rt_path_update_au after update on $turbot_schema.resource_types for each row when (old.path is distinct from new.path) execute procedure $turbot_schema.update_types_path();
[!NOTE] The above script must be executed for no of workspaces separately if they are part of the same database.
Any additional new trigger will be updated here in future state.
Step 13: Test Data
Run the following queries to compare the count of functions, triggers, indexes, and constraints between the source and target databases:
Trigger
SELECT count(trigger_name), trigger_schema FROM information_schema.triggers group by trigger_schema;
Indexes
SELECT n.nspname AS schema_name, COUNT(i.indexname) AS index_count FROM pg_catalog.pg_indexes i JOIN pg_catalog.pg_namespace n ON i.schemaname = n.nspname WHERE n.nspname NOT IN ('pg_catalog', 'information_schema') GROUP BY n.nspname ORDER BY index_count DESC;
Functions
SELECT n.nspname AS schema_name, p.proname AS function_name FROM pg_catalog.pg_proc p LEFT JOIN pg_catalog.pg_namespace n ON n.oid = p.pronamespace WHERE n.nspname IN ('pg_catalog');
Constraints
SELECT n.nspname AS schema_name, COUNT(c.conname) AS constraint_count FROM pg_catalog.pg_constraint c JOIN pg_catalog.pg_namespace n ON c.connamespace = n.oid WHERE n.nspname NOT IN ('pg_catalog', 'information_schema') GROUP BY n.nspname ORDER BY constraint_count DESC;
Trigger Count by Status
SELECT count(tgname), tgenabled FROM pg_trigger GROUP by tgenabled;
Step 14: Rename DB Instances
Pause Events
Similar to Step 1 > Pause Events
Modify DB Instance
After proper validation of data consistencies, it's time to interchange the DB names as below in AWS RDS console.
Rename the original (source) instance by appending -blue to its name e.g. from turbot-einstein to turbot-einstein-blue.
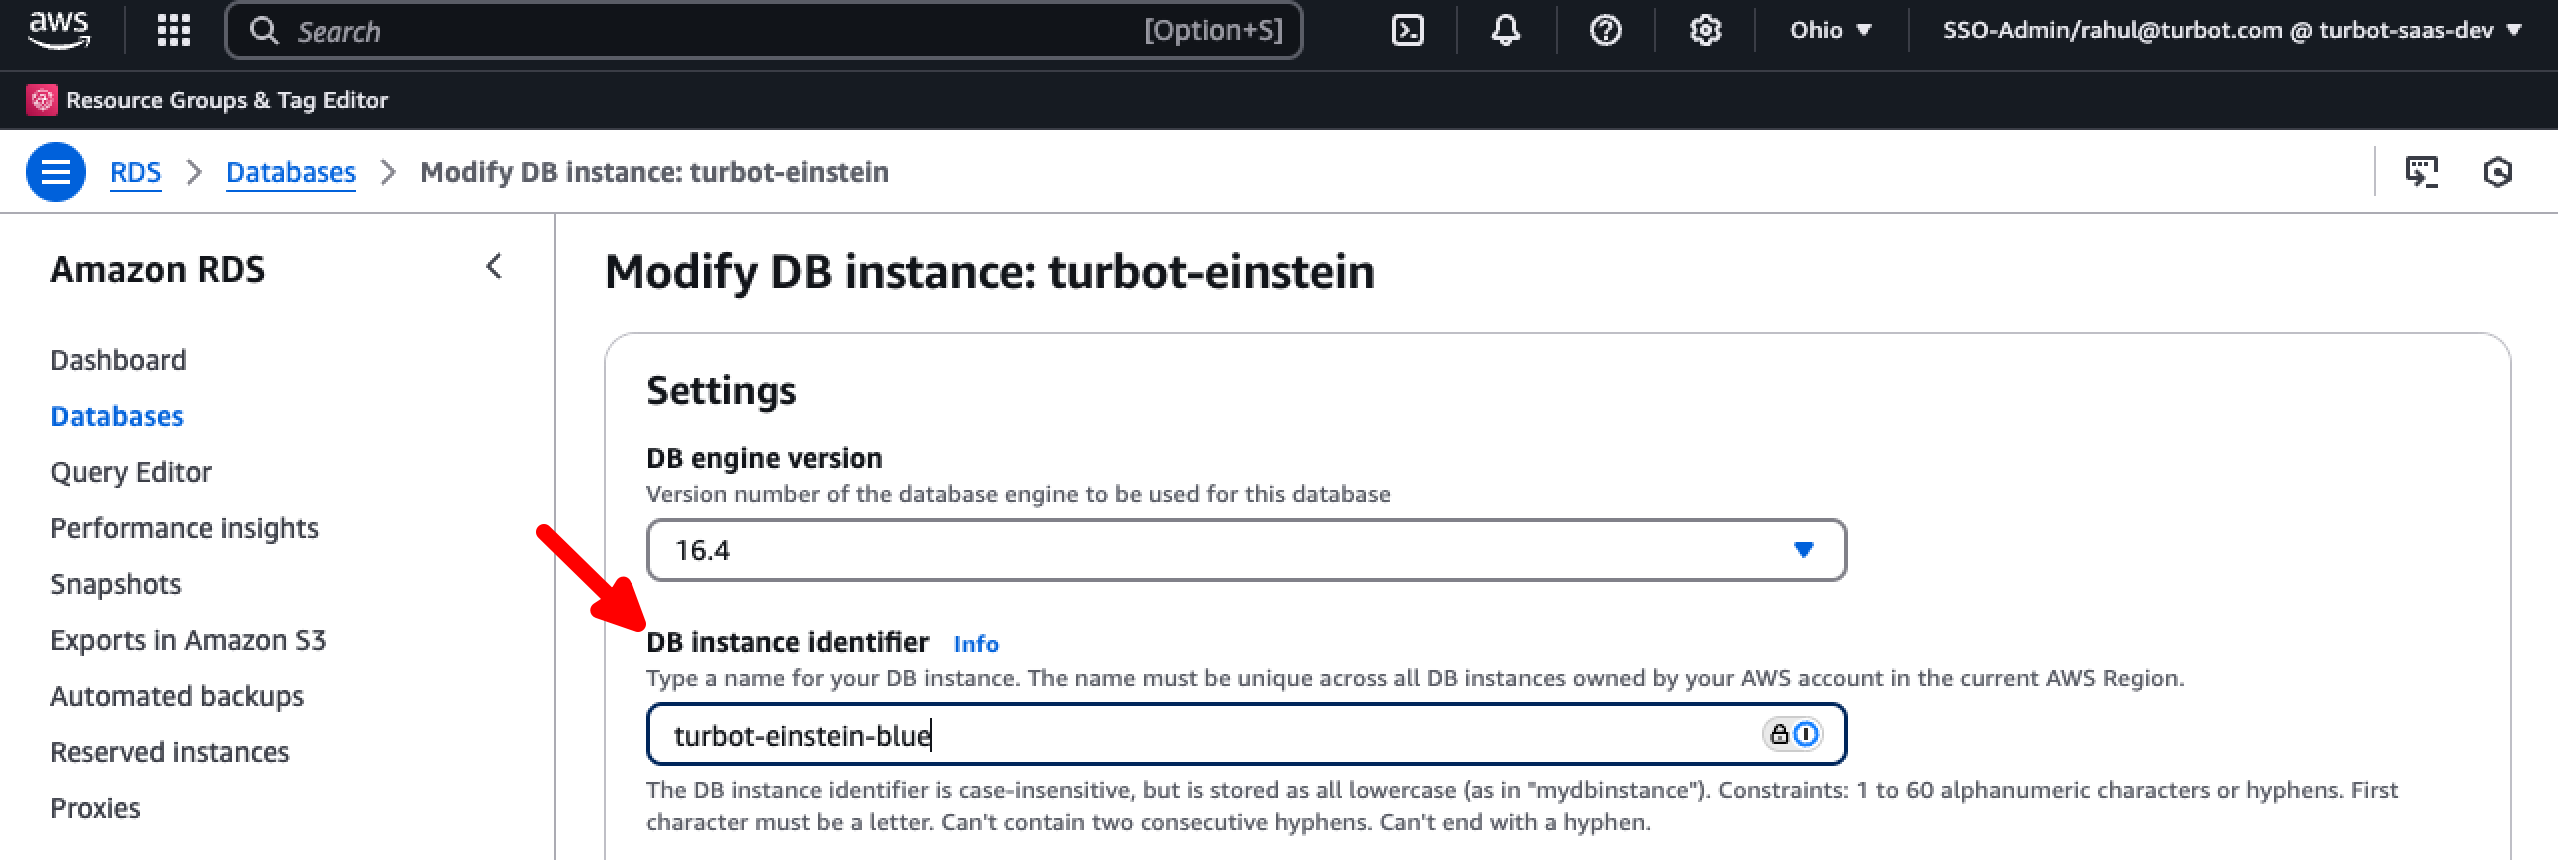
Rename the new target instance by removing the -green suffix e.g. from turbot-einstein-green to turbot-einstein.

At this stage the workspace is now pointing to the new target DB with the earlier used RDS DB instance endpoint.
Start Events
Now enable event processing. Refer Enable the events.
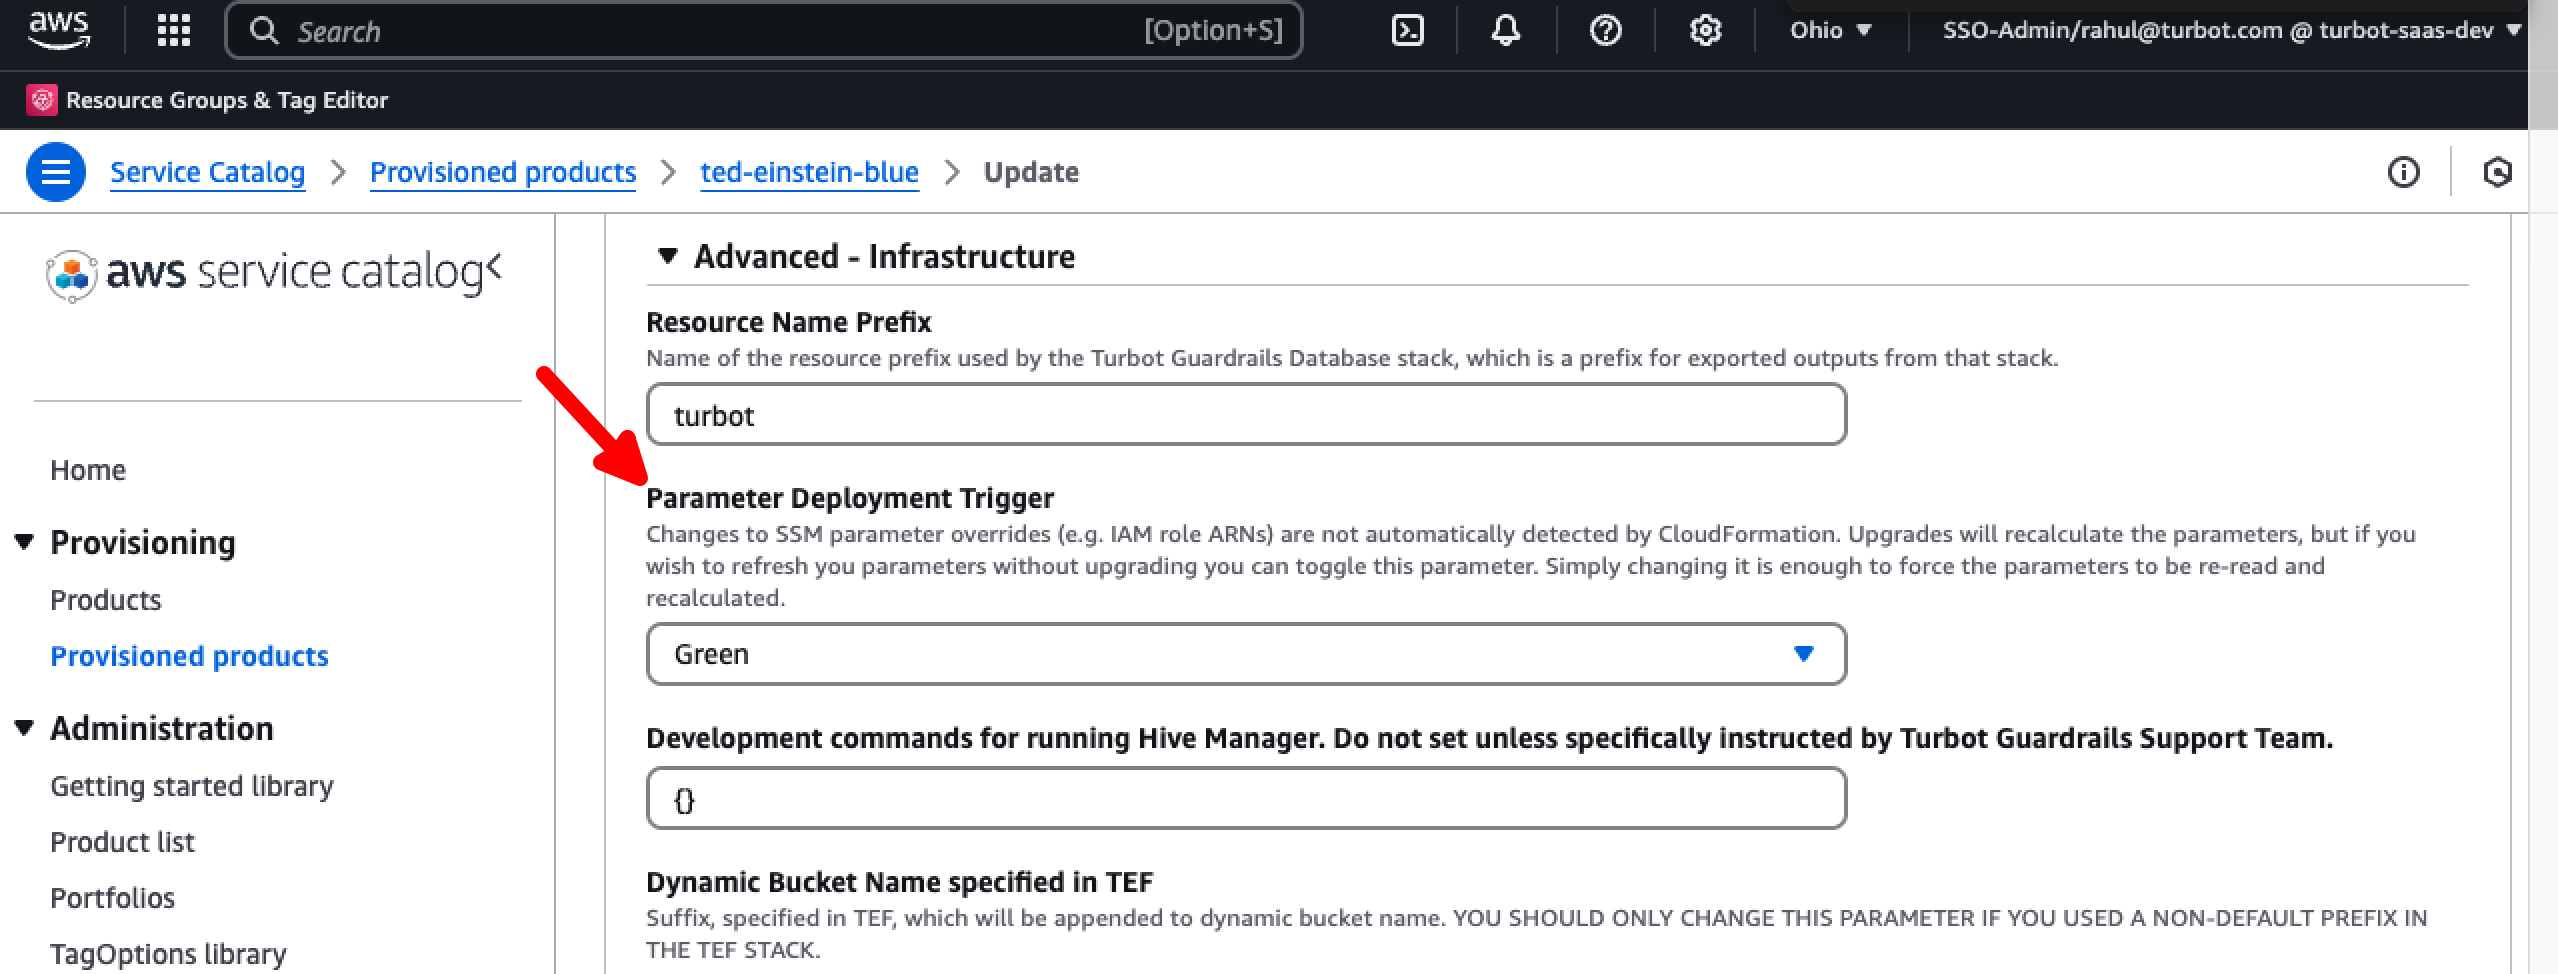
Step 15: Update Original TED Stack
It's important to update the original TED stack e.g. (ted-einstein) with parameter values of new TED stack (ted-einstein-green) we created in Step 2 DB Upgrade.
[!IMPORTANT] Do not change
Custom Hive Keyparameter
Refer the parameters used in Step 2: Provision New Database Instance
Execute green<>blue Deployment
This will reset the master password along with other applicable parameters.
Step 16: Run Smoke Tests
Run smoke tests to Test both the restored and new database instances to confirm the upgrade.
-
Validate the Count of Controls
- Pre
- Post
-
Validate the Count of Resources
- Pre
- Post
-
Validate the Count of Active Controls
- Pre
- Post
-
Ensure all controls are running as expected.
-
Confirm events are functioning properly.
-
Verify grants are working correctly.
-
Ensure stacks are functioning as intended.
Step 17: Clean Up
After verifying a successful upgrade and switchover, delete the new TED stack i.e turbot-einstein-green and remove its associated resources such as the S3 bucket, CloudWatch log groups, and AWS Backup configurations. Clean up replication slots and subscriptions.
In Case of Upgrade Failure or Aborted Migration
If the database upgrade fails or is manually aborted before completion, it’s important to clean up replication artifacts from the source database to avoid lingering replication objects and ensure a clean state for future upgrade attempts.
Run the following SQL commands on the source (blue) database to drop replication artifacts:
-- Check for existing publications
SELECT * FROM pg_publication;

-- Drop the publication used for replication
DROP PUBLICATION pub_blue;

-- Check for replication slots
SELECT * FROM pg_replication_slots;

-- Drop the replication slot used for streaming
SELECT * FROM pg_drop_replication_slot('rs_blue');

-- Check for existing subscriptions
SELECT * FROM pg_subscription;

-- Drop the subscription created during upgrade
DROP SUBSCRIPTION sub_blue;
Example:
Here's an example showing how to check for and clean up a leftover publication:
select * from pg_publication indicates the presence of left over PUBLICATION pub_blue, this needs to be dropped. Recheck after dropping the PUBLICATION
turbot=> select * from pg_publication
turbot-> ;
    oid     | pubname  | pubowner | puballtables | pubinsert | pubupdate | pubdelete | pubtruncate | pubviaroot
------------+----------+----------+--------------+-----------+-----------+-----------+-------------+------------
 2142597123 | pub_blue |    16397 | t            | t         | t         | t         | t           | f
(1 row)

turbot=> DROP PUBLICATION pub_blue;
DROP PUBLICATION

turbot=> select * from pg_publication
;
 oid | pubname | pubowner | puballtables | pubinsert | pubupdate | pubdelete | pubtruncate | pubviaroot
-----+---------+----------+--------------+-----------+-----------+-----------+-------------+------------
(0 rows)
Also, make sure to delete associated resources created as part of the upgrade attempt:
- S3 bucket
- CloudWatch Log Groups
- AWS Backup plans and vaults
- Any temporary RDS instances or TED-related infrastructure
Step 18: Disable and Delete Subscriptions
Disable and delete subscription and replication slots.
select * from pg_subscription;
alter subscription sub_blue disable;
alter subscription sub_blue set (slot_name=none);
drop subscription sub_blue;
Troubleshooting
| Issue | Description | Guide |
|---|---|---|
| Permission Issues | If the current logged-in user lacks permission to modify, update, or create resources in the stack, or if IAM roles or SCPs have changed, preventing built-in roles from accessing needed configuration settings. | Troubleshoot Permission Issues |
| Further Assistance | If you continue to encounter issues, please open a ticket with us and attach the relevant information to assist you more efficiently. | Open Support Ticket |