Import a GCP Project
Import a GCP Project into Guardrails
In this guide, you will:
- Learn how to import a Google Cloud Platform (GCP) project into Turbot Guardrails. This process allows Guardrails to discover and manage resources across the project.
- Monitor and troubleshoot the process.
Process Overview
In the GCP Console
- Create a service account for Guardrails to use. Must be in the form of
{service-account-name}@{project_id}.iam.gserviceaccount.com. Personal or corporate email addresses may not be used. - Assign appropriate permissions to the Guardrails service account.
- Create a secret key.
- Enable the Cloud Resource Manager, and Service Management. Enable any other required Google APIs for GCP services that Guardrails may interact with. (Note: beyond the Cloud Resource Manager and Service Management APIs enabled, Guardrails can be configured to automatically enable other GCP APIs on your behalf).
- Ensure Billing is enabled.
In the Guardrails Console
- If not installed already, install at least the gcp mod. Check out our Mods recommendation page for more info on suggested mods to install alongside the base GCP mod.
- Import the project
- If not already complete, set the appropriate
GCP > {Service} > API Enabledpolicies toEnforce: Enabled. Guardrails cannot complete the discovery process for services with disabled APIs.
What Permissions to Grant
Which permissions you grant to Guardrails will depend on your organization's requirements.
-
Full Remediation
- To take advantage of every GCP integration offered by Guardrails (recommended),
assign the
Ownerrole to the service account.
- To take advantage of every GCP integration offered by Guardrails (recommended),
assign the
-
Mixed Remediation + Event Handlers:
- Customers can build a custom role or collection of standard roles that meet
their requirements. Guardrails will use whatever permissions are granted. If
Guardrails is asked to do something without sufficient permissions, then
Access Deniederrors will appear in the Guardrails console. Resolve these errors by granting additional permissions or altering the set Guardrails policies to match.
- Customers can build a custom role or collection of standard roles that meet
their requirements. Guardrails will use whatever permissions are granted. If
Guardrails is asked to do something without sufficient permissions, then
-
Readonly + Event Handlers: To enable read-only access for Guardrails with Event Handler support, assign the following roles:
- To get ReadOnly Access + Event Handlers, assign these roles:
ViewerPub/Sub AdminLogging Admin- Or, to strictly limit Guardrails write access in the account to only event handling resources, build a role with the following permissions. Convenient Terraform templates can be found below.
- To get ReadOnly Access + Event Handlers, assign these roles:
-
Readonly + Event Pollers: To enable read-only access for Guardrails with Event Poller support, assign the following roles:
ViewerLogging Read- An additional custom role that includes the
pubsub.topics.getIamPolicyandstorage.buckets.getIamPolicypermissions. (Required for discovery on Pub/Sub Topics and Storage Buckets).
Creating a Guardrails service account within the GCP Project
Service Accounts
Turbot Support recommends creating a service account for each project. A discussion of multiple projects per service account can be found in the service accounts documentation.
Creating a Service Account in the GCP Console
- In the Google Cloud console, go to the Create service account page.
- Go to Create service account and select a GCP project.
- Enter a service account name to display in the Google Cloud console.
- The Google Cloud console generates a service account ID based on this name. Edit the ID if necessary. You cannot change the ID later.
- To set access controls now, click Create and continue and continue to the next step.
- Choose one or more IAM roles to grant to the service account on the project. If necessary, create a custom role with the required permissions.
- Click Done to finish creating the service account.
- Create a service account key. After key creation, download the JSON key type file.
Head on over to Google's documentation on creating a service account if you need additional assistance. For info on creating the service role via the CLI, refer to the bottom of this page.
Creating a Service Account via the GCloud CLI
If you do not have access to create the service account via the console, follow these steps to create the service account, assign it the owner role, and generate an access key. Then refer to above for account import.
- Create a service account.
$ gcloud iam service-accounts create --project=your-project-id  guardrails-service-owner
Created service account [guardrails-service-owner].
- Assign the owner role.
$ gcloud projects add-iam-policy-binding your-project-id --member=serviceAccount:[email protected] --role=roles/owner
Updated IAM policy for project [your-project-id].
bindings:
- members:
  - serviceAccount:[email protected]
etag: BwWK_UiAW44=
version: 1
- Generate an access key for the service account.
$ gcloud iam service-accounts keys create --iam-account=guardrails-service-owner@your-project-id.iam.gserviceaccount.com key.json
created key [1402f86298e8a44e4d0a32cf5ec3a7241a4008cc] of type [json] as [key.json] for [[email protected]]
- The private_key in the key.json from the previous command will be a required secret to import the project into a Guardrails workspace. Guardrails will need the text in multi-line format. This simply means that the text cannot be a single, long string. For example, the private key might look as follows:
$ cat key.json | jq -r .private_key
-----BEGIN PRIVATE KEY-----
MIIEvQIBADANBgkqhkiG9w0BAQEFAASCBKcwggSjAgEAAoIBAQClvph2e9f6Dl/H
xxxxxxxxxxxxxxxxxxxxxxxxxxxxxxxxxxxxxxxxxxxxxxxxxxxxxxxxxxxxxxxx
xxxxxxxxxxxxxxxxxxxxxxxxxxxxxxxxxxxxxxxxxxxxxxxxxxxxxxxxxxxxxxxx
xxxxxxxxxxxxxxxxxxxxxxxxxxxxxxxxxxxxxxxxxxxxxxxxxxxxxxxxxxxxxxxx
<truncated>
xxxxxxxxxxxxxxxxxxxxxxxxxxxxxxxxxxxxxxxxxxxxxxxxxxxxxxxxxxxxxxxx
xxxxxxxxxxxxxxxxxxxxxxxxxxxxxxxxxxxxxxxxxxxxxxxxxxxxxxxxxxxxxxxx
xxxxxxxxxxxxxxxxxxxxxxxxxxxxxxxxxxxxxxxxxxxxxxxxxxxxxxxxxxxxxxxx
Pwd0PmmSB1U3h3+Ued/eDhw=
-----END PRIVATE KEY-----
Custom Roles for Event Handling
The Guardrails GCP Event Handlers depend on the Pub/Sub and Logging services. The custom role definitions and conditionals described below are sufficient to manage the event handler infrastructure in the project.
Logging
The custom role below enumerates the required write permissions for GCP Logging. These permissions assume that the Guardrails service role also has read-only access to GCP Logging.
Condition: resource.name.endsWith("turbot_gcp_event_sink")
resource "google_project_iam_custom_role" "guardrails_logging_role" {
  role_id     = "guardrails_logging"
  title       = "Guardrails Logging Maintainer"
  description = "A role for Guardrails to deploy, manage and destroy Logging resources for Guardrails Event Handling."
  permissions = [
    "logging.sinks.create",
    "logging.sinks.delete",
    "logging.sinks.update"
  ]
}
Note: While rare, if the GCP > Turbot > Event Handlers > Logging > Sink > Name Prefix policy is set to something other than the default value, the condition listed above will need to be updated to the new prefix.
Pub/Sub
The custom role below enumerates the required write permissions for GCP Logging. These permissions assume that the Guardrails service role also has read-only access to GCP Pub/Sub.
Condition:
resource.name.startsWith("projects/_/topics/turbot_gcp_event_handler")
resource "google_project_iam_custom_role" "guardrails_event_handler_role" {
  role_id     = "guardrails_event_handlers"
  title       = "Guardrails Event Handler Maintainer"
  description = "A role for Guardrails to deploy, manage and destroy for Pub/Sub resources for Guardrails Event Handler infrastructure."
  permissions = [
    "pubsub.subscriptions.create",
    "pubsub.subscriptions.delete",
    "pubsub.subscriptions.setIamPolicy",
    "pubsub.subscriptions.update",

    "pubsub.topics.attachSubscription",
    "pubsub.topics.detachSubscription",
    "pubsub.topics.create",
    "pubsub.topics.delete",
    "pubsub.topics.setIamPolicy",
    "pubsub.topics.update",
    "pubsub.topics.updateTag"
  ]
}
Note: While rare, if the GCP > Turbot > Event Handlers > Pub/Sub > Topic > Name Prefix policy is set to something other than the default value, the condition listed above will need to be updated to the new prefix.
Cloud Resource Manager and Service Management APIs
The Cloud Resource Manager and Service Management API will need to be enabled for proper functionality.
-
Via Console:
- Go to the APIs & Services service in the GCP console.
- Search for the Cloud Resource Manager API and select it.
- If it is not already enabled, click Enable
- Repeat steps 2 and 3 for the Service Management API.
-
Via CLI:
- Enable Cloud Resource Manager
$ gcloud services enable cloudresourcemanager.googleapis.com –-project=your-project-id
Operation "operations/acf.d2983634-c21e-480d-880f-16d060069925" finished successfully.
- Enable Service Management
gcloud services enable servicemanagement.googleapis.com –-project=your-project-id
Operation "operations/acf.cecc205f-3e9f-4707-86b5-9b22ded3f8db" finished successfully.
Enable Billing
Enable Billing for the project, if not already enabled. This may have been enabled at the Organization level already.
- Go to the API Console.
- From the projects list, select the project that is being imported into your Guardrails workspace.
- Open the console left side menu and select Billing.
- Click Enable billing. (If billing is already enabled then this option isn't available.)
- If you don't have a billing account, create one.
- Select your location, fill out the form, and click Submit and enable billing.
Go to GCP documentation for more information regarding the billing API.
Importing a GCP Project via the Guardrails Console
- Login to your Guardrails workspace as a Turbot/Owner or Turbot/Admin.
- Select the CONNECT card in the top right of the landing page.
- Select GCP.
- Select GCP Project.
- Select the
Import location(the imported project will be a child of this resource). - Select the
Access modeasUpload a credential file. - Drop the JSON file saved in the above step into the account import screen.
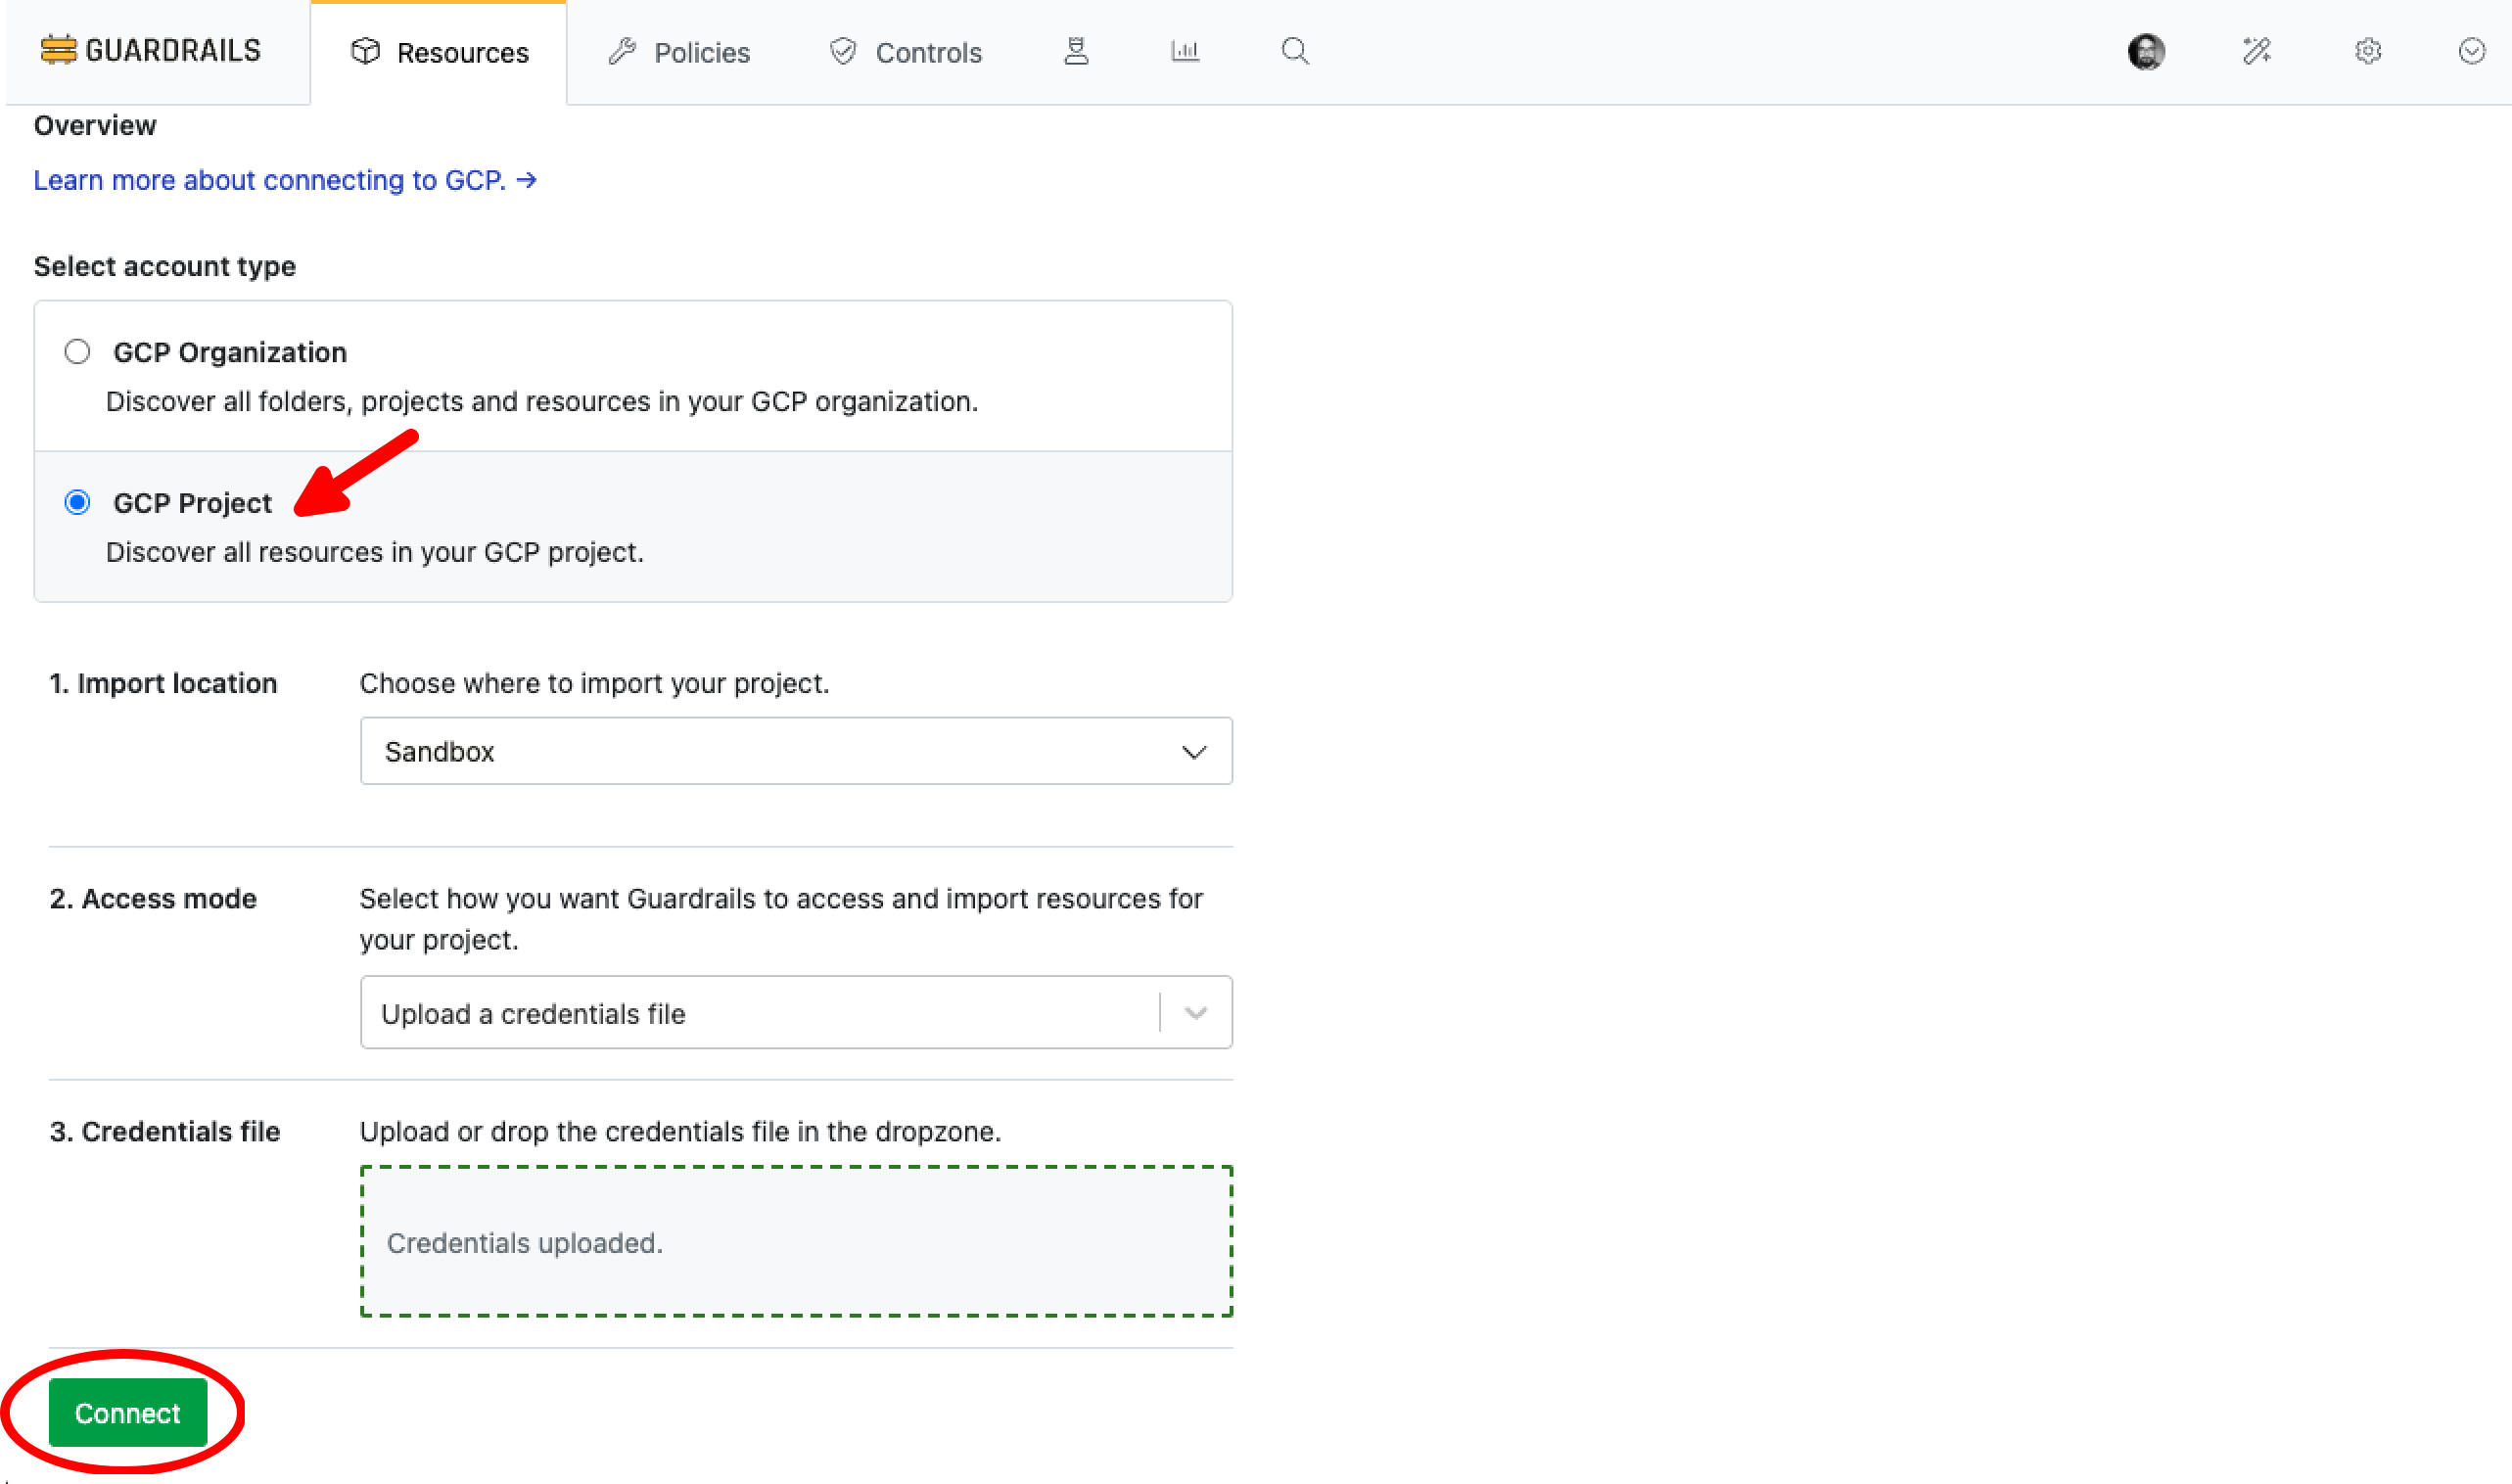
- Select Connect to start Guardrails discovery. You will be redirected to an account import splash page that shows you resources discovered in real time. If you see a large amount of errors, refer to the troubleshooting instructions below.
Troubleshooting
| Issue | Description | Guide |
|---|---|---|
| Access Denied: Missing Token Creator Role | If using Service Account Impersonation, the impersonating user or workload must have roles/iam.serviceAccountTokenCreator on the service account. |
Refer to the Service Account Token Creator Role Documentation. |
| Access Denied: Malformed Secret Key | Guardrails requires the multi-line format of the Secret Key. Ensure it includes the -----BEGIN PRIVATE KEY----- and -----END PRIVATE KEY----- headers. |
|
| Access Denied: Improper Client Email | Guardrails cannot use a non-service account email to access the project. Ensure the Client Email is in the form of {identifier}@{your-project-id}.iam.gserviceaccount.com. |
Check GCP Service Account Documentation. |
| Access Denied: Missing or Insufficient Permissions | If Guardrails is asked to discover, track, or remediate resources without the necessary permissions, access denied errors will appear in the Discovery and CMDB controls in the Guardrails console. Resolve by granting the required permissions. |
|
| Lots of Controls in Error State | If there were issues with credentials during project import, many Discovery controls may show an error state. You can either delete and reimport the project or rerun the controls in error using scripts provided in the Guardrails Samples Repo. |
Use the Python, Node, or Shell scripts. |
| GCP Service API Enabled Policies Aren't Set | If the GCP > {Service} > API Enabled policy is not set to Enforce: Enabled, Discovery and CMDB controls will be skipped. Enable the applicable service APIs manually if Guardrails lacks permissions to do so. |
Enable GCP APIs Documentation. |
| Further Assistance | If you continue to encounter issues, please open a ticket with us and attach the relevant information to assist you more efficiently. | Open Support Ticket. |