
Configuring Microsoft Entra ID (formerly Azure AD) and Guardrails
This guide details configuring a Guardrails application in Azure's Entra ID as well as the
directory in Guardrails. Administrator access in Entra ID and Turbot/Owner
permissions in Guardrails are required for configuration.
If SAML group syncing is desired, check out our Entra ID Group Sync guide after the SAML application has been verified to allow authentication.
Configuring Entra ID for Guardrails is a three-phase process.
- Initial app configuration in Entra ID
- Directory configuration and activation in the Guardrails console
- Finalizing configuration in Entra ID
Phase 1: Create the SAML App in Entra ID
Add a Non-Gallery Application
- Sign in to the Entra ID portal using your Microsoft identity platform administrator account.
- Select Enterprise Applications > New application.
- Select Create your own application. The Create your own application page appears.
- Type
Turbot Guardrailsas the display name for your new application. - Under What are you looking to do with your application? choose Integrate any other application you don't find in the gallery. This option is typically used for SAML and WS-Fed applications.
- Select Create. The application Overview page opens.
Configure User Sign-In Properties
- Select Properties to open the Properties pane for editing.
- Set the following options to determine how users who are assigned or
unassigned to the application can sign in to the application and if a user can
see the application in the access panel.
- Enabled for users to sign-in determines whether users assigned to the application can sign in.
- User assignment required determines whether users who aren't assigned to the application can sign in.
- Visible to user determines whether users assigned to an app can see it in the access panel and O365 launcher.
- Set the name as
Turbot Guardrails(or other appropriate name for your organization). - Homepage URL should be the URI of your Guardrails Console. For enterprise
installations, the hostname may look like:
https://console.turbot.company.com. For SaaS, it will look something likehttps://turbot-orgid.cloud.turbot.com. - Optional: To use a custom logo, create a logo that is 215 by 215 pixels, and save it in PNG format. Then browse to your logo and upload it. We have attached a graphic of appropriate size here:

Edit SAML Configuration
- Sign in to the Azure portal as a cloud application admin or an application admin for your Entra ID tenant.
- Navigate to Microsoft Entra ID > Enterprise applications then
select the Guardrails application from the list.
- To search for the application, in the Application Type menu, select All applications, and then select Apply. Enter the name of the application in the search box and then select the application from the results.
- Under the Manage section, select Single sign-on.
- Select SAML. The Setup Single Sign-On with SAML - Preview page appears.
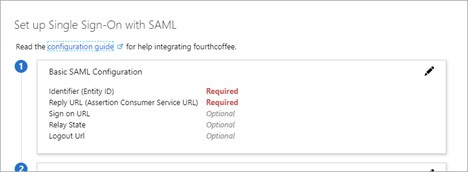
- To edit the basic SAML configuration options, select the Edit icon (pencil) in the upper-right corner of the Basic SAML Configuration section.
- Enter the following settings:
| Basic SAML Configuration setting | SP-Initiated | Description |
|---|---|---|
| Identifier | Required | https://{guardrails_console_url} |
| Reply URL | Required | https://{guardrails_console_url}/api/latest/directories/123451234512345/saml/callback |
| Sign-on URL | Required | https://{guardrails_console_url}/login |
| Reply State | Optional | Not Needed |
| Logout URL | Optional | Not Needed |
- Note that the Reply URL provided above is a placeholder. The final value will be available after the directory has been created in Guardrails.
Configure User Attributes and Claims
When a user authenticates into Guardrails, Entra ID issues a SAML token with information (or claims) about the user that uniquely identifies them. By default, this information includes the user's username, email address, first name, and last name. Guardrails requires specific attributes and claims as described below.
- In the User Attributes and Claims section, select the Edit icon (pencil) in the upper-right corner.

- Choose the Name Identifier Value. The default value is user.principalname. The user identifier uniquely identifies each user within the application. If the email address is both the username and the unique identifier, set the value to user.mail. If you use AD usernames then the appropriate value might also be sAMAccountName.
- To configure group claims, select the Edit icon for the Groups returned in claim field. For details, see Configure group claims.
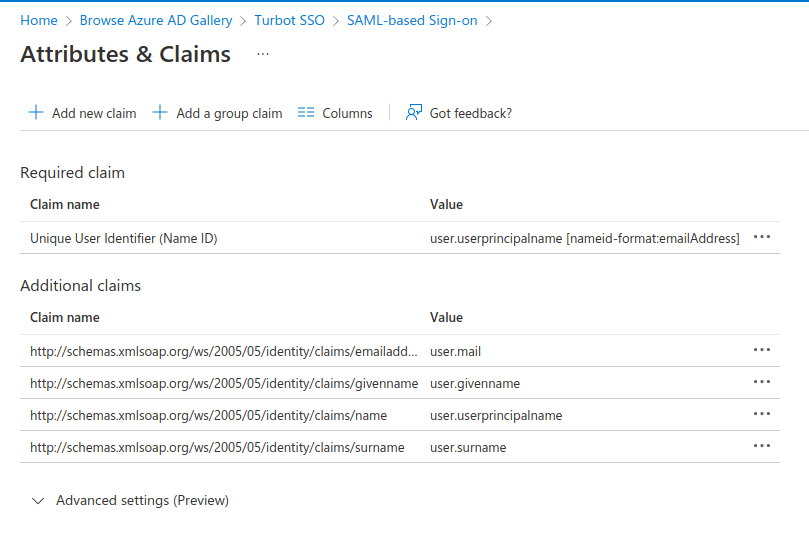
- Delete default claims as they are not formatted correctly for Guardrails.
Claim Names starting with
http://schemas.xmlsoap.org/should all be removed. If the default names are not removed and replaced as described below, Guardrails will not be able to get proper data for each user; resulting in blank data fields for each Guardrails profile. - To add a claim, select Add new claim at the top of the page. Enter the
Name and select the appropriate source from the table below. These are
the required values that Guardrails expects to see in the SAML Assertion.
- Guardrails requires all fields listed below.
- Please note that the Attribute names are CASE SENSITIVE.
- There may be some variations in which source attributes are used for which claim, dependent on the configuration of the organization's Active Directory. The most common configuration is provided in the below table.
| Attribute Name | Source | Source Attribute | Example |
|---|---|---|---|
| Email Address | user.mail | jdoe@company.com | |
| nameId | userPrincipalName, email or sAMAccountName | user.userprincipalname, user.mail, or user.samaccountname | jdoe |
| displayName | userPrincipalName or displayName | user.userprincipalname or user.displayname | John Doe |
| firstName | Givenname | user.givenname | John |
| lastName | Surname (sn) | user.surname | Doe |
Before
After
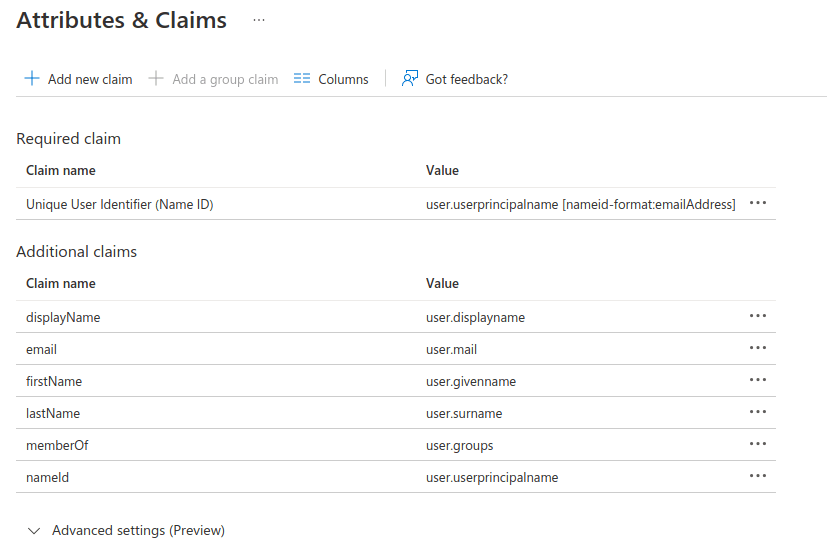
- Select Save. The new claims will appear in the table.
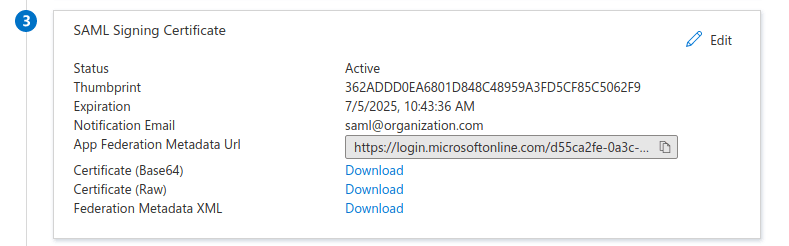
Get Certificate
- Download the Base64 encoded certificate. The file will start with
-----BEGIN CERTIFICATE-----on the first line. This will be required when configuring the directory in Guardrails.
Phase 2: Configure Directory in Guardrails
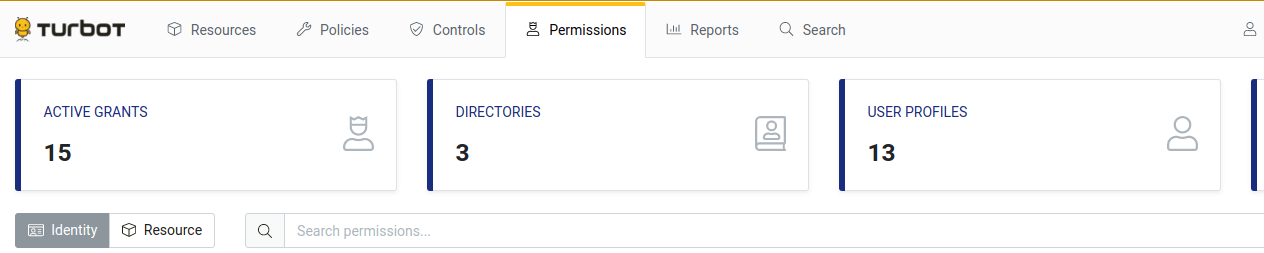
Log into your Guardrails workspace with
Turbot/Ownerpermissions at the Turbot level.Click the Permissions tab (designated with a king icon) in the top navigation bar.

Select the blue Directories button at the top.
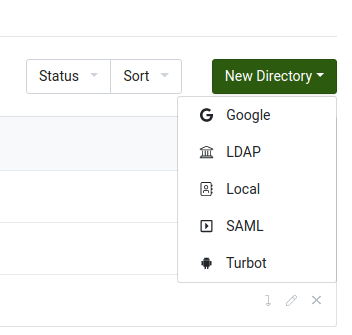
Select New Directory then click the SAML option. The Create SAML Directory window will pop up.
Enter the following information:
- Title: Title for the SAML directory. This will display at the login screen. A common title is "{Organization} SSO".
- Description: A description for the directory.
- Entry Point: The URL that Guardrails redirects the user to authenticate. This is the Login URL defined in the Entra ID SAML configuration.
- Issuer: The base Guardrails URL, i.e.
https://cloud.turbot.company.comfor enterprise installations. For SaaS, it will look something likehttps://turbot-orgid.cloud.turbot.com. - Certificate: Retrieve the Base64 certificate from the Entra ID SAML Configuration page, then paste the entire contents into this field.
- Profile ID Template: A template to generate the ID of the Guardrails profile for users authenticated through this directory. The ID MUST be unique for each profile in Guardrails, but it is possible to have multiple directories map users to the same ID. This CANNOT be changed unless the directory is new.
Expand the Groups section. If SAML group syncing is desired, follow the Entra ID group sync directions.
Name ID Format can generally be left as
unspecified. This can be flipped toEmail Addressas needed.The Signature section can be used to sign requests with a private key and signature algorithm. This is usually used only as an organizational requirement.
Advanced Configuration Options:
- Advanced > Allow IdP-Initiated SSO: Administrators have the option to allow IdP-initiated Single Sign-On (SSO)
logins.
Allowing IdP-initiated SSO carries inherent security risks. The lack of an InResponseTo attribute means that
Service Provider (SP)-solicited SAML assertions cannot be validated.
Before enabling this feature, thoroughly assess the potential security implications of not verifying the
InResponseTo field. Decisions regarding this setting are typically guided by an organization's security team, and
should be confirmed to align with security protocols prior to implementing the directory.
- Troubleshooting: If users encounter an error stating
InResponseTo is missing from responseduring SAML login, it indicates that the IdP-initiated SSO option needs to be enabled. Select the "Enabled" option to resolve this problem.
- Troubleshooting: If users encounter an error stating
- Advanced > Require Signed Authentication Response: If enabled, make sure you choose the Signing option to be "SIGN SAML response and assertion". The Signing option is available on the Signing Certificate page of Entra ID.
- Advanced > Strict Audience Validation: Administrators have the
option to enable strict audience validation. This should not be enabled
if the
Issuerfield above does not match the workspace URL.- Troubleshooting: If users encounter an error stating
SAML assertion audience mismatchduring SAML login, it indicates that the Strict Audience Validation should be disabled. Select the "Disabled" option to resolve this problem.
- Troubleshooting: If users encounter an error stating
- Advanced > Allow IdP-Initiated SSO: Administrators have the option to allow IdP-initiated Single Sign-On (SSO)
logins.
Allowing IdP-initiated SSO carries inherent security risks. The lack of an InResponseTo attribute means that
Service Provider (SP)-solicited SAML assertions cannot be validated.
Before enabling this feature, thoroughly assess the potential security implications of not verifying the
InResponseTo field. Decisions regarding this setting are typically guided by an organization's security team, and
should be confirmed to align with security protocols prior to implementing the directory.
Click the Create button.
Phase 3: Update the Callback URL in Entra ID
- Be sure to replace the default Reply URL in the Entra ID SAML
Configuration settings with the callback URL defined in the new directory.
This can be found by clicking on the pencil icon next to the new directory in
Guardrails. The Reply URL will look like
https://{turbot_console_url}/api/latest/directories/{directoryID}/saml/callback. The{directoryId}will be a 15-digit number.
Test the Configuration
- Activate the directory by clicking on the upward point arrow icon next to the new directory.
- Open a private browser session. Navigate to the Guardrails URL and select the new directory listed in the drop down menu. If the directory is not showing, check to see that the directory was successfully activated.
- Resolve any error messages that may pop up.
- After successful login, go to the user profile link in the top right corner.
Click the
Developerstab next toOverview. In theTerraformsidebar, all the profile data for this user will be displayed. If those fields are empty or contain incorrect/improper values then adjust the SAML Claims until fixed. Log out then log in again after each SAML claims adjustment. - If there are any residual user profiles with incorrect information, delete them before finishing.
- Congratulations! Entra ID SAML is now configured and can be used to authenticate users into Guardrails.
- Grant user permissions as appropriate.
As with other directories within Guardrails, an initial login will need to happen in order for the profile to be created, and then permissions can be assigned to the profile. Refer to our Permissions documentation on how to grant permissions to new users.