
Assigning Permissions in Guardrails
Permissions in Guardrails are extremely flexible to allow organizations to be granular in their application. A user can have permissions such as AWS/Admin, GCP/Metadata, or Turbot/Admin assigned at any level in the Guardrails hierarchy. However, there are prerequisites to assigning rights to specific user profiles.
Each directory type will have slightly different methods of creating users, but all profiles require users to log in to initiate Guardrails profile creation. Without a profile for the specific user, PERMISSIONS CANNOT BE ASSIGNED.
For more information regarding directory creation, head on over to our directories guide.
For a general Guardrails IAM overview, check out the IAM concepts page.
Permissions Tab
Administrators will assign permissions via the Permissions Tab.
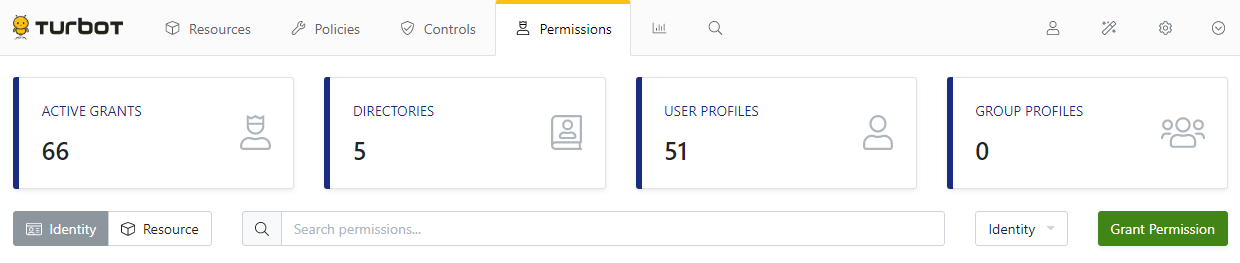
The default view is of Active Grants. These are currently assigned permissions.
By selecting the Identity option on the left and typing in a profile name, a list of matching profiles along with their grants appears.
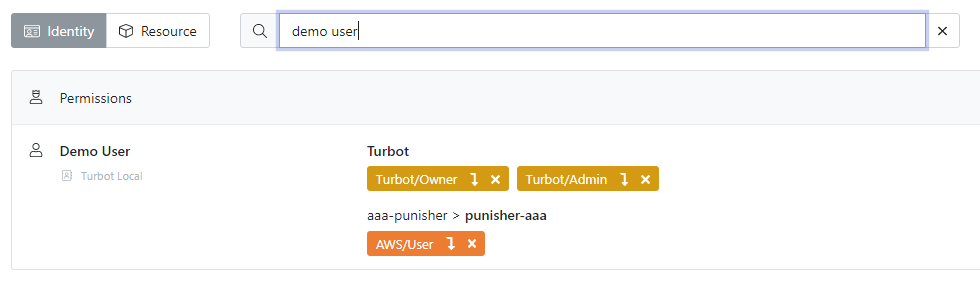
We can see that the Demo User is in the Turbot Local directory with
Turbot/Owner and Turbot/Admin permissions at the root level, along with
AWS/User permissions in the aaa-punisher > punisher-aaa account.
Turbot Local Directory
- Create the user in the local directory.
- Log into Guardrails with the credentials provided for the new user. This creates the profile in Guardrails.
- Using a profile with
Turbot/Ownerpermissions. navigate back to the Permissions tab and click on the green button titled Grant Permission. - Select Resource Scope for appropriate level (i.e. Turbot, account, or folder) to assign rights to the local user using the Browse button. Once the correct level is selected, click Select.
- Start typing the user name into the Identities field, then select the correct user. Multiple users can be assigned permissions at the same time.
- Start typing the grant level to assign into the Permissions field. For
example,
Turbotwill bring up a list of valid Guardrails permissions. Multiple permissions can be assigned at the same time. - Click Grant to confirm the permission assignment.
SAML and Google Directories
- After directory setup, users will be able to log into the Guardrails console. Users MUST sign in prior to initial permission assignment. Logging in with a user for the first time creates the associated profile in Guardrails.
- Using a profile with
Turbot/Ownerpermissions. navigate back to the Permissions tab and click on the green button titled Grant Permission. - Select Resource Scope for appropriate level (i.e. Turbot, account, or folder) to assign rights to the local user using the Browse button. Once the correct level is selected, click Select.
- Start typing the user or group name into the Identities field, then select the correct user. Multiple users and/or groups can be assigned permissions at the same time.
- Start typing the grant level to assign into the Permissions field. For
example,
Turbotwill bring up a list of valid Guardrails permissions. Multiple permissions can be assigned at the same time. - Click Grant to confirm the permission assignment.
Advanced Grant Settings
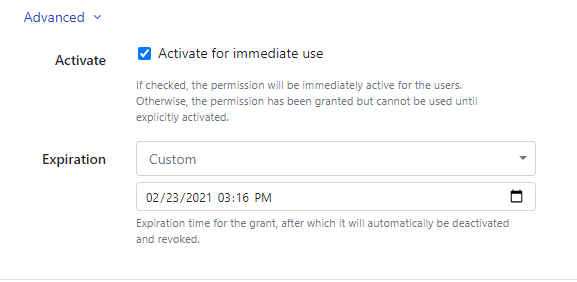
Activate
By default, permissions are activated immediately upon clicking the Grant button. Administrators can toggle this option to save the grant but delay activation for a later time.
Expiration
Grants can be set to expire after a defined amount of time. The drop down menu has many default time frames, from 1 hour to 1 year, as well as the ability to set a custom expiration time and date. This is extremely useful when troubleshooting accounts with strict access requirements, or temporarily elevating a developers permission set in a cloud account for development.