
Calculated Policies in 7 minutes
| Goal | Use calculated policies to dynamically determine policy values |
|---|---|
| Time | 7 minutes |
Overview
While most policy settings can be set with a simple static value, there may be instances where you need more flexibility in determining the correct option. Calculated policies allow you to dynamically compute policy values using any information in the Turbot Guardrails CMDB.
In this exercise, you will create a calculated policy to set the
AWS > S3 > Bucket > Tags > Template using the Turbot Guardrails Console.
By the end of this lab, you will be able to create and test calculated policies in the Turbot Guardrails Console.
Prerequisites
Install the aws and aws-s3 mods. This lab exercise uses policies in the
aws-s3mod, so it must be installed in your Workspace.You should be familiar with the basics of Managing Policies. You may want to start with the Policy Settings in 7 minutes lab.
You must have at least one S3 bucket that has been discovered in your workspace. It is recommended that you create a test bucket for this lab (or re-use the bucket you created for Policy Settings in 7 minutes)
Create/Edit the Policy Setting
- Log into the Turbot Guardrails Console as an Administrator (
Turbot/AdminorTurbot/Owner), then click the Policies tab. - Click the green New Policy Setting button.
- Search and select
AWS > S3 > Bucket > Tags > Templateas Policy Type. - In the Resource field, select the test bucket created in the Prerequisites setup. You can search for it by name, or Browse and select it.
- In the Setting section, click the link
Enable calculated mode. Then Launch calculated policy builder. This will allow you to create and test your calculated policy. - By default, the test bucket that you set in the Resource should be set as the Test Resource.
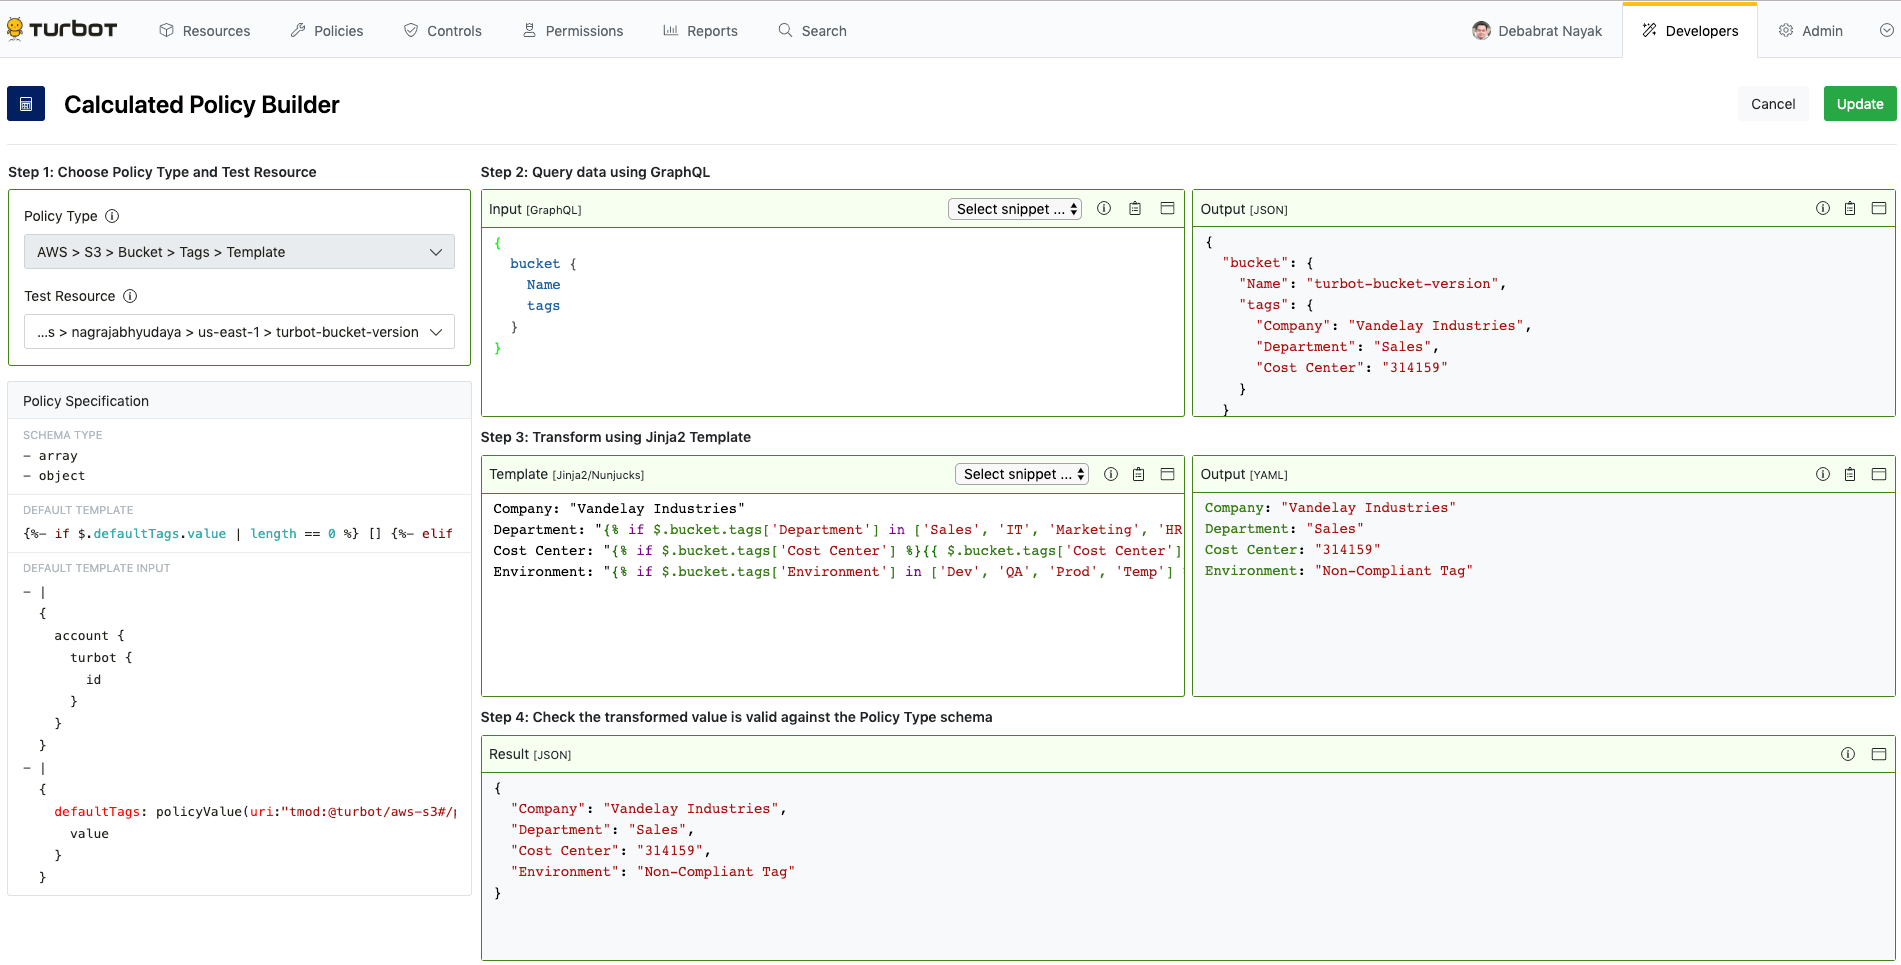
Define the GraphQL input query
To get information from the CMDB to use in our policy, you need to specify a GraphQL Query. Copy & paste this query into the Step 2: Query data using GraphQL field:
{ bucket { Name tags }}Note that the box to the right is populated with the results of your query against the Test Resource. For example:
{ "bucket": { "Name": "turbot-bucket-version", "tags": { "Company": "Vandelay Industries", "Department": "Sales", "Cost Center": "314159" } }}Create a template to format the results
The AWS > S3 > Bucket > Tags > Template expects the tags to be formatted yaml
object as a set of key: value pairs. You can use a
nunjucks template to transform the query
results into the format expected by the Policy Type.
Copy & paste this template into the Step 3: Transform using Jinja2 Template field. For example:
Company: "Vandelay Industries"Department: "{% if $.bucket.tags['Department'] in ['Sales', 'IT', 'Marketing', 'HR'] %}{{ $.bucket.tags['Department'] }}{% else %}Non-Compliant Tag{% endif %}"Cost Center: "{% if $.bucket.tags['Cost Center'] %}{{ $.bucket.tags['Cost Center'] }}{% else %}Non-Compliant Tag{% endif %}"Environment: "{% if $.bucket.tags['Environment'] in ['Dev', 'QA', 'Prod', 'Temp'] %}{{ $.bucket.tags['Environment'] }}{% else %}Non-Compliant Tag{% endif %}"The template uses standard nunjucks, allowing you to use conditional logic, iterate over items, and perform complex transformations of the data.
Notice that the results of rendering your template with the data from the input query are shown to the right of the template. The box at the bottom shows the final, rendered policy value after validation against the schema for the policy type.
Click Create to create this setting (or Update if you are updating an existing setting).
The policy value for this bucket will not be calculated. Any changes to the data in the input query will cause this policy to be re-calculated bases on the new values.
Note that you created this setting on the bucket itself, thus only this bucket will be affected. If you made the setting at a higher level in the hierarchy, it would apply to every bucket below. For example, setting this calculated policy at the AWS Account level would cause every S3 bucket in the account to calculate its own value, based on its own data in the CMDB.
Expand your query
Search and select
AWS > S3 > Bucket > Tags > Templatepolicy setting, and click EDIT to update it.Update the Graphql. Make the following changes to the query. For this exercise, you should type these changes -- do not cut and paste.
{ // highlight-start region { Name } // highlight-end bucket { Name tags }}
The GraphQL available in calculated policies is a super-set of the
Turbot Guardrails GraphQL API. The API is extended with dynamic
queries for the Turbot Guardrails Resource Type that automatically pivot based on the
context of the current resource. Notice in the example query that we added
region to the query - Guardrails assumes that we mean the region resource in
which this bucket resides. Likewise, you may use account and folder to get
information about account and folder above the bucket in the hierarchy.
You can discover the schema for these resources via auto-complete, or by viewing
the schema definition in the Inspect tab of the mod documentation.
The bucket query refers to the
S3 Bucket Schema, as an
example.
You can also view the schema by looking at the Explore page on an existing
resource. Occasionally, attributes may exist in the CMDB that are not explicitly
defined in the schema definition. You can use get to retrieve these items.
- Go to the Explore page for your test bucket resource. Notice that there
is a
Granteeattribute for this resource. - View the
S3 Bucket Schema definition.
Notice that
Granteeis not explicitly defined as an attribute. - To query the
Granteeattribute, you must use agetquery. Edit your query as follows:
{ region { Name } bucket { Name tags grantee: get(path: "Acl.Grants[0].Grantee") //highlight-line }}- Notice that the
granteeis now added to your query results.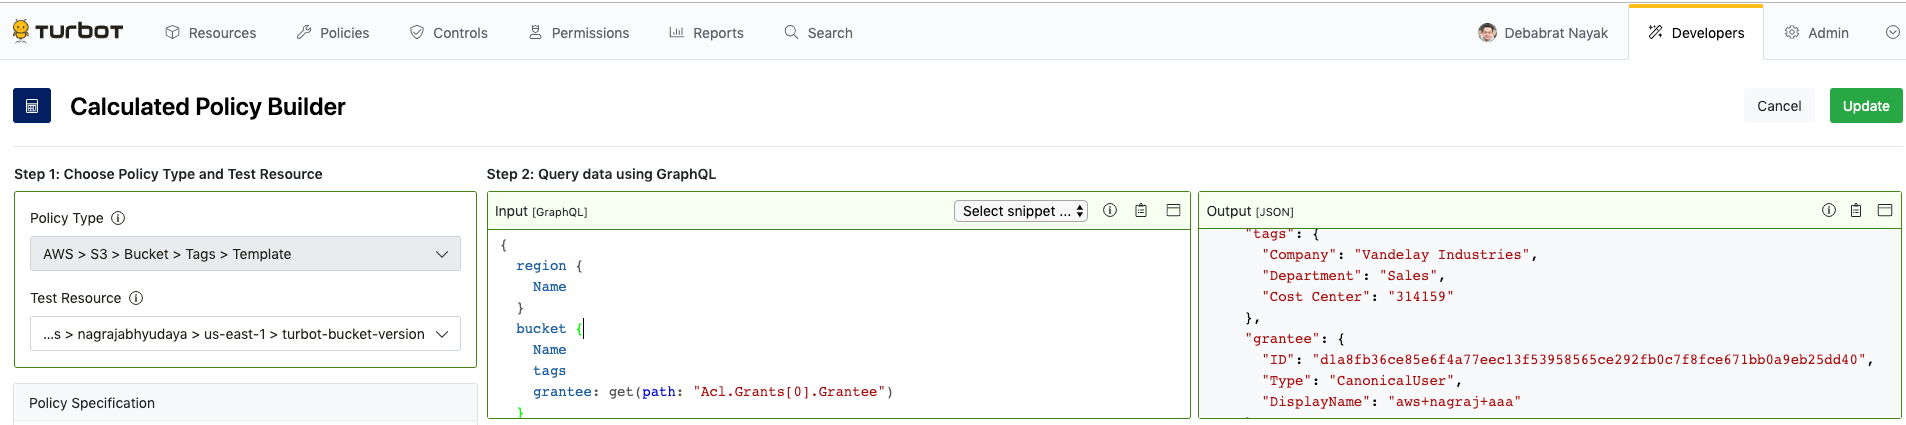
The combination of GraphQL and Nunjucks make calculated policies powerful and flexible. Any Turbot Guardrails policy can be calculated, using any data in the entire CMDB!